RailsでPostgreSQLのrank関数を叩いて、ランキングをつけてみた

こんにちは!kossyです!


さて、今回はRailspostgreSQLのrank関数SQLを直叩きしてランキングをつける方法について、
ブログに残してみたいと思います。


環境

Rails 6.0.3.4
Ruby 2.6.6
MacOS Catalina


事前準備

例として社員の売り上げを管理するようなテーブル構成を作ってみます。
ancestryを使ったりしていますが、後々部署ごとの売り上げを出したい!みたいなユースケースに対応するために用いています。(今回はやりません)

gemfile

gem 'ancestry'
gem 'gimei' # テストデータ作成向け 
gem 'faker' # テストデータ作成向け

各種migrationファイル

class CreateCompanies < ActiveRecord::Migration[6.0]
  def change
    create_table :companies do |t|
      t.string :name, null: false

      t.timestamps
    end
  end
end
class CreatePositions < ActiveRecord::Migration[6.0]
  def change
    create_table :positions do |t|
      t.string :name, null: false
      t.references :company, null: false, foreign_key: true, index: true

      t.timestamps
    end
  end
end
class CreateDepartments < ActiveRecord::Migration[6.0]
  def change
    create_table :departments do |t|
      t.string :name, null: false
      t.string :ancestry
      t.integer :ancestry_depth
      t.references :company, null: false, foreign_key: true, index: true

      t.timestamps
    end
  end
end
class CreateEmployees < ActiveRecord::Migration[6.0]
  def change
    create_table :employees do |t|
      t.string :first_name, null: false
      t.string :last_name, null: false
      t.string :first_name_kana, null: false
      t.string :last_name_kana, null: false
      t.string :middle_name
      t.string :middle_name_kana
      t.boolean :sex, null: false
      t.date :hired_at, null: false
      t.date :retired_at
      t.references :company, null: false, foreign_key: true, index: true
      t.references :position, null: false, foreign_key: true, index: true
      t.references :department, null: false, foreign_key: true, index: true

      t.timestamps
    end
  end
end
class CreateOrders < ActiveRecord::Migration[6.0]
  def change
    create_table :orders do |t|
      t.string :customer_name, null: false
      t.integer :price, null: false
      t.integer :status, null: false
      t.date :ordered_at, null: false
      t.references :employee, null: false, foreign_key: true, index: true
      t.references :company, null: false, foreign_key: true, index: true

      t.timestamps
    end
  end
end

各種モデル

class Company < ApplicationRecord
  with_options dependent: :destroy do
    has_many :employees
    has_many :departments
    has_many :orders
    has_many :positions
  end
end
class Department < ApplicationRecord
  belongs_to :company
  has_many :employees
  has_ancestry cache_depth: true
end
class Employee < ApplicationRecord
  belongs_to :company
  belongs_to :department
  belongs_to :position
  has_many :orders

  enum sex: { male: false, female: true }
end
class Order < ApplicationRecord
  belongs_to :employee
  belongs_to :company

  enum status: [:un_official, :fixed]
end
class Position < ApplicationRecord
  belongs_to :company
  has_many :employees
end

seedデータ

ActiveRecord::Base.transaction do
  # 会社
  company = Company.create!(name: "日本株式会社")

  puts "successed create #{company.name}"

  # 役職
  position_0 = Position.create!(company: company, name: '本部長')
  position_1 = Position.create!(company: company, name: '支店長')
  position_2 = Position.create!(company: company, name: '課長')
  position_3 = Position.create!(company: company, name: '係長')
  position_4 = Position.create!(company: company, name: '一般社員')

  puts "successed create positions"

  # 部
  department_1 = Department.create!(company: company, name: "北海道営業部")
  department_2 = Department.create!(company: company, name: "東北営業部")
  department_3 = Department.create!(company: company, name: "関東営業部")
  department_4 = Department.create!(company: company, name: "北陸営業部")
  department_5 = Department.create!(company: company, name: "近畿営業部")
  department_6 = Department.create!(company: company, name: "四国営業部")
  department_7 = Department.create!(company: company, name: "中国営業部")
  department_8 = Department.create!(company: company, name: "九州沖縄営業部")

  puts "successed create root departments"

  # 部署・支店
  ## 北海道
  department_1_1 = department_1.children.create!(company: company, name: "札幌支店")
  department_1_2 = department_1.children.create!(company: company, name: "函館支店")
  department_1_3 = department_1.children.create!(company: company, name: "旭川支店")

  ## 東北
  department_2_1 = department_2.children.create!(company: company, name: "宮城支店")
  department_2_2 = department_2.children.create!(company: company, name: "秋田支店")
  department_2_3 = department_2.children.create!(company: company, name: "福島支店")

  ## 関東
  department_3_1 = department_3.children.create!(company: company, name: "埼玉支店")
  department_3_2 = department_3.children.create!(company: company, name: "千葉支店")
  department_3_3 = department_3.children.create!(company: company, name: "東京支店")

  ## 北陸
  department_4_1 = department_4.children.create!(company: company, name: "山形支店")
  department_4_2 = department_4.children.create!(company: company, name: "新潟支店")
  department_4_3 = department_4.children.create!(company: company, name: "富山支店")

  ## 近畿
  department_5_1 = department_5.children.create!(company: company, name: "大阪支店")
  department_5_2 = department_5.children.create!(company: company, name: "兵庫支店")
  department_5_3 = department_5.children.create!(company: company, name: "京都支店")

  ## 四国
  department_6_1 = department_6.children.create!(company: company, name: "徳島支店")
  department_6_2 = department_6.children.create!(company: company, name: "高知支店")
  department_6_3 = department_6.children.create!(company: company, name: "香川支店")

  ## 中国
  department_7_1 = department_7.children.create!(company: company, name: "鳥取支店")
  department_7_2 = department_7.children.create!(company: company, name: "島根支店")
  department_7_3 = department_7.children.create!(company: company, name: "山口支店")

  ## 九州沖縄
  department_8_1 = department_8.children.create!(company: company, name: "福岡支店")
  department_8_2 = department_8.children.create!(company: company, name: "鹿児島支店")
  department_8_3 = department_8.children.create!(company: company, name: "沖縄支店")

  puts "successed create child departments"

  ROOT_DEPARTMENT = [
    "北海道営業部",
    "東北営業部",
    "関東営業部",
    "北陸営業部",
    "近畿営業部",
    "四国営業部",
    "中国営業部",
    "九州沖縄営業部"
  ]

  # 社員
  Department.all.each do |department|

    # 本部長データの作成(本部長は売り上げを持たない)
    if ROOT_DEPARTMENT.include?(department.name)
      gimei = Gimei.name
      sex = [:male, :female].sample
      gimei =
        if sex == :male
          Gimei.male
        else
          Gimei.female
        end
      Employee.create!(
        company: company,
        position: position_0,
        department: department,
        last_name: gimei.last.kanji,
        first_name: gimei.first.kanji,
        last_name_kana: gimei.last.katakana,
        first_name_kana: gimei.first.katakana,
        sex: sex,
        hired_at: Faker::Date.between(from: '1990-04-01', to: '2000-04-01')
      )
      puts "successed create #{department.name} account"
      next
    end

    # 支店長以下の役職のデータを作成
    4.times do |i|
      i += 1
      position =
        case i
        when 1
          position_1
        when 2
          position_2
        when 3
          position_3
        when 4
          position_4
        end
      gimei = Gimei.name
      sex = [:male, :female].sample
      gimei =
        if sex == :male
          Gimei.male
        else
          Gimei.female
        end
      employee = Employee.create!(
        company: company,
        position: position,
        department: department,
        last_name: gimei.last.kanji,
        first_name: gimei.first.kanji,
        last_name_kana: gimei.last.katakana,
        first_name_kana: gimei.first.katakana,
        sex: sex,
        hired_at: Faker::Date.between(from: '2005-04-01', to: '2018-04-01')
      )

      puts "successed create #{department.name} account" if i == 4

      # 売り上げデータの作成
      30.times do |i|
        i += 1

        Order.create!(
          customer_name: Faker::Company.name,
          employee: employee,
          company: company,
          price: "#{rand(10) + 1}000000".to_i,
          status: Order.statuses.keys.sample,
          ordered_at: Faker::Date.between(from: '2018-07-01', to: '2021-04-01')
        )

        puts "successed create order" if i == 30
      end
    end
  end
end

rails db:migrate, rails db:seedの実行

$ rails db:migrate

$ rails db:seed

Orderモデルにscopeを記述する

find_by_sqlメソッドを使って、SQLを直に叩いていきます。

class Order

  # 省略

  # 社員ごとの累計の売り上げTOP10をランキング付きで出力する
  scope :get_total_earning_group_by_employee_top_ten, -> () {
    sub_query = <<-SQL
      SELECT orders.employee_id, SUM(orders.price) as total_earning
      FROM orders
      GROUP BY employee_id
    SQL

    query =  <<-SQL
      SELECT employee_id, total_earning, RANK () OVER (ORDER BY total_earning DESC) as ranking
      FROM (#{sub_query}) as total_earnings
      LIMIT 10
    SQL

    find_by_sql(query)
  }

上記で行っていることを解説します。

サブクエリ

    sub_query = <<-SQL
      SELECT orders.employee_id, SUM(orders.price) as total_earning
      FROM orders
      GROUP BY employee_id
    SQL

employee_idでグルーピングを行い、SUM関数で社員ごとの売り上げの総額を求めて、別名(total_earning)を付与しています。
サブクエリ とすることで、後述のSQLはこのサブクエリで構築したビューからデータを引いてくるようにします。

サブクエリ化しているのは、GROUP BYとORDER BYを一緒に使えなかったからです、、、
qiita.com

クエリ

    query =  <<-SQL
      SELECT employee_id, total_earning, RANK () OVER (ORDER BY total_earning DESC) as ranking
      FROM (#{sub_query}) as total_earnings
      LIMIT 10
    SQL

    find_by_sql(query)

先ほどのサブクエリで構築したビューにtotal_earningsという別名をつけ、employee_id、total_earning、そしてrank関数を使ってランキングをつけています。
ranking列は降順で取得するようにしたので、最も高い売上が上位にきます。

rank関数の基本構文は以下です。

RANK () (ORDER BY ランキングしたい列名 ASC/DESC)

PARTITION BYという関数を使うこともありますが、今回は使っていません。
zukucode.com

LIMIT句はソートされたデータの上から10件を取得しています。トップ10ですね。

そしてfind_by_sql(query)でSQLを直接叩いています。

これでRails consoleで動作確認をしてみましょう。

動作確認

$ rails c

$ Order.get_total_earning_group_by_employee_top_ten
=> [
 #<Order:0x000055b201711070 id: nil, employee_id: 13>,
 #<Order:0x000055b1ff1f3dd8 id: nil, employee_id: 39>,
 #<Order:0x000055b1ff1f3d10 id: nil, employee_id: 15>,
 #<Order:0x000055b1ff1f3c48 id: nil, employee_id: 72>,
 #<Order:0x000055b1ff1f3b58 id: nil, employee_id: 54>,
 #<Order:0x000055b1ff1f3a68 id: nil, employee_id: 43>,
 #<Order:0x000055b1ff1f39a0 id: nil, employee_id: 66>,
 #<Order:0x000055b1ff1f38d8 id: nil, employee_id: 59>,
 #<Order:0x000055b1ff1f3810 id: nil, employee_id: 11>,
 #<Order:0x000055b1ff1f3748 id: nil, employee_id: 89>
]

データが引けました。total_earningやrankingがありませんが、

$ Order.get_total_earning_group_by_employee_top_ten.first.ranking
=> 1

$ Order.get_total_earning_group_by_employee_top_ten.first.total_earning
=> 210000000

きっちり取得できています。これで全社員の売り上げをランキング化することができました!


日付指定で取得したい

上記のクエリは累計の売り上げからランキングをつけていますが、「月ごとの売り上げをランキング化したい」場合はどうしましょう。

これも簡単で、find_by_sqlは引数に配列を渡すことで、 ? の演算子に値を入れることが可能です。

class Order

  # 省略
  # 社員ごとの累計の売り上げTOP10をランキング付きで日付指定で出力する
  scope :get_total_earning_group_by_employee_from_to, -> (from, to) {
    sub_query = <<-SQL
      SELECT orders.employee_id, SUM(orders.price) as total_earning
      FROM orders
      WHERE orders.ordered_at >= ? AND orders.ordered_at < ?
      GROUP BY employee_id
    SQL

    query =  <<-SQL
      SELECT employee_id, total_earning, RANK () OVER (ORDER BY total_earning DESC) as ranking
      FROM (#{sub_query}) as total_earnings
      LIMIT 10
    SQL

    find_by_sql([query, from, to])
  }

サブクエリにWHERE句を追加して、日付で絞り込みを行えるようにしました。
また、find_by_sqlに配列[query, from, to]を渡したことで、?演算子にfromとtoが入るようになります。

動作確認をしてみます。

動作確認

$ from = Date.today.beginning_of_month

$ to = Date.today.end_of_month

$  result = Order.get_total_earning_group_by_employee_from_to(from, to)
=> 
[
 #<Order:0x000055b2006d2d30 id: nil, employee_id: 88>,
 #<Order:0x000055b2006d28a8 id: nil, employee_id: 103>,
 #<Order:0x000055b2006d2650 id: nil, employee_id: 27>,
 #<Order:0x000055b2006d24c0 id: nil, employee_id: 74>,
 #<Order:0x000055b2006d2358 id: nil, employee_id: 22>,
 #<Order:0x000055b2006d2268 id: nil, employee_id: 78>,
 #<Order:0x000055b2006d21a0 id: nil, employee_id: 23>,
 #<Order:0x000055b2006d20d8 id: nil, employee_id: 60>,
 #<Order:0x000055b2006d1fe8 id: nil, employee_id: 41>,
 #<Order:0x000055b2006d1e80 id: nil, employee_id: 44>
]

$ result.first.total_earning
=> 22000000

実行結果はあなたの環境によって異なるかと思いますが、先ほどよりも低い数字が出たかと思われます。

このように、find_by_sqlに配列を渡してやることで、動的に値を取得することができます。

まとめ

find_by_sqlすごいなと思いました。笑
とはいえ、ActiveRecordがサポートしていない関数を使いたい時等に留めるのがいいかと思います。

Cannot create the snapshot because a snapshot with the identifier db_name already exists. と言われたとき

こんにちは!kossyです!


さて、今回は、Cannot create the snapshot because a snapshot with the identifier db_name already exists. エラーに遭遇したので、
備忘録としてブログに残してみたいと思います。


スナップショット名の識別子が既に存在していて、失敗していた

terraform destroyコマンドでリソースの削除を行おうとした時、以下のエラーが出力されました。

Error: error deleting Database Instance "aws-sample-db": DBSnapshotAlreadyExists: Cannot create the snapshot because a snapshot with the identifier aws-sample-db already exists. 
status code: 400, request id: 47551e97-4ac3-4203-84c8-948d14d1f445

調べたところ、どうやら同名のsnapshot名のものがAWS上に存在していたため、「どのリソースを削除すればいいんだい!?」とエラーを吐かれてしまったようです。

この場合、AWSのリソース管理画面から削除するしかありません。

AWSのRDSの管理画面からリソースの削除を行うようにしてください。

f:id:kossy-web-engineer:20210206151238p:plain


勉強になりました。

Auth0のログイン機能で取得したaccess_tokenを使ってRails側で認証を通してみた

こんにちは!kossyです!


さて、今回はAuth0のログイン機能で取得したaccess_tokenを使ってRails側で認証を通してみたので、
備忘録としてブログに残してみたいと思います。


環境

Rails

Ruby 2.6.3
Rails 6.0.3.4
Docker-Desktop

Vue

@vue/cli 4.5.9
vue@3.0.5
npm 6.14.8
node 14.15.0


前提

下記拙著内で作成した認証情報を用いることを前提に話を進めます。

kossy-web-engineer.hatenablog.com


Rails側での準備

以下のAuth0の中の人が書いたチュートリアルを参考にRailsのプロジェクトを作成しました。
auth0.com

ブログに書いてないもので別途対応したことは、CORSの対応です。

今回はVue.jsからRailsAPIへCROSS ORIGINな通信を行いたいので、rack-cors gemを導入します。

# Gemfile

get 'rack-cors'

# terminal

$ docker-compose run web bundle install

config/initializers/cors.rbを編集します。

Rails.application.config.middleware.insert_before 0, Rack::Cors do
  allow do
    origins '*'
    resource '*',
    :headers => :any,
    :expose  => ['access-token', 'expiry', 'token-type', 'uid', 'client'],
    :methods => [:get, :post, :options, :delete, :put, :patch]
  end
end

今回はoriginsを * (どこのオリジンからの通信でも許可する)にしていますが、この場合だとSameOriginPolicyが意味を為さなくなってしまい、
XSSCSRFに対して脆弱になってしまうので、実際に運用するときは環境変数にオリジンを格納する等して、
ワイルドカードではなくきちんと指定してあげるようにして下さい。

参考: なんとなく CORS がわかる...はもう終わりにする。 - Qiita

また、chirps_controller.rbのskip_before_action :authorize_request, only: [:index, :show]もコメントアウトするようにしてください。

app/controllers/chirps_controller.rb

# skip_before_action :authorize_request, only: [:index, :show]

これでRails側の準備は完了です。


クライアント側の準備

以前執筆した拙著の中で作成したAuth0での認証機能が追加されたVue.jsアプリをクライアントとして使います。

kossy-web-engineer.hatenablog.com

src/router/index.tsに以下のコードを追記します。

// 省略
import { routeGuard } from '@/auth'

const routes: Array<RouteRecordRaw> = [
  {
    path: '/',
    name: 'Home',
    component: Home,
    beforeEnter: routeGuard // 追加
  },

// 省略

beforeEnterプロパティにrouteGuard関数を指定することで、ルートパスにアクセスがあった場合にコンポーネントの描画が行われる前に認証を要求されるようになります。


また、HTTP通信を行いたいため、今回はaxiosを導入します。

$ npm i axios

RailsAPIを叩くコードを追加します。

$ mkdir src/api

$ touch src/api/client.ts

$ touch src/api/chirp.ts

$ touch .env.development
// src/api/client.ts

import axios from 'axios'

export default axios.create({
  baseURL: process.env.VUE_APP_API_BASE
})
import Client from '@/api/client'

export const getChirps = async (token: string) => {
  return await Client.get('/chirps', { headers: { 'Content-Type': 'application/json', Authorization: `bearer ${token}` } })
    .then((response) => {
      return response.data
    })
}
// .env.development

VUE_APP_API_BASE=localhost:3000

client.tsはaxiosインスタンスをbaseURL付きで生成するコードになっています。
axiosを直接コールするのではなく、chirp.tsでimportしClient.get(...)のように呼び出せるようにします。

ライブラリをラップしてあげることで、仮にライブラリを差し替えることになっても、修正範囲を少なくすることができます。

chirp.tsはlocalhost:3000/chirpsを叩く関数を定義しています。
引数でtokenを受け取って、HTTPリクエストヘッダーに載せる形で用います。

.env.developmentはVue.jsで環境変数を扱う場合に用いるファイルです。
process.env.VUE_APP_API_BASEのように記述することで、ファイル内で環境変数を使うことができます。

次はgetChirps関数を叩くためにsrc/views/Home.vueを修正します。

// src/views/Home.vue

<template>
  <button @click="handleGetChirps">Get Chirps</button> // 追加
  <div v-if="!auth.loading.value">
    <button v-if="!auth.isAuthenticated.value" @click="handleLogin">Log in</button>
    <div v-if="auth.isAuthenticated.value">
      <button @click="handleLogout">Log out</button>
      <p>{{ auth.user.value.name }}</p>
    </div>
  </div>
</template>

<script lang="ts">
import { defineComponent, inject, reactive } from 'vue'
import { getChirps } from '@/api/chirp'           // 追加

export default defineComponent({
  name: 'Home',
  setup () {
    const auth = inject<any>('$auth')

    const handleGetChirps = async () => {       // 追加
      const res = await auth.getTokenSilently() // 追加
      await getChirps(res).then((res) => {          // 追加
        console.log(res)                                         // 追加   
      })                                                                    // 追加
    }                                                                       // 追加

    return {
      auth,
      handleGetChirps, // 追加
      handleLogin: () => {
        auth.loginWithRedirect()
      },
      handleLogout: () => {
        auth.logout({
          returnTo: window.location.origin
        })
      }
    }
  }
})
</script>

getChirps関数をimportして、クリックイベントをトリガーに関数を叩くようにしました。

await auth.getTokenSilently() は、Auth0クライアント内に保存されているTokenを取得しています。
正しく認証をパスしていれば、getTokenSilently()を呼び出すとTokenが取得できます。


これで動作確認の準備は完了です。

動作確認

まず、localhost:8080にアクセスして、認証を要求されるか検証してください。
beforeEnterが正常に機能していれば、添付画像の画面が表示されます。
f:id:kossy-web-engineer:20210130220043p:plain

認証に成功したら、以下のような画面になります。

f:id:kossy-web-engineer:20210203222632p:plain

ここで、検証ツールを開いてから、Get Chirpsボタンを押してみましょう。

通信に成功すれば、以下のようにレコードが取得できるはずです。
f:id:kossy-web-engineer:20210203223313p:plain

先ほど、Rails側でskip_before_actionをコメントアウトしているため、chirps関連のレコードにアクセスする場合は認証を要求されるようになっているので、
認証に失敗するとHTTPステータスコード「401」が返り、成功すると「200」と共にchirpsのレコードが返ります。

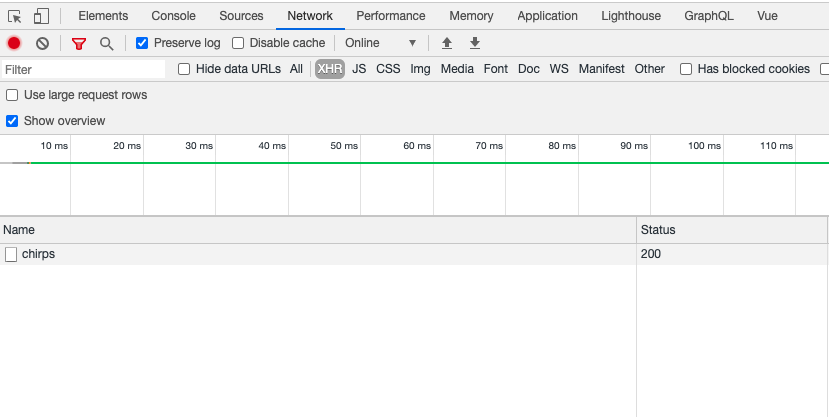
検証ツール(Chromeを想定しています)で添付画像のようにNetworkタブに合わせて、XHRを選択してください。
f:id:kossy-web-engineer:20210203223140p:plain

この状態で再度Get Chirpsボタンを押してみましょう。
f:id:kossy-web-engineer:20210203223429p:plain

問題なく認証をパスすれば、上記のような画面になります。

chirpsをクリックすると、通信の詳細を確認することができます。

f:id:kossy-web-engineer:20210203223520p:plain

きちんと値を取得できていることがわかります。


まとめ

Auth0を使えば結構お手軽にログインから認証付きリクエストまで送信できることがわかりました。

他にも様々な拡張機能があるので、興味のある方は公式Docをご覧ください。
auth0.com

Vue.jsのAuth0の認証チュートリアルを Vue3 + TypeScriptで書き直してみた

こんにちは!kossyです!


さて、今回はVue.jsのAuth0の認証チュートリアルを Vue.js 3 + TypeScriptで書き直してみたので、
備忘録としてブログに残してみたいと思います。


環境

vue/cli 4.5.9
vue 3.0.4
node 14.15.0
npm 6.14.8


Vue.jsのボイラープレートを作る

インストール

まずはvue/cliをインストールします。
yarnでもOKですが、今回はnpmでインストールを行います。

既にvue/cliをインストールされている方は、

$ vue --version

でVue CLIのバージョンを確認し、4.5.0よりバージョンが低い場合は、4.5.0以上にアップグレードを行うようにお願いします。

この時、既に作成されているVueアプリの開発に影響が出ることがあるので、
作業ディレクトリ内にのみ最新版のVue CLI を入れるようにしましょう。

初めてVue CLIをインストールする場合
$ npm install -g @vue/cli
4.5.0よりバージョンが低いVue CLIをインストールしたことがある方
$ mkdir 任意のディレクトリ
$ cd 任意のディレクトリ
任意のディレクトリ $ npm install @vue/cli

vue createの実行

無事Vue CLIのインストールに成功したら、vue createコマンドを実行してボイラープレートを作成します。
プロジェクト名はなんでもいいですが、今回はauth0-sampleとします。

設定はお好みでいいと思いますが、私は以下のようにしました。

? Please pick a preset: Manually select features
? Check the features needed for your project: Choose Vue version, Babel, TS, Router, CSS Pre-processors, Linter
? Choose a version of Vue.js that you want to start the project with 3.x (Preview)
? Use class-style component syntax? No
? Use Babel alongside TypeScript (required for modern mode, auto-detected polyfills, transpiling JSX)? Yes
? Use history mode for router? (Requires proper server setup for index fallback in production) Yes
? Pick a CSS pre-processor (PostCSS, Autoprefixer and CSS Modules are supported by default): Sass/SCSS (with dart-sass)
? Pick a linter / formatter config: Standard
? Pick additional lint features: Lint on save
? Where do you prefer placing config for Babel, ESLint, etc.? In dedicated config files
? Save this as a preset for future projects? No
? Pick the package manager to use when installing dependencies: NPM

@auth0/auth0-spa-jsのインストール

Auth0公式よりSDKが提供されているので、プロジェクトにインストールします。
以下のコマンドを実行してください。

$ npm install @auth0/auth0-spa-js

...

+ @auth0/auth0-spa-js@1.13.6
added 7 packages from 8 contributors and audited 1460 packages in 7.692s

82 packages are looking for funding
  run `npm fund` for details

found 0 vulnerabilities

上記のような表示が出たらインストール成功です。


Auth0の管理画面でApplicationの作成と設定

ユーザー登録を行った後、サイドメニューのApplicationにアクセスします。

f:id:kossy-web-engineer:20210130204902p:plain

アクセスしたら、CREATE APPLICATON のボタンを押して下さい。

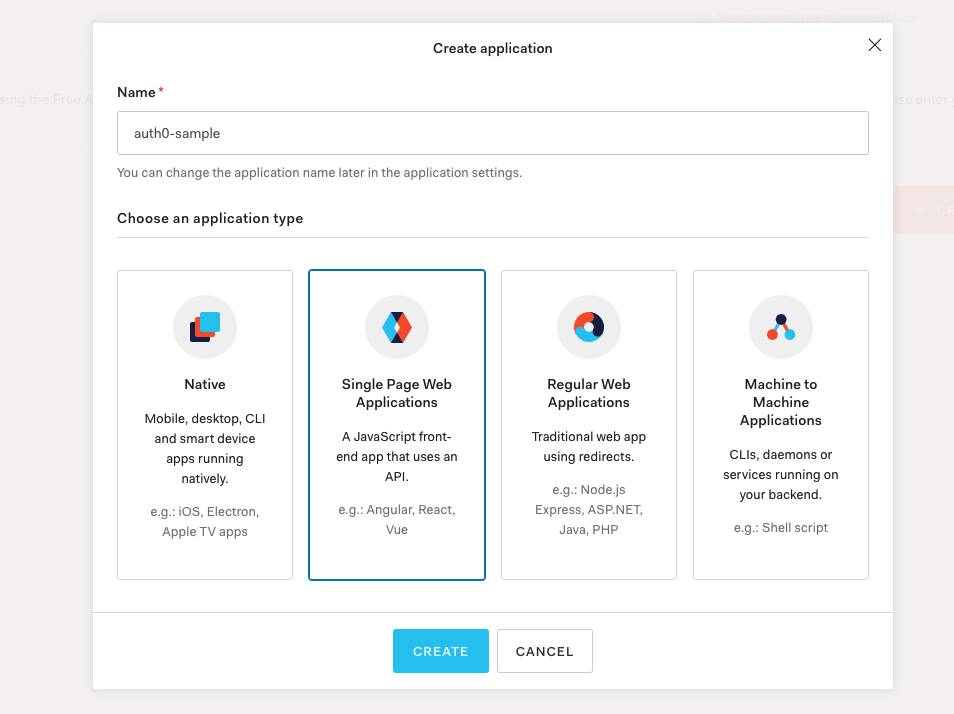
モーダルが開きますので、任意のプロジェクト名と、今回はVue.js内でAuth0を用いるので、Single Page Web Applicationsを選択します。

f:id:kossy-web-engineer:20210130205202p:plain

入力と選択ができましたら、CREATEボタンを押して下さい。

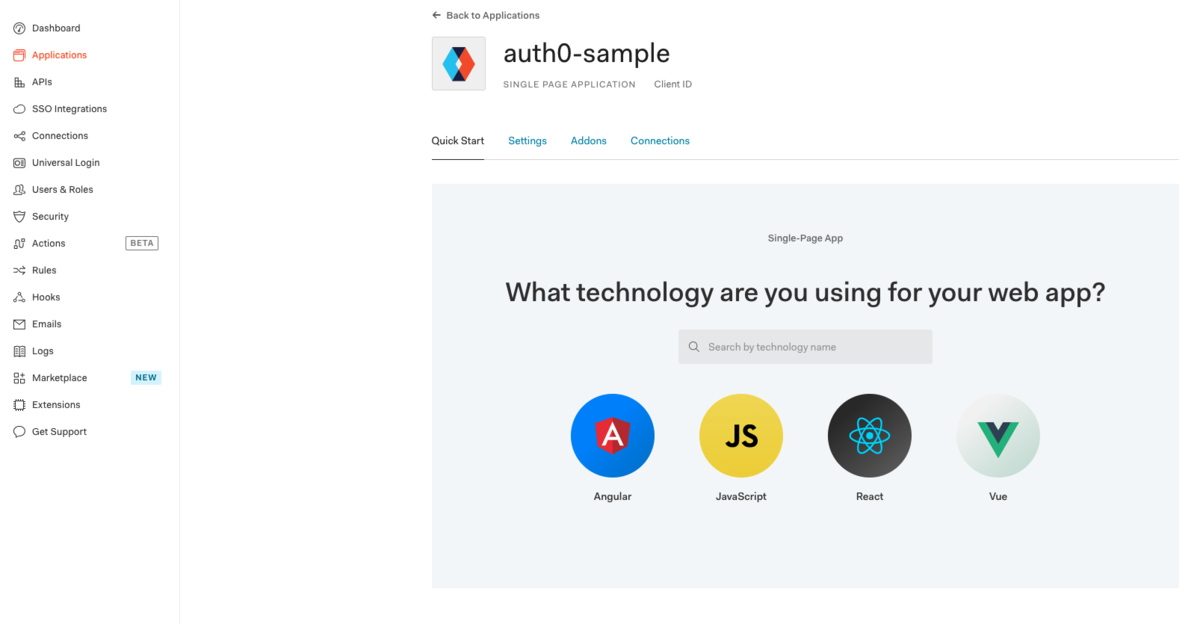
f:id:kossy-web-engineer:20210130205812p:plain

上記の画面が表示されたら、Settingsのタブをクリックします。

f:id:kossy-web-engineer:20210130205846p:plain

スクロールしていくと、URLを入力するフォームがあるので、添付画像のようにURLを入力します。

また、domainとclient_idは後ほど使いますので、どこかに控えておいて下さい。


認証機能を実現するコードを実装

公式のチュートリアルJavaScriptソースコードをベースにTypeScriptに書き換える形で実装します。
auth0.com

以下のコマンドを実行してください。

$ mkdir src/auth

$ touch src/auth/index.ts

まずindex.tsのコードを全晒しします。

import createAuth0Client, { Auth0Client, Auth0ClientOptions, GetIdTokenClaimsOptions, LogoutOptions, RedirectLoginOptions, User } from '@auth0/auth0-spa-js'
import { App, computed, reactive, watchEffect } from 'vue'
import { NavigationGuardNext, RouteLocationNormalized } from 'vue-router'

let client: Auth0Client

const state = reactive({
  loading: true,
  isAuthenticated: false,
  user: {} as User | undefined,
  popupOpen: false,
  error: null
})

async function loginWithPopup () {
  state.popupOpen = true

  try {
    await client.loginWithPopup()
  } catch (e) {
    console.error(e)
  } finally {
    state.popupOpen = false
  }

  state.user = await client.getUser()
  state.isAuthenticated = true
}

async function handleRedirectCallback () {
  state.loading = true

  try {
    await client.handleRedirectCallback()
    state.user = await client.getUser()
    state.isAuthenticated = true
  } catch (e) {
    state.error = e
  } finally {
    state.loading = false
  }
}

function loginWithRedirect (o: RedirectLoginOptions | undefined) {
  return client.loginWithRedirect(o)
}

function getIdTokenClaims (o: GetIdTokenClaimsOptions | undefined) {
  return client.getIdTokenClaims(o)
}

function getTokenSilently (o: GetIdTokenClaimsOptions | undefined) {
  return client.getTokenSilently(o)
}

function getTokenWithPopup (o: GetIdTokenClaimsOptions | undefined) {
  return client.getTokenWithPopup(o)
}

function logout (o: LogoutOptions | undefined) {
  return client.logout(o)
}

const authPlugin = {
  isAuthenticated: computed(() => state.isAuthenticated),
  loading: computed(() => state.loading),
  user: computed(() => state.user),
  getIdTokenClaims,
  getTokenSilently,
  getTokenWithPopup,
  handleRedirectCallback,
  loginWithRedirect,
  loginWithPopup,
  logout
}

export const routeGuard = (to: RouteLocationNormalized, from: RouteLocationNormalized, next: NavigationGuardNext) => {
  const { isAuthenticated, loading, loginWithRedirect } = authPlugin

  const verify = () => {
    if (isAuthenticated.value) {
      return next()
    }

    loginWithRedirect({ appState: { targetUrl: to.fullPath } })
  }

  if (!loading.value) {
    return verify()
  }

  watchEffect(() => {
    if (loading.value === false) {
      return verify()
    }
  })
}

export const setupAuth = async (options: Auth0ClientOptions, callbackRedirect: Function) => {
  client = await createAuth0Client({
    ...options
  })

  try {
    if (
      window.location.search.includes('code=') &&
      window.location.search.includes('state=')
    ) {
      const { appState } = await client.handleRedirectCallback()

      callbackRedirect(appState)
    }
  } catch (e) {
    state.error = e
  } finally {
    // Initialize our internal authentication state
    state.isAuthenticated = await client.isAuthenticated()
    state.user = await client.getUser()
    state.loading = false
  }

  return {
    install: (app: App) => {
      app.config.globalProperties.$auth = authPlugin
      app.provide('$auth', app.config.globalProperties.$auth)
    }
  }
}

コードについて説明していきます。(というか込み入ったことはほとんどSDKの中でやってくれてる)


1行目から3行目

import createAuth0Client, { Auth0Client, Auth0ClientOptions, GetIdTokenClaimsOptions, LogoutOptions, RedirectLoginOptions, User } from '@auth0/auth0-spa-js'
import { App, computed, reactive, watchEffect } from 'vue'
import { NavigationGuardNext, RouteLocationNormalized } from 'vue-router'

そもそもAuth0Clientってなんやねんという答えはここですね。
auth0-spa-js/Auth0Client.ts at master · auth0/auth0-spa-js · GitHub

1行目から3行目までは認証のためのインスタンスを生成する関数や型定義に用いるType、
composition-apiを使うための関数等をimportしています。

createAuth0Clientは、100行目付近で呼び出しています。中身の処理としては、引数にAuth0ClientOptions型のオブジェクトを取って、
新しいAuth0Clientを生成しています。

SDKの中の処理で言うと、
createAuth0Client関数の定義元は以下で、
auth0-spa-js/index.ts at master · auth0/auth0-spa-js · GitHub

export default async function createAuth0Client(options: Auth0ClientOptions) {
  const auth0 = new Auth0Client(options);
  await auth0.checkSession();
  return auth0;
}

auth0Clientインスタンスを作成しています。


7行目 ~ 13行目

const state = reactive({
  loading: true,
  isAuthenticated: false,
  user: {} as User | undefined,
  popupOpen: false,
  error: null
})

7行目 ~ 13行目の const state の部分は、Vue.js 3系から導入されたreactive関数を使って、各種プロパティをreactiveな値にしています。


15行目 ~ 27行目

async function loginWithPopup () {
  state.popupOpen = true

  try {
    await client.loginWithPopup()
  } catch (e) {
    console.error(e)
  } finally {
    state.popupOpen = false
  }

  state.user = await client.getUser()
  state.isAuthenticated = true
}

15行目からのloginWithPopupメソッドは、stateの値をいじりつつ、Auth0ClientインスタンスのloginWithPopup関数を呼び出す実装になっています。
loginWithPopup関数のSDKの実装箇所はこの辺りですね。
auth0-spa-js/Auth0Client.ts at master · auth0/auth0-spa-js · GitHub

loginWithPopup関数の中でrunPopup関数が呼ばれているのですが、実際に画面遷移を行っている関数はrunPopup関数で、SDKでの実装箇所はこの辺りかと思われます。
auth0-spa-js/utils.ts at master · auth0/auth0-spa-js · GitHub


30行目 ~ 41行目

async function handleRedirectCallback () {
  state.loading = true

  try {
    await client.handleRedirectCallback()
    state.user = await client.getUser()
    state.isAuthenticated = true
  } catch (e) {
    state.error = e
  } finally {
    state.loading = false
  }
}

30行目からのhandleRedirectCallback関数は、stateをいじってloading中にしつつ、Auth0ClientインスタンスのhandleRedirectCallback関数を呼び出す実装になっています。
handleRedirectCallback関数のSDKでの実装箇所はこの辺り。
auth0-spa-js/Auth0Client.ts at master · auth0/auth0-spa-js · GitHub

44行目から62行目

function loginWithRedirect (o: RedirectLoginOptions | undefined) {
  return client.loginWithRedirect(o)
}

function getIdTokenClaims (o: GetIdTokenClaimsOptions | undefined) {
  return client.getIdTokenClaims(o)
}

function getTokenSilently (o: GetIdTokenClaimsOptions | undefined) {
  return client.getTokenSilently(o)
}

function getTokenWithPopup (o: GetIdTokenClaimsOptions | undefined) {
  return client.getTokenWithPopup(o)
}

function logout (o: LogoutOptions | undefined) {
  return client.logout(o)
}

44行目から62行目まではAuth0Clientインスタンスの各種関数を呼び出す関数を定義しています。


64行目 ~ 75行目

const authPlugin = {
  isAuthenticated: computed(() => state.isAuthenticated),
  loading: computed(() => state.loading),
  user: computed(() => state.user),
  getIdTokenClaims,
  getTokenSilently,
  getTokenWithPopup,
  handleRedirectCallback,
  loginWithRedirect,
  loginWithPopup,
  logout
}

64行目のauthPlugin変数は、後にglobalPropertiesを使って$auth.logout()のように呼び出すために使うものです。
上記で定義した関数達を持つオブジェクトとして定義します。


77行目 ~ 97行目

export const routeGuard = (to: RouteLocationNormalized, from: RouteLocationNormalized, next: NavigationGuardNext) => {
  const { isAuthenticated, loading, loginWithRedirect } = authPlugin

  const verify = () => {
    if (isAuthenticated.value) {
      return next()
    }

    loginWithRedirect({ appState: { targetUrl: to.fullPath } })
  }

  if (!loading.value) {
    return verify()
  }

  watchEffect(() => {
    if (loading.value === false) {
      return verify()
    }
  })
}

77行目のrouteGuard関数は認証済みかどうかを検証してルーティングの制御を行う関数です。


99行目 ~ 127行目

export const setupAuth = async (options: Auth0ClientOptions, callbackRedirect: Function) => {
  client = await createAuth0Client({
    ...options
  })

  try {
    if (
      window.location.search.includes('code=') &&
      window.location.search.includes('state=')
    ) {
      const { appState } = await client.handleRedirectCallback()

      callbackRedirect(appState)
    }
  } catch (e) {
    state.error = e
  } finally {
    // Initialize our internal authentication state
    state.isAuthenticated = await client.isAuthenticated()
    state.user = await client.getUser()
    state.loading = false
  }

  return {
    install: (app: App) => {
      app.config.globalProperties.$auth = authPlugin
      app.provide('$auth', app.config.globalProperties.$auth)
    }
  }
}

99行目のsetupAuth関数は引数のAuth0ClientOptionsを使ってAuth0Clientを生成しつつ、URLにcodeやstateが含まれていればcallbackRedirectを呼び出し、
エラーが返ってくればstate.errorに代入、最後にPromiseの成功/失敗に関わらずAuth0Clientの各種関数を呼び出しながらstateを更新しています。

返り値は、main.tsでVueにglobalPropertiesとして定義するため、install関数を返すようにしています。


main.tsでsetupAuth関数を読み込む

上記で定義したsetupAuth関数をmain.tsで読み込むようにします。

import { setupAuth } from '@/auth'
import authConfig from '../auth_config.json'

const app = createApp(App).use(router)

function callbackRedirect (appState: any) {
  router.push(
    appState && appState.targetUrl ? appState.targetUrl : '/'
  )
}

setupAuth(authConfig, callbackRedirect).then((auth) => {
  app.use(auth)
})

app.mount('#app')

9行目でリダイレクト処理を行うための関数を定義し、15行目でauthconfig(後ほど定義します)とcallbackRedirect関数を渡して、
use関数でauthをプラグインとして使用できるようにしています。

auth_config.jsonの作成

認証情報を管理するjsonファイルをルートディレクトリに作成します。

touch auth_config.json
{
  "domain": "your_auth0_domain",
  "client_id": "your_auth0_client_id",
  "redirect_uri": "your_redirect_uri"
}

auth_config.jsonの各種値には、先ほどAuth0でApplicationを作成した際に控えたものを入力してください。


動作確認

簡単な動作確認のためにHomeコンポーネントを以下のように修正します。

<template>
  <div v-if="!auth.loading.value">
    <button v-if="!auth.isAuthenticated.value" @click="handleLogin">Log in</button>
    <div v-if="auth.isAuthenticated.value">
      <button @click="handleLogout">Log out</button>
      <p>{{ auth.user.value.name }}</p>
    </div>
  </div>
</template>

<script lang="ts">
import { defineComponent, inject } from 'vue'

export default defineComponent({
  name: 'Home',
  setup () {
    const auth = inject<any>('$auth')

    return {
      auth,
      handleLogin: () => {
        auth.loginWithRedirect()
      },
      handleLogout: () => {
        auth.logout({
          returnTo: window.location.origin
        })
      }
    }
  }
})
</script>

main.tsでuseメソッドで読み込んだ$authはinjectメソッドを用いることでコンポーネントで使うことができます。
一旦anyで渡していますが、適切な型を当てるのがいいと思います。


これで準備完了です。
npm run serve をターミナルで実行して、localhost:8080にアクセスしてください。

f:id:kossy-web-engineer:20210130215958p:plain

Loginボタンを押すと、Auth0のログイン画面が開きます。

f:id:kossy-web-engineer:20210130220043p:plain

サインアップのリンクをクリックし、登録を終えると、アプリの画面にリダイレクトします。

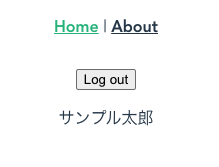
f:id:kossy-web-engineer:20210130220212p:plain

Log outのボタンとユーザー名が表示されれば成功です。


勉強になりました!


RspecでRuntimeError: Circular dependency detected while autoloading constant が出た場合の対処法

こんにちは!kossyです!


さて、今回はRspecでテストを実行する際に、RuntimeError: Circular dependency detected while autoloading constantが出た場合の対処法をブログに残してみたいと思います。


環境
Ruby 2.6.5
Rails 5.1.7
Docker for Desktop


原因

Rspecを複数スレッドで回していると、アプリケーションサーバーとテストのスレッドで同時に同じ定数を参照して読み込もうとすることがあります。
そういった場合、以下のようなエラーが出ることになります。

RuntimeError:
  Circular dependency detected while autoloading constant User

この場合、specファイルの先頭に

require_dependency 'user'

のように、明示的に依存関係を記載することで解決する場合があります。


勉強になりました。


Vue.jsで環境変数を扱う時はVUE_APPを接頭辞に付与するのを忘れないようにしよう

こんにちは!kossyです!


さて、今回はVue.jsで環境変数を扱う時に、VUE_APPを付与し忘れて10分ほどハマってしまったので、
備忘録としてブログに残してみたいと思います。


環境

vue/cli 4.5.9
vue 3.0.4
node 14.15.0
npm 6.14.8


事象

.envファイルに以下の二つの環境変数を定義しました。

VUE_APP_API_BASE=https://api.themoviedb.org/3
API_KEY=MASKED_API_KEY

そしてaxiosを使ってクエリストリングにAPI_KEYを混ぜてリクエストを送るタイプのAPIを叩くテストをしていました。

axios.get(`/trending/all/week?api_key=${process.env.API_KEY}&language=en-us`)

ここで、認証に失敗して401が返ってきていたので、

console.log(process.env.API_KEY)

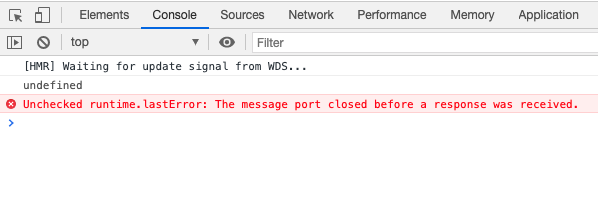
console.logでAPI_KEYの値がきちんと取得できているかを検証しました。すると、

f:id:kossy-web-engineer:20210125005805p:plain

undefinedが返っています、、、

ここで、「Vue 環境変数」みたいなググり方で以下の記事を発見

kic-yuuki.hatenablog.com


VUE_APPの付与忘れにここで気がつきます。(ちゃんと環境変数使う前にドキュメント読めっていう話、、、)

.envファイルの方を以下のように編集

VUE_APP_API_BASE=https://api.themoviedb.org/3
VUE_APP_API_KEY=MASKED_API_KEY // VUE_APPを忘れないで!!

そして

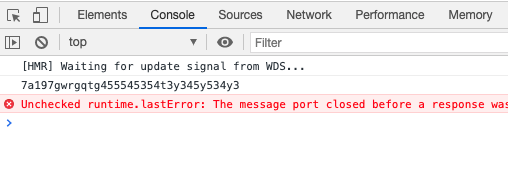
console.log(process.env.VUE_APP_API_KEY)

f:id:kossy-web-engineer:20210125010210p:plain

無事環境変数から値を取得することに成功しました。(添付画像の文字列はAPI_KEYっぽいものにしています)


勉強になりました。


大いに参考にさせていただいた記事

この場を借りて御礼を申し上げます。
kic-yuuki.hatenablog.com
qiita.com

Railsのvalidationで値が空であることを検証する absence: true

こんにちは!kossyです!


さて、今回はRailsのvalidationで値が空であることを検証する absence: trueの使い方について、
ブログに残してみたいと思います。


環境

Ruby 2.6.6
Rails 6.0.3.4
MacOS catalina


まずはドキュメントを読んで使い方を把握しよう


2.10 absence
このヘルパーは、指定された属性が「空」であることを検証します。値がnilや空文字である (つまり空欄またはホワイトスペースである) かどうかを確認するために、内部ではpresent?メソッドを使っています。

class Person < ApplicationRecord
  validates :name, :login, :email, absence: true
end

関連付けが存在しないことを確認したい場合は、関連付けられたオブジェクト自体が存在しないかどうかを確認し、そのオブジェクトが関連付けにマッピングされた外部キーでないことを確認する必要があります。

class LineItem < ApplicationRecord
  belongs_to :order
  validates :order, absence: true
end

関連付けられたレコードが存在してはならない場合、これを検証するには:inverse_ofオプションでその関連付けを指定する必要があります。

class Order < ApplicationRecord
  has_many :line_items, inverse_of: :order
end

このヘルパーを使って、has_oneまたはhas_manyリレーションシップを経由して関連付けられたオブジェクトが存在しないことを検証すると、presence?でもなくmarked_for_destruction?(削除するためにマークされている)でもないかどうかがチェックされます。

false.present?は常にfalseなので、真偽値に対してこのメソッドを使うと正しい結果が得られません。真偽値が存在しないことをチェックしたい場合は、validates :field_name, exclusion: { in: [true, false] }を使う必要があります。

デフォルトのエラーメッセージは「must be blank」です。

指定された値がnullかどうかを確認するバリデーションオプションです。

上記で挙げられた例以外にどういう風に使えるか少し考えてみました。

with_optionsメソッドと組み合わせて、特定の条件下でバリデーションが発火するようにする

一つの使用例として、with_optionsと組み合わせるやり方があると思います。

例えば、「公開 / 非公開」を管理する is_published という属性と、「公開日」を表すpublished_atという属性があったとします。
普通に考えれば、「非公開」なのに、published_atに値が入っている状態は異常な状態かと思います(アプリケーションの要件にもよると思いますが、、、

このような場合、

class Post < ActiveRecord::Base

  with_options if: :private? do
    validates :published_at, absence: true
  end
end

のように、非公開状態の時だけ値がnullであることを検証するバリデーションを記載することができます。


勉強になりました。


大いに参考にさせていただいたサイト

この場を借りて御礼を申し上げます。


tbpgr.hatenablog.com

Railsでvalidationを行う際のwith_optionsの使い方

こんにちは!kossyです!


さて、今回はRailsでvalidationを行う際のwith_optionsの使い方について、ブログに残してみたいと思います!


環境

Ruby 2.6.6
Rails 6.0.3.4
MacOS catalina


Documentを読んで使い方を学ぶ

まずはドキュメントを読んでみましょう。


5.3 条件付きバリデーションをグループ化する


1つの条件を複数のバリデーションで共用できると便利なことがあります。これはwith_optionsを使うことで簡単に実現できます。

class User < ApplicationRecord
  with_options if: :is_admin? do |admin|
    admin.validates :password, length: { minimum: 10 }
    admin.validates :email, presence: true
  end
end

with_optionsブロックの内側にあるすべてのバリデーションには、if: :is_admin?という条件が渡されます。

Userがadminの場合にのみ適用したいvalidationを行う例が示されています。


次はこのドキュメントを読みます。

with_options(options, &block) public

An elegant way to factor duplication out of options passed to a series of method calls. Each method called in the block, with the block variable as the receiver, will have its options merged with the default options hash provided. Each method called on the block variable must take an options hash as its final argument.

一連のメソッド呼び出しに渡されるオプションから重複を除外するための洗練された方法。
ブロック変数をレシーバーとしてブロック内で呼び出される各メソッドのオプションは、提供されているデフォルトのオプションハッシュとマージされます。ブロック変数で呼び出される各メソッドは、最後の引数としてオプションハッシュを取る必要があります。

with_optionsの使い方の例として、dependent: :destroyをまとめて定義する方法が記載されていました。

class Account < ActiveRecord::Base
  with_options dependent: :destroy do |assoc|
    assoc.has_many :customers
    assoc.has_many :products
    assoc.has_many :invoices
    assoc.has_many :expenses
  end
end

上記のようにwith_optionsの引数にdependent: :destroy とブロックを渡すことで、
まとめて定義することができるようです。

以下のように記述した場合でも上記の例と同じ効果を得られるみたいです。

class Account < ActiveRecord::Base
  with_options dependent: :destroy do
    has_many :customers
    has_many :products
    has_many :invoices
    has_many :expenses
  end
end

また、with_optionsにifとブロックを渡して定義する記述方法もあります。

class Post < ActiveRecord::Base
  with_options if: :persisted?, length: { minimum: 50 } do
    validates :content, if: -> { content.present? }
  end
end

この場合は、インスタンスがDBに保存済みかどうかを判定して、保存済みだった場合に適用されるバリデーションになっています。

with_optionsを使う場合の注意点

ドキュメントにこのようなNOTEがありました。

NOTE: You cannot call class methods implicitly inside of with_options. You can access these methods using the class name instead:

class Phone < ActiveRecord::Base
  enum phone_number_type: [home: 0, office: 1, mobile: 2]

  with_options presence: true do
    validates :phone_number_type, inclusion: { in: Phone.phone_number_types.keys }
  end
end

なるほど、with_options内だとselfを参照できないから、明示的にPhone.phone_number_types.keysを呼び出さないといけないと注意を促しているんですね。

知らないとハマりそうです。

binding.pryしながら実行してみた

試しに以下のように、インスタンス自身を参照できるのか試してみます。

  with_options presence: true do |_self|
    binding.pry
    validates :condition, presence: true
  end
pry $ _self
=> #<ActiveSupport::OptionMerger:0x2b00cbb1492c>

インスタンスそのものが返ってくると予想していましたが、
ActiveSupport::OptionMergerクラスが返ってきました。

apidock.com
joker1007.hatenablog.com


次は_selfを渡さずに試してみます。

  with_options presence: true do
    binding.pry
    validates :condition, presence: true
  end
pry $ self
=> #<ActiveSupport::OptionMerger:0x2b00cbb1492c>

うーん、やはりwith_optionsメソッドのブロック内だと、selfはActiveSupport::OptionMergerになるみたいですね。


勉強になりました。


Vue.js 3 系で globalProperties を使ってグローバルなプロパティを定義する

こんにちは!kossyです!


さて、今回はVue.js 3 系で globalProperties を使ってグローバルなプロパティを定義する方法について、
ブログに残してみたいと思います。


環境

vue/cli 4.5.9
vue 3.0.4
node 14.15.0
npm 6.14.8


方法

Vue.js 3系では、従来の「Vue.prototype」の代わりに、config.globalPropertiesを使ってVueインスタンスにプロパティを追加できます。

以下は簡単な例です。

// src/plugins/sample-plugin.ts

import { App } from 'vue'

export const samplePlugin = {
  install: (app: App) => {
    const isSample = true;
    app.config.globalProperties.$isSample = isSample
    app.provide('$isSample', isSample)
  }
}

samplePlugin関数をmain.tsでimportし、use関数の引数に渡します。

// import { samplePlugin } from '@/plugins/sample-plugin'

const app = createApp(App)

app.use(samplePlugin)

samplePlugin関数の中身の処理は、isSampleという値をapp.config.globalProperties.$isSampleに代入し、provideメソッドを用いてグローバルプロパティとして外部から呼び出せるようにしています。
そしてuse関数を用いてsamplePluginを読み込むようにしています。

呼び出す際には、injectメソッドを用います。

const isSample = inject<boolean>('$isSample')

injectメソッドにグローバルプロパティ名を渡すことで、外部から使うことが可能になります。


勉強になりました。


大いに参考にさせていただいたサイト

Vue.js でPropTypeを使ってpropsに型を当てる

こんにちは!kossyです!


さて、今回はVue.js 3系で子コンポーネントに渡ってきたpropsに
PropTypeを使って型を付与する方法についてブログに残してみたいと思います。


環境

vue/cli 4.5.9
vue 3.0.4
node 14.15.0
npm 6.14.8


実装例

<script lang="ts">
import { defineComponent, PropType} from 'vue'
import { Book } from '@/types/book-data'

props: {
  book: {
    type: Object as PropType<Book>,
    required: true
  }
}

上記のように、propsで渡ってきた値に対し、as PropType<型>のように指定してあげることで、
型を付与することができます。

f:id:kossy-web-engineer:20210117000249p:plain

きちんとbookにBook型が付与されていることが確認できました。


勉強になりました。


大いに参考にさせていただいたサイト

この場を借りて御礼を申し上げます。

Vue + TypeScriptでpropsのObjectやArrayに型をつける - Qiita
Vue.jsでObject型のPropsにTypeScriptの型を割り当てる | count0.org