RailsでPostgreSQLを使う際にgen_random_uuid関数を有効化したい

こんにちは!kossyです!


今回はRailsPostgreSQLを使う際にgen_random_uuid関数を有効化する方法について、

備忘録としてブログに残してみたいと思います。


環境

Ruby 2.6.9
Rails 6.0.4
PostgreSQL 13系


マイグレーションファイルの作成

gen_random_uuid関数を有効化するために、マイグレーションファイルを作成し、以下のように変更します。

class EnableUuidExtension < ActiveRecord::Migration[6.0]
  def change
    enable_extension 'pgcrypto'
  end
end

その後migrateを実行。

$ rails db:migrate

== 20211216142135 EnableUuidExtension: migrating ==============================
-- enable_extension("pgcrypto")
   -> 0.0554s
== 20211216142135 EnableUuidExtension: migrated (0.0556s) =====================

これでマイグレーションファイル内でgen_random_uuid関数が使えるようになります。

テーブルの作成

試しにテーブルを作成して、uuid型のデフォルト値にgen_random_uuid関数を指定してみます。

class CreateTenants < ActiveRecord::Migration[6.0]
  def change
    create_table :tenants do |t|
      t.string :name, null: false
      t.uuid :uuid, null: false, default: 'gen_random_uuid()'

      t.timestamps
    end
  end
end

migrateコマンドを実行した後、schema.rbを確認してみます。

  create_table "tenants", force: :cascade do |t|
    t.string "name", null: false
    t.uuid "uuid", default: -> { "gen_random_uuid()" }, null: false
    t.datetime "created_at", precision: 6, null: false
    t.datetime "updated_at", precision: 6, null: false
  end

default値にgen_random_uuid関数が指定できているようです。


動作確認

試しにtenantsテーブルにレコードを新規作成してみます。

$ Tenant.create!(name: 'その辺にいるWebエンジニア株式会社')
   (0.5ms)  BEGIN
  Tenant Exists? (4.5ms)  SELECT 1 AS one FROM "tenants" WHERE "tenants"."id" = $1 LIMIT $2  [["id", nil], ["LIMIT", 1]]
  Tenant Create (3.7ms)  INSERT INTO "tenants" ("name", "uuid", "created_at", "updated_at") VALUES ($1, $2, $3, $4) RETURNING "id"  [["name", "その辺にいるWebエンジニア株式会社"], ["uuid", "b5188d11-d9a3-423b-be17-dae29800977e"], ["created_at", "2021-12-16 13:16:51.489288"], ["updated_at", "2021-12-16 13:16:51.489288"]]
   (3.8ms)  COMMIT

uuidにデフォルト値が挿入されていることがわかります。

念のためきちんとランダムな値になっているかどうかも確認してみます。

$ Tenant.create!(name: 'ランダム株式会社')
   (0.8ms)  BEGIN
  Tenant Exists? (7.4ms)  SELECT 1 AS one FROM "tenants" WHERE "tenants"."id" = $1 LIMIT $2  [["id", 1], ["LIMIT", 1]]
  Tenant Exists? (4.4ms)  SELECT 1 AS one FROM "tenants" WHERE "tenants"."id" = $1 LIMIT $2  [["id", nil], ["LIMIT", 1]]
  Tenant Create (0.9ms)  INSERT INTO "tenants" ("name", "uuid", "created_at", "updated_at") VALUES ($1, $2, $3, $4) RETURNING "id"  [["name", "ランダム株式会社"], ["uuid", "a46244c4-8a3a-4b48-8236-1e76b475b4da"], ["created_at", "2021-12-16 13:19:26.898640"], ["updated_at", "2021-12-16 13:19:26.898640"]]
   (1.4ms)  COMMIT

先ほどと異なるuuidが生成されているので、ランダムな値になっているようです。


uuid_generate_v4じゃダメなの?

uuid_generate_v4という関数もあるんですが、PostgreSQLのドキュメントを見たところ、

注意: ランダムに生成された(バージョン4)UUIDのみが必要な場合には、代わりにpgcryptoモジュールのgen_random_uuid()を利用すること検討してください。

出典: www.postgresql.jp

という記述があったため、ランダムに生成された(バージョン4)UUIDのみが必要な場合にはpgcryptoモジュールを有効化するのがデファクトスタンダートのようです。


まとめ

Railsだとfriendly_id Gemを用いる際にuuidを設定することがあると思いますが、その場合にはpgcryptoモジュールを有効化するのを忘れないようにしましょう。(私は10分ハマりました)

devise-two-factorでの2要素認証設定時にdigestを変更したい

こんにちは!kossyです!


今回はdevise-two-factorでの2要素認証設定時にdigestを変更する方法について、ブログに残してみたいと思います。


環境

Ruby 2.6.9
Rails 6.0.4
MacOS BigSur
devise-two-factor 4.0.1


otpメソッドのオーバーライド

devise-two-factorは内部でrotpというGemを使っているのですが、ソースコードを見てみると、デフォルトでは暗号化にSHA1を用いています。

initializeでインスタンスを作成する際に、optionsでdigestを指定してやれば、SHA256等のSHA1以外のアルゴリズムも設定できるようになっていますので、

今回はotpメソッドをオーバーライドする形で実現したいと思います。

# devise-two-factor を使っているモデルと仮定

class User
  def otp(otp_secret = self.otp_secret)
    options = { digest: 'sha256' }
    ROTP::TOTP.new(otp_secret, options)
  end
end

これで、validate_and_consume_otp!メソッドが呼ばれた際に、digestにSHA256が設定されます。

github.com


動作確認

動作を確認してみます。確認のため、validate_and_consume_otp!メソッドをUserモデルに定義し、binding.pryを挟みます。

  def validate_and_consume_otp!(code, options = {})
    otp_secret = options[:otp_secret] || self.otp_secret
    return false unless code.present? && otp_secret.present?

    totp = otp(otp_secret)
    binding.pry
    if totp.verify(code.gsub(/\s+/, ""), drift_behind: self.class.otp_allowed_drift, drift_ahead: self.class.otp_allowed_drift)
      return consume_otp!
    end

    false
  end
$ totp
=> #<ROTP::TOTP:0x00007fa7328a1458 @digest="SHA256", @digits=6, @interval=30, @issuer=nil, @secret="35FZU6MQ3CAVSJWWN4VUAPVW">

digestにsha256が設定されていることが確認できました。

Rubyで五捨五超入を計算する

こんにちは!kossyです!


さて、今回はRubyで五捨五超入する方法について、備忘録としてブログに残してみたいと思います。


環境

Ruby 2.6.9


五捨五超入とは

主に薬価の計算を行う時に用いる端数処理で、薬価の円を点数に直して計算するときに使われます。

www.foresight.jp


Rubyで五捨五超入をやってみる

ロジックとしては、「小数点以下が0.5を超えていれば切り上げ」なので、

def rounding_up_five
  # レシーバの数字からレシーバをint型にして引き算
  decimal = self - to_i

  # 小数点以下の数値が0.5よりも大きいかどうか
  if decimal > 0.5
    to_i + 1
  else
    to_i
  end
end

のようになると思います。

早速実行してみましょう。説明のためにFloatクラスを拡張する形でメソッドを定義します。

$ irb

$ class Float
  def rounding_up_five
    # レシーバの数字からレシーバをint型にして引き算
    decimal = self - to_i

    # 小数点以下の数値が0.5よりも大きいかどうか
    if decimal > 0.5
      to_i + 1
    else
      to_i
    end
  end
end

$ 1.49.rounding_up_five
=> 1
$ 1.50.rounding_up_five
=> 1
$ 1.51.rounding_up_five
=> 2

小数点以下が0.5よりも大きい場合に、一の位に1を足した数値が返ることが確認できました。


勉強になりました。

graphql-rubyで認可制御を行うready?メソッドとauthorized?メソッド

こんにちは!kossyです!


さて、今回はgraphql-rubyで認可制御を行うready?メソッドとauthorized?メソッドについて、

備忘録としてブログに残してみたいと思います。


環境

Ruby 2.6.9
Rails 6.0.4
MacOS BigSur
graphql-ruby 1.13.0


graphql-rubyでの認可制御

graphql-rubyのドキュメントを見ると、Mutationの認可制御メソッドとして、ready?メソッドとauthorized?メソッドが使えると記載があります。

graphql-ruby.org

それぞれどのような違いがあるのでしょうか。ソースコードを見てみましょう。


ready?メソッドのソースコードを見る

まずはソースコードを読んでみます。

github.com

def ready?(**args)
  true
end

有無を言わさず true を返すメソッドになっていました。ちょっと意図がよくわからないので、コメントアウト部分を読んでみましょう。

Called before arguments are prepared.
Implement this hook to make checks before doing any work.

argumentsが準備される前に呼び出されます。
このフックを実装して、resolverが実行される前にチェックを行います。

If it returns a lazy object (like a promise), it will be synced by GraphQL
(but the resulting value won't be used).

遅延実行されるオブジェクト(Promiseのようなオブジェクトです)を返す場合、GraphQLによって同期されます。
(ただし、結果の値は使用されません)。

出典: graphql-ruby/lib/graphql/schema/resolver.rb at master · rmosolgo/graphql-ruby · GitHub

呼び出しのタイミングは、引数が準備される前とのことでした。


authorized?

こちらもソースコードを見てみます。

def authorized?(**inputs)
  self.class.arguments(context).each_value do |argument|
    arg_keyword = argument.keyword
    if inputs.key?(arg_keyword) && !(arg_value = inputs[arg_keyword]).nil? && (arg_value != argument.default_value)
      arg_auth, err = argument.authorized?(self, arg_value, context)
      if !arg_auth
        return arg_auth, err
      else
        true
      end
    else
      true
    end
  end
end

コメントアウト部分を見てみます。

Called after arguments are loaded, but before resolving.

引数がロードされた後、resolverの前に呼び出されます。

出典: graphql-ruby/lib/graphql/schema/resolver.rb at master · rmosolgo/graphql-ruby · GitHub

とのことでした。よしなにオーバーライドしてもOKなようです。

ready?とauthorized?のユースケース

ready?は引数がロードされる前に実行されるとのことなので、引数の値抜きで権限チェックを行いたい時に使うのがいいと思います。

def ready?
  if context[:current_user].admin?
    true
  else
     raise GraphQL::ExecutionError, "Only admins can run this mutation"
  end
end

逆にauthorized?メソッドは引数がロードされた後に実行されるとのことなので、引数の値込みで権限チェックを行いたい時に使うのがいいと思います。

例えば、管理者権限でも更新できない値があった場合に例外を発生させたりするパターンが考えられます。(履歴データとか)

def authorized?(**inputs)
  if context[:current_user].admin? && context[:current_user].can_edit_all?(inputs)
    true
  else
    raise GraphQL::ExecutionError, "Inculde Cannnot Edit Value"
  end
end


勉強になりました。

パスワードリセット機能を提供するdeviseのrecoverableモジュールのソースコードを追ってみた

こんにちは!kossyです!


今回はパスワードリセット機能を提供するdeviseのrecoverableモジュールのソースコードを追ってみたので、

備忘録としてブログに残してみたいと思います。


環境
Ruby 2.6.9
Rails 6.0.4
MacOS BigSur


createアクション

まずはcreateアクションのソースコードから読んでみます。

github.com

  # POST /resource/password
  def create
    self.resource = resource_class.send_reset_password_instructions(resource_params)
    yield resource if block_given?

    if successfully_sent?(resource)
      respond_with({}, location: after_sending_reset_password_instructions_path_for(resource_name))
    else
      respond_with(resource)
    end
  end

resource_classは User のように、deviseを使って認証を行うモデルのクラスが返ります。

send_reset_password_instructionsはどんな処理でしょうか。

send_reset_password_instructions

# Attempt to find a user by its email. If a record is found, send new
# password instructions to it. If user is not found, returns a new user
# with an email not found error.
# Attributes must contain the user's email

# ↓Google翻訳先生に訳してもらいました。↓
# メールでユーザーを見つけようとします。 
# レコードが見つかった場合は、そのレコードに新しいパスワードの指示を送信します。 
# ユーザーが見つからない場合は、メールが見つかりませんというエラーで新しいユーザーを返します。
# 属性にはユーザーのメールアドレスが含まれている必要があります

def send_reset_password_instructions(attributes = {})
  recoverable = find_or_initialize_with_errors(reset_password_keys, attributes, :not_found)
  recoverable.send_reset_password_instructions if recoverable.persisted?
  recoverable
end

コメントアウト部分で挙動について丁寧に説明されているので、内部で呼んでいるメソッドについては読まなくてもいいかなと思いつつ、

念のため目を通してみます。

find_or_initialize_with_errors

github.com

# Find or initialize a record with group of attributes based on a list of required attributes.
# 必要な属性のリストに基づいて、属性のグループを使用してレコードを検索または初期化します。

def find_or_initialize_with_errors(required_attributes, attributes, error = :invalid) #:nodoc:
  attributes.try(:permit!)
  attributes = attributes.to_h.with_indifferent_access
                          .slice(*required_attributes)
                          .delete_if { |key, value| value.blank? }

  if attributes.size == required_attributes.size
    record = find_first_by_auth_conditions(attributes) and return record
  end

  new(devise_parameter_filter.filter(attributes)).tap do |record|
    required_attributes.each do |key|
      record.errors.add(key, attributes[key].blank? ? :blank : error)
    end
  end
end

pry-byebugのstepメソッドで処理の内部に入って、適宜処理を実行して挙動の把握を試みます。

$ attributes = attributes.to_h.with_indifferent_access.slice(*required_attributes).delete_if { |key, value| value.blank? }
=> {"email"=>"sample@example.com"}

$ record = find_first_by_auth_conditions(attributes) and return record
=> nil

$   record = new(devise_parameter_filter.filter(attributes)).tap do |record|
    required_attributes.each do |key|
      record.errors.add(key, attributes[key].blank? ? :blank : error)
    end
  end

$ record
=> #<User id: nil, email: "keisuke.koshikawa@gmail.com", unique_session_id: nil, created_at: nil, updated_at: nil>

$ record.errors
=> #<ActiveModel::Errors:0x00007f8eec050488
 @base=#<User id: nil, email: "keisuke.koshikawa@gmail.com", unique_session_id: nil, created_at: nil, updated_at: nil>,
 @details={:email=>[{:error=>:not_found}]},
 @messages={:email=>["not found"]}>

attrを加工して必要なattrと数が一致していればレコードを引いてきて、適宜errorsオブジェクトにエラーを格納していました。

個人的には加工とエラー格納をprivateメソッドにしてメソッドの粒度を細かくしたいなと読んでて思いましたが余談ですね、、、

しかも12年前のコードが現役で動いていることに感動、、、またまた余談でした。

make User#send_reset_password_instructions to require all authenticat… · heartcombo/devise@850afec · GitHub

さて、recordを引いてくる部分のメソッドを読んでみます。


find_first_by_auth_conditions

github.com

def find_first_by_auth_conditions(tainted_conditions, opts = {})
  to_adapter.find_first(devise_parameter_filter.filter(tainted_conditions).merge(opts))
end

こちらもstepメソッドで適宜実行してみます。

$ tainted_conditions
=> {"email"=>"sample@example.com"}

$ to_adapter
=> #<OrmAdapter::ActiveRecord:0x00007f8ee0094540
 @klass=
  User(id: integer, email: string, encrypted_password: string, reset_password_token: string, reset_password_sent_at: datetime, remember_created_at: datetime, unique_session_id: string, created_at: datetime, updated_at: datetime)>

$ devise_parameter_filter
=> #<Devise::ParameterFilter:0x00007f8ee011b810 @case_insensitive_keys=[:email], @strip_whitespace_keys=[:email]>

$  devise_parameter_filter.filter(tainted_conditions)
=> {"email"=>"sample@example.com"}

$ to_adapter.find_first(devise_parameter_filter.filter(tainted_conditions).merge(opts))
=> nil

From: /usr/local/bundle/gems/orm_adapter-0.5.0/lib/orm_adapter/adapters/active_record.rb:22 OrmAdapter::ActiveRecord#find_first:

    21: def find_first(options = {})
 => 22:   construct_relation(klass, options).first
    23: end

$ klass
=> User(id: integer, email: string, encrypted_password: string, reset_password_token: string, reset_password_sent_at: datetime, remember_created_at: datetime, unique_session_id: string, created_at: datetime, updated_at: datetime)

$ options
=> {"email"=>"sample@example.com"}

$  construct_relation(klass, options)
 User Load (5.0ms)  SELECT "users".* FROM "users" WHERE "users"."email" = $1  [["email", "sample@example.com"]]
=> []

From: /usr/local/bundle/gems/orm_adapter-0.5.0/lib/orm_adapter/adapters/active_record.rb:42 OrmAdapter::ActiveRecord#construct_relation:

    41: def construct_relation(relation, options)
    42:   conditions, order, limit, offset = extract_conditions!(options)
    43:
    44:   relation = relation.where(conditions_to_fields(conditions))
    45:   relation = relation.order(order_clause(order)) if order.any?
    46:   relation = relation.limit(limit) if limit
    47:   relation = relation.offset(offset) if offset
    48:
=>49:   relation
    50: end

$ relation
 User Load (5.0ms)  SELECT "users".* FROM "users" WHERE "users"."email" = $1  [["email", "sample@example.com"]]
=> []

最終的にdeviseのコードではないところのコードになりましたが、、、

find_first_by_auth_conditionsメソッドは引数でユーザーの情報を検索するメソッドでした。

find_or_initialize_with_errorsメソッドの処理もこれで一通り把握できました。


send_reset_password_instructions

ようやくself.send_reset_password_instructionsメソッドの2行目に突入です、、、

github.com

# Resets reset password token and send reset password instructions by email.
# Returns the token sent in the e-mail.
# リセットパスワードトークンをリセットし、パスワードのリセット手順を電子メールで送信します。 
# 電子メールで送信されたトークンが返り値になります。

def send_reset_password_instructions
  token = set_reset_password_token
  send_reset_password_instructions_notification(token)

  token
end

set_reset_password_token

github.com

def set_reset_password_token
  raw, enc = Devise.token_generator.generate(self.class, :reset_password_token)

  self.reset_password_token   = enc
  self.reset_password_sent_at = Time.now.utc
  save(validate: false)
  raw
end

encryptedされたtokenをreset_password_tokenとし、パスワードリセットメール送信日時を設定し、バリデーションを実行せずにレコードをDBに保存しています。

返り値は先ほど訳したコメントアウトにもある通り、トークン(encryptedされてない生の)が返っています。


send_reset_password_instructions_notification

github.com

def send_reset_password_instructions_notification(token)
  send_devise_notification(:reset_password_instructions, token, {})
end

ここからはstepメソッドで処理を追ってみます。

From: /usr/local/bundle/gems/devise-4.8.0/lib/devise/models/recoverable.rb:99 Devise::Models::Recoverable#send_reset_password_instructions_notification:

     98: def send_reset_password_instructions_notification(token)
 =>  99:   send_devise_notification(:reset_password_instructions, token, {})
    100: end

$ step

From: /usr/local/bundle/gems/devise-4.8.0/lib/devise/models/authenticatable.rb:201 Devise::Models::Authenticatable#send_devise_notification:

    200: def send_devise_notification(notification, *args)
 => 201:   message = devise_mailer.send(notification, self, *args)
    202:   # Remove once we move to Rails 4.2+ only.
    203:   if message.respond_to?(:deliver_now)
    204:     message.deliver_now
    205:   else
    206:     message.deliver
    207:   end
    208: end

$ message = devise_mailer.send(notification, self, *args)
=> #<ActionMailer::MessageDelivery:0x2b0923acff60>

DeviseのMailerを呼ぶ処理を実行していました。以下のメソッドが実行されるようです。

def reset_password_instructions(record, token, opts = {})
  @token = token
  devise_mail(record, :reset_password_instructions, opts)
end

devise_mailの処理はこちら。

github.com

これでようやくsend_reset_password_instructionsメソッドも挙動の把握ができました、、、


successfully_sent?

controllerの処理に戻ってこれました、、、もう一度createアクションを記載します。

  # POST /resource/password
  def create
    self.resource = resource_class.send_reset_password_instructions(resource_params)
    yield resource if block_given?

    if successfully_sent?(resource)
      respond_with({}, location: after_sending_reset_password_instructions_path_for(resource_name))
    else
      respond_with(resource)
    end
  end

successfully_sent?というメソッド名からどんな処理か想像はつきますが、見に行ってみましょう。

github.com

# Helper for use after calling send_*_instructions methods on a resource.
# If we are in paranoid mode, we always act as if the resource was valid
# and instructions were sent.

# リソースでsend_ * _instructionsメソッドを呼び出した後に使用するヘルパー。 
# パラノイドモードの場合、リソースが有効であり、指示が送信されたかのように常に動作します。

def successfully_sent?(resource)
  notice = if Devise.paranoid
    resource.errors.clear
    :send_paranoid_instructions
  elsif resource.errors.empty?
    :send_instructions
  end

  if notice
    set_flash_message! :notice, notice
    true
  end
end

Devise.paranoidをどのように使うかは以下の記事が詳しかったです。

techracho.bpsinc.jp

noticeの値に応じて表示するフラッシュメッセージを変えているようでした。


まとめ

Devise.paranoidは知らない機能でした、、、コード読んでおいてよかった。

個人的には Time.now.utc も気になりました。アプリケーションのタイムゾーン運用によっては軽く問題になるような気もします。

recoverableモジュール入れるだけでパスワードリセットできるやん!viewもちゃちゃっとカスタマイズできるし!とか思ってましたが、

裏でいろんなことをdeviseがやってくれていたということを改めて認識する良い機会になりました。

devise-securityのsession_limitableモジュールのソースコードを追ってみた

こんにちは!kossyです!


さて、今回はdevise-securiyのsession_limitableのソースコードを追ってみたので、備忘録としてブログに残してみたいと思います。


環境

Ruby 2.6.8
Rails 6.0.4
MacOS BigSur
devise-security 0.16.1


前提

devise-securityのsession_limitableモジュールをincludeしたUserモデルが定義されているものとします。

Devise::Models::SessionLimitable

まずはモジュールのコードをさらっと確認してみます。

# 省略

module Devise
  module Models
    # SessionLimited ensures, that there is only one session usable per account at once.
    # If someone logs in, and some other is logging in with the same credentials,
    # the session from the first one is invalidated and not usable anymore.
    # The first one is redirected to the sign page with a message, telling that
    # someone used his credentials to sign in.
    module SessionLimitable
      extend ActiveSupport::Concern
      include Devise::Models::Compatibility

      # Update the unique_session_id on the model.  This will be checked in
      # the Warden after_set_user hook in {file:devise-security/hooks/session_limitable}
      # @param unique_session_id [String]
      # @return [void]
      # @raise [Devise::Models::Compatibility::NotPersistedError] if record is unsaved
      def update_unique_session_id!(unique_session_id)
        raise Devise::Models::Compatibility::NotPersistedError, 'cannot update a new record' unless persisted?

        update_attribute_without_validatons_or_callbacks(:unique_session_id, unique_session_id).tap do
          Rails.logger.debug { "[devise-security][session_limitable] unique_session_id=#{unique_session_id}" }
        end
      end

      # Should session_limitable be skipped for this instance?
      # @return [Boolean]
      # @return [false] by default. This can be overridden by application logic as necessary.
      def skip_session_limitable?
        false
      end
    end
  end
end

SessionLimited...から始まる部分をGoogle翻訳で訳してみます。

SessionLimited ensures, that there is only one session usable per account at once.
If someone logs in, and some other is logging in with the same credentials,
the session from the first one is invalidated and not usable anymore.
The first one is redirected to the sign page with a message, telling that someone used his credentials to sign in.

SessionLimitedは、アカウントごとに一度に使用できるセッションが1つだけであることを保証します。
誰かがログインし、他の誰かが同じ資格情報でログインしている場合、
最初のセッションからのセッションは無効になり、使用できなくなります。
最初のセッションは、誰かが自分の資格情報を使用してサインインしたことを通知するメッセージとともにサインページにリダイレクトされます。

平たく言ってしまうと、多重セッションを禁ずるモジュールですね。

上記の機能はどのようにして実現しているのでしょうか。


update_unique_session_id!

Devise::Models::SessionLimitableモジュールには2つのメソッドが定義されていて、そのうちの一つがupdate_unique_session_id!メソッドです。

コメントアウト部分を訳してみます。

Update the unique_session_id on the model. This will be checked in
the Warden after_set_user hook in {file:devise-security/hooks/session_limitable}

モデル内のunique_session_idをupdateします。
これはWardenのafter_set_userフック内でチェックされます。(fileはdevise-security/hooks/session_limitable)

session_limitableを使うときに必要になる、unique_session_idをWardenのafter_set_userフック内でupdateするメソッドのようです。

  def update_unique_session_id!(unique_session_id)
    raise Devise::Models::Compatibility::NotPersistedError, 'cannot update a new record' unless persisted?

    update_attribute_without_validatons_or_callbacks(:unique_session_id, unique_session_id).tap do
      Rails.logger.debug { "[devise-security][session_limitable] unique_session_id=#{unique_session_id}" }
    end
  end

このメソッドをUserモデルに定義し、間にbinding.pryを挟んだ上で、ログインを試みます。

From: /app/app/models/supervisor.rb:94 Supervisor#update_unique_session_id!:

    90: def update_unique_session_id!(unique_session_id)
    91:   binding.pry
    92:   raise Devise::Models::Compatibility::NotPersistedError, 'cannot update a new record' unless persisted?
    93:
 => 94:   update_attribute_without_validatons_or_callbacks(:unique_session_id, unique_session_id).tap do
    95:     Rails.logger.debug { "[devise-security][session_limitable] unique_session_id=#{unique_session_id}" }
    96:   end
    97: end

$ unique_session_id
=> nil

$ persisted?
=> true


update_attribute_without_validatons_or_callbacksメソッドを読んでみる必要がありそう。

update_attribute_without_validatons_or_callbacks

pry-byebugを導入していると使える、stepメソッドを使って update_attribute_without_validatons_or_callbacks の処理を見てみます。

From: /usr/local/bundle/gems/devise-security-0.16.0/lib/devise-security/models/compatibility/active_record_patch.rb:34 Devise::Models::Compatibility::ActiveRecordPatch#update_attribute_without_validatons_or_callbacks:

    33: def update_attribute_without_validatons_or_callbacks(name, value)
 => 34:   update_column(name, value)
    35: end

$ name
=> :unique_session_id

$ value
=> "buGqJFwGDV1bmXa39fgY"

ActiveRecordのupdate_columnメソッドを呼び出している処理でした。

update_columnメソッドでattributeの更新を行っているため、updated_at/updated_onの更新は行われません、、、

参考: 週刊Railsウォッチ(20181210)update_columnは要注意、DBカラムコメントは書こう、個人情報扱いの注意点、Capistranoはやっぱりいいほか|TechRacho by BPS株式会社


Warden::Manager.after_set_user

update_unique_session_id!メソッドの呼び出し元はWarden::Managerクラスのafter_set_userフックでした。

# After each sign in, update unique_session_id. This is only triggered when the
# user is explicitly set (with set_user) and on authentication. Retrieving the
# user from session (:fetch) does not trigger it.
Warden::Manager.after_set_user except: :fetch do |record, warden, options|
  if record.devise_modules.include?(:session_limitable) &&
     warden.authenticated?(options[:scope]) &&
     !record.skip_session_limitable?

     if !options[:skip_session_limitable]
      unique_session_id = Devise.friendly_token
      warden.session(options[:scope])['unique_session_id'] = unique_session_id
      record.update_unique_session_id!(unique_session_id)
     else
      warden.session(options[:scope])['devise.skip_session_limitable'] = true
     end
  end
end

skip_session_limitableオプションがfalseでなければ、tokenを生成してwardenのsessionにunique_session_idを代入して、

.update_unique_session_id!メソッドを呼び出しています。

コメントアウト部分を訳してみます。

After each sign in, update unique_session_id.
This is only triggered when the user is explicitly set (with set_user) and on authentication.
Retrieving the user from session (:fetch) does not trigger it.

サインインするたびに、unique_session_idを更新します。
これは、ユーザーが(set_userを使用して)明示的に設定され、認証された場合にのみトリガーされます。
セッション(:fetch)からユーザーを取得しても、トリガーされません。

呼び出されるタイミングが記載されていました。

skip_session_limitable?

      # Should session_limitable be skipped for this instance?
      # @return [Boolean]
      # @return [false] by default. This can be overridden by application logic as necessary.
      def skip_session_limitable?
        false
      end

コメントアウト部分を意訳してみます。

Should session_limitable be skipped for this instance?
@return [Boolean]
@return [false] by default. This can be overridden by application logic as necessary.

session_limitableをスキップする必要があるかどうかを制御できます。
もしスキップしたい場合は必要に応じてアプリケーションロジックによって上書きできます。

trueを返すようにすれば、unique_session_idカラムの値を更新しなくなるようでした。

まとめ

update_columnを使っているため、timestamp機能が有効でもupdated_at/updated_on属性が更新されない問題があるみたいです、、、

自力で直せるか検討してみたんですが、Railsのtimestamp機能のprivateメソッドを直に呼び出すような案しか思いつきませんでした。

OSSコントリビュートのチャンスだと思うんですが、思ったよりも考慮事項が多そうに思いました。どこかで直したいけど。

devise-securityのsession_limitableを使ってみる

こんにちは!kossyです!


さて、今回は認証機能を提供するGem「devise」のextensionで、エンタープライズな認証機能を実現する

devise-securityのsession_limitableを使ってみたので、備忘録としてブログに残してみたいと思います。


環境

Ruby 2.6.8
Rails 6.0.4
MacOS BigSur
devise-security 0.16.1


session_limitableとは?

1アカウント1セッションであることを強制する、いわゆる「多重セッション」を禁止するモジュールです。

多重セッションの禁止とは、例えばスマホTwitterにログインした状態でPCからTwitterにログインすると、スマホ側のTwitterのセッションが切れることを指します。

導入

既にdeviseの導入とdeviseの各種モジュールをincludeしたモデル(User)が定義されているものとします。

Gemfileにdevise-securiyを追加

gem 'devise-security'

でbundle

$ bundle

Userモデルにsession_limitableモジュールで使うカラムを追加します。

class AddUniqueSessionIdToUsers < ActiveRecord::Migration[6.0]
  def change
    add_column :users, :unique_session_id, :string
  end
end

rails db:migrate

$ rails db:migrate

次にUserモデルにsession_limitableモジュールを追加します。

devise :session_limitable

これで導入は完了です。


動作確認

複数ブラウザを立ち上げて動作を確認してみます。

chromeでログイン

f:id:kossy-web-engineer:20211128232921p:plain

その後safariでログイン

f:id:kossy-web-engineer:20211128233024p:plain

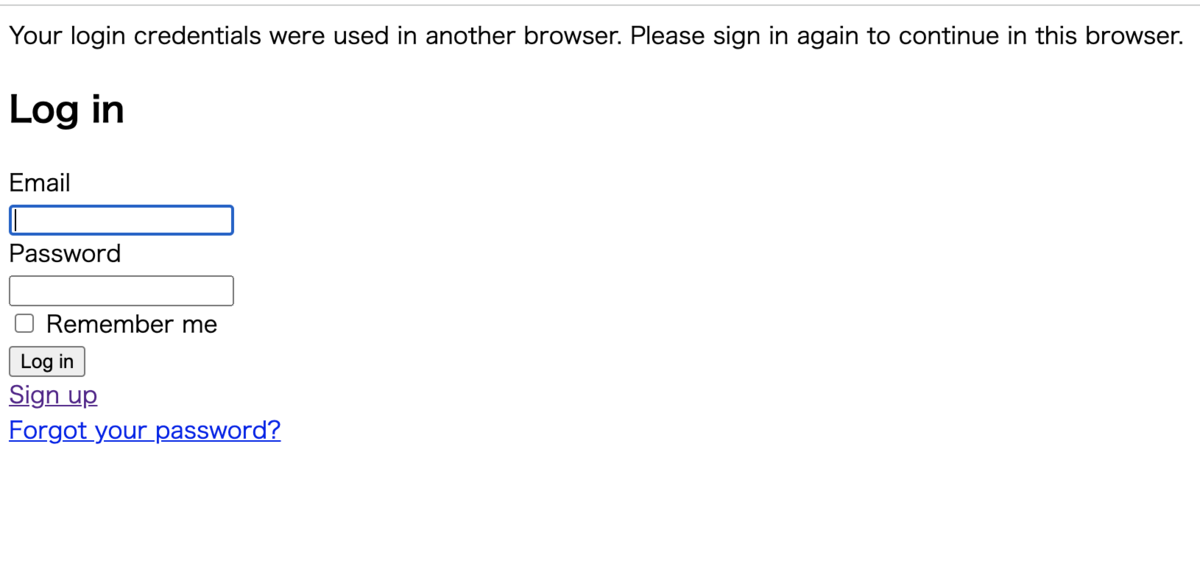
その後chromeの方をリロードすると、ログアウト画面に遷移する(sessionが切れている)

f:id:kossy-web-engineer:20211128233058p:plain


動作の確認が取れました。

まとめ

動作確認していて思ったのですが、複数環境でのログインそのものはできるんですね。セッションが生きている状態でログインを試みたら、ログインに失敗する機能かと勘違いしていました。

session_limitableを検索すると、「多重ログイン」という文言が出てくるのですが、

本ブログでは「多重セッション」という言葉を選んでいます。多重ログイン自体は可能のようだからですね。

あと、unique_session_idの更新時にupdated_atの値が更新されていないようでした。

Railsの場合、レコードに変更が加わると自動でupdated_atが更新されるんですが、なぜ更新がされていないのか、原因を追ってみたくなりました。

ruby-samlで「Invalid Signature on SAML Response」が返ってきた場合の調査方法

こんにちは!kossyです!


今回はSSOを実現するGem「ruby-saml」で「Invalid Signature on SAML Response」が返ってきた場合の調査方法について、

備忘録としてブログに残してみたいと思います。


環境
Ruby 2.6.8
Rails 6.0.4
MacOS BigSur
ruby-saml 1.13.0


なお、サンプルのアプリケーションはoneloginが提供している以下のアプリを使っているものとします。

github.com

コードリーディング

fail.html.erbをレンダリングしている処理はこちらでした。

  def acs
    settings = Account.get_saml_settings(get_url_base)
    response = OneLogin::RubySaml::Response.new(params[:SAMLResponse], settings: settings)

    if response.is_valid?
      session[:nameid] = response.nameid
      session[:attributes] = response.attributes
      @attrs = session[:attributes]
      logger.info "Sucessfully logged"
      logger.info "NAMEID: #{response.nameid}"
      render :action => :index
    else
      logger.info "Response Invalid. Errors: #{response.errors}"
      @errors = response.errors
      render :action => :fail
    end
  end

なので、acsアクションにbinding.pryを定義し、pry-byebug Gemを入れることで使えるようになるstepメソッドを使って、

原因を探りたいと思います。

    20: def acs
    21:   settings = Account.get_saml_settings(get_url_base)
    22:   response = OneLogin::RubySaml::Response.new(params[:SAMLResponse], settings: settings)
    23:
    24:   binding.pry
    25:
 => 26:   if response.is_valid?
    27:     session[:nameid] = response.nameid
    28:     session[:attributes] = response.attributes
    29:     @attrs = session[:attributes]
    30:     logger.info "Sucessfully logged"
    31:     logger.info "NAMEID: #{response.nameid}"
    32:     render :action => :index
    33:   else
    34:     logger.info "Response Invalid. Errors: #{response.errors}"
    35:     @errors = response.errors
    36:     render :action => :fail
    37:   end
    38: end


$ response.is_valid?
=> false

$ step

From: /usr/local/bundle/gems/ruby-saml-1.13.0/lib/onelogin/ruby-saml/response.rb:79 OneLogin::RubySaml::Response#is_valid?:

    78: def is_valid?(collect_errors = false)
 => 79:   validate(collect_errors)
    80: end

$ step

      # Validates the SAML Response (calls several validation methods)
      # @param collect_errors [Boolean] Stop validation when first error appears or keep validating. (if soft=true)
      # @return [Boolean] True if the SAML Response is valid, otherwise False if soft=True
      # @raise [ValidationError] if soft == false and validation fails
      #
      def validate(collect_errors = false)
        reset_errors!
        return false unless validate_response_state

        validations = [
          :validate_version,
          :validate_id,
          :validate_success_status,
          :validate_num_assertion,
          :validate_no_duplicated_attributes,
          :validate_signed_elements,
          :validate_structure,
          :validate_in_response_to,
          :validate_one_conditions,
          :validate_conditions,
          :validate_one_authnstatement,
          :validate_audience,
          :validate_destination,
          :validate_issuer,
          :validate_session_expiration,
          :validate_subject_confirmation,
          :validate_name_id,
          :validate_signature
        ]

        if collect_errors
          validations.each { |validation| send(validation) }
          @errors.empty?
        else
          validations.all? { |validation| send(validation) }
        end
      end

# ですよね()という結果
$  validations.all? { |validation| send(validation) }
=> false

実際にvalidationを実行しているのは、send(validation)の部分ですね。

ここは全て読むのは辛いので、「Invalid Signature」でruby-samlのコードを検索してみます。

      # Validates the Signature
      # @return [Boolean] True if not contains a Signature or if the Signature is valid, otherwise False if soft=True
      # @raise [ValidationError] if soft == false and validation fails
      #
      def validate_signature
        error_msg = "Invalid Signature on SAML Response"

        # If the response contains the signature, and the assertion was encrypted, validate the original SAML Response
        # otherwise, review if the decrypted assertion contains a signature
        sig_elements = REXML::XPath.match(
          document,
          "/p:Response[@ID=$id]/ds:Signature",
          { "p" => PROTOCOL, "ds" => DSIG },
          { 'id' => document.signed_element_id }
        )

        use_original = sig_elements.size == 1 || decrypted_document.nil?
        doc = use_original ? document : decrypted_document

        # Check signature nodes
        if sig_elements.nil? || sig_elements.size == 0
          sig_elements = REXML::XPath.match(
            doc,
            "/p:Response/a:Assertion[@ID=$id]/ds:Signature",
            {"p" => PROTOCOL, "a" => ASSERTION, "ds"=>DSIG},
            { 'id' => doc.signed_element_id }
          )
        end

        if sig_elements.size != 1
          if sig_elements.size == 0
             append_error("Signed element id ##{doc.signed_element_id} is not found")
          else
             append_error("Signed element id ##{doc.signed_element_id} is found more than once")
          end
          return append_error(error_msg)
        end

        old_errors = @errors.clone

        idp_certs = settings.get_idp_cert_multi
        if idp_certs.nil? || idp_certs[:signing].empty?
          opts = {}
          opts[:fingerprint_alg] = settings.idp_cert_fingerprint_algorithm
          idp_cert = settings.get_idp_cert
          fingerprint = settings.get_fingerprint
          opts[:cert] = idp_cert

          if fingerprint && doc.validate_document(fingerprint, @soft, opts)
            if settings.security[:check_idp_cert_expiration]
              if OneLogin::RubySaml::Utils.is_cert_expired(idp_cert)
                error_msg = "IdP x509 certificate expired"
                return append_error(error_msg)
              end
            end
          else
            return append_error(error_msg)
          end
        else
          valid = false
          expired = false
          idp_certs[:signing].each do |idp_cert|
            valid = doc.validate_document_with_cert(idp_cert, true)
            if valid
              if settings.security[:check_idp_cert_expiration]
                if OneLogin::RubySaml::Utils.is_cert_expired(idp_cert)
                  expired = true
                end
              end

              # At least one certificate is valid, restore the old accumulated errors
              @errors = old_errors
              break
            end

          end
          if expired
            error_msg = "IdP x509 certificate expired"
            return append_error(error_msg)
          end
          unless valid
            # Remove duplicated errors
            @errors = @errors.uniq
            return append_error(error_msg)
          end
        end

        true
      end


validate_signatureメソッドがエラーメッセージを返していそうなので、処理を追ってみます。

$ send(:validate_signature)
=> false

# stepでvalidate_signatureメソッドの内部に移動

# どうやらここがfalseなのが原因
$ if fingerprint && doc.validate_document(fingerprint, @soft, opts)
=> false

$ fingerprint
=> "AB:CD:EF:AB:CD:EF:A1:B2:C3:D4:E5:F6:94:C1:B5:8B:00:23:0A:D8:3D:1B:55:DF:41:EA:42:5F:9E:62:07:85"

$ doc.validate_document(fingerprint, @soft, opts)
=> false

どうやらfingerprintが間違っているのが原因のようです。

    # IdP section
    settings.idp_entity_id                  = "#{idp_base_url}/#{ENV['IDP_GROUP_NAME']}"
    settings.idp_sso_target_url             = "#{idp_base_url}/idp/#{ENV['IDP_GROUP_NAME']}"
    settings.idp_slo_target_url             = "#{idp_base_url}/idp/#{ENV['IDP_GROUP_NAME']}/logout"
    settings.idp_cert_fingerprint           = "#{ENV['IDP_FINGERPRINT']}"
    settings.idp_cert_fingerprint_algorithm = XMLSecurity::Document::SHA256

settings.idp_cert_fingerprint属性の値に正しいfingerprintを渡してやればOKでした。


まとめ

もし本番運用で「Invalid Signature on SAML Response」に遭遇して、原因が「fingerprintの値が間違っている」だったとして、

原因を特定するまでにかなりの労力を使うような気がしています、、、(エラーメッセージが不親切)

XmlSecurityモジュールのvalidate_documentメソッドも読んでみようと思ったんですが、何をしているのかさっぱりわからなかったので、

Pull Requestのコメントやcommitメッセージを読みつつコードリーディングを進めるのと、

そもそもなぜSAMLによるSSO認証にfingerprintが使われているか、等を調べて知見を深めようと思います、、、

ruby-samlで「Invalid settings, idp_sso_service_url is not set!」が発生した場合の対処法

こんにちは!kossyです!


今回はSSOを実現するGem「ruby-saml」で「Invalid settings, idp_sso_service_url is not set!」が発生した場合の対処法について、

備忘録としてブログに残してみたいと思います。


環境
Ruby 2.6.8
Rails 6.0.4
MacOS BigSur
ruby-saml 1.13.0


エラーの発生箇所のコードリーディング

まずはどこで例外が投げられているのか、binding.pryで処理を止めて、

pry-byebug Gemを入れると使用できるstepコマンドを使いながら確認してみます。

class SamlController < ApplicationController
  skip_before_action :verify_authenticity_token, :only => [:acs, :logout]

  # 省略

  def sso
    settings = Account.get_saml_settings(get_url_base)
    if settings.nil?
      render :action => :no_settings
      return
    end

    request = OneLogin::RubySaml::Authrequest.new

    binding.pry
    redirect_to(request.create(settings))
  end

  # 省略
end

localhost:3000/saml/sso にアクセスすると、処理が止まります。

From: /app/app/controllers/saml_controller.rb:18 SamlController#sso:

     8: def sso
     9:   settings = Account.get_saml_settings(get_url_base)
    10:   if settings.nil?
    11:     render :action => :no_settings
    12:     return
    13:   end
    14:
    15:   request = OneLogin::RubySaml::Authrequest.new
    16:
    17:   binding.pry
 => 18:   redirect_to(request.create(settings))
    19: end

この状態でstepコマンドでcreateメソッドの処理を見に行ってみます。

From: /usr/local/bundle/gems/ruby-saml-1.13.0/lib/onelogin/ruby-saml/authrequest.rb:37 OneLogin::RubySaml::Authrequest#create:

    36: def create(settings, params = {})
 => 37:   params = create_params(settings, params)
    38:   params_prefix = (settings.idp_sso_service_url =~ /\?/) ? '&' : '?'
    39:   saml_request = CGI.escape(params.delete("SAMLRequest"))
    40:   request_params = "#{params_prefix}SAMLRequest=#{saml_request}"
    41:   params.each_pair do |key, value|
    42:     request_params << "&#{key.to_s}=#{CGI.escape(value.to_s)}"
    43:   end
    44:   raise SettingError.new "Invalid settings, idp_sso_service_url is not set!" if settings.idp_sso_service_url.nil? or settings.idp_sso_service_url.empty?
    45:   @login_url = settings.idp_sso_service_url + request_params
    46: end

44行目が今回の例外をraiseしているところですね。

$  settings.idp_sso_service_url.nil? or settings.idp_sso_service_url.empty?
=> true

true が返りました。 タイトルの例外が生じた原因は、settingsオブジェクトのidp_sso_service_url属性がnilまたは空だったからですね。

idp_sso_service_urlはsettingsオブジェクトのメソッドになっていました。

github.com

      # @return [String] IdP Single Sign On Service URL
      #
      def idp_sso_service_url
        @idp_sso_service_url || @idp_sso_target_url
      end

idp_sso_service_url属性がDBに保存されているか、はたまたconfig値を引っ張ってきているかは各々のアプリケーション次第かと思いますが、

settingsオブジェクトの生成時に、idp_sso_service_url属性に値が必ず入るようにすればOKそうですね。


まとめ

ruby-samlのReadMe通りに実装してテストしているときにはあまり遭遇しないかもしれませんが、

DBから値を引っ張ってくるような構成の場合は、きちんと制約をかけてあげていないと、ハマってしまうかもしれませんね。

github.com


大いに参考にさせていただいたサイト

素晴らしいコンテンツの提供、誠にありがとうございます。

ruby-saml/README.md at master · onelogin/ruby-saml · GitHub

devise_saml_authenticatableのSamlAuthenticatable::SamlResponseのソースコードを追ってみる

こんにちは!kossyです!


今回は、前回のブログで追いきれなかった、SamlAuthenticatable::SamlResponseのソースコードを追ってみようと思います。

前回のブログ

kossy-web-engineer.hatenablog.com


環境
Ruby 2.6.8
Rails 6.0.4
MacOS BigSur
devise_saml_authenticatable 1.7.0


呼び出し元のおさらい

呼び出し元の処理はこちらでした。

github.com

def authenticate_with_saml(saml_response, relay_state)
  key = Devise.saml_default_user_key
  decorated_response = ::SamlAuthenticatable::SamlResponse.new(
    saml_response,
    attribute_map(saml_response),
  )
  if Devise.saml_use_subject
    auth_value = saml_response.name_id
  else
    auth_value = decorated_response.attribute_value_by_resource_key(key)
  end
  auth_value.try(:downcase!) if Devise.case_insensitive_keys.include?(key)

  resource = Devise.saml_resource_locator.call(self, decorated_response, auth_value)

  raise "Only one validator configuration can be used at a time" if Devise.saml_resource_validator && Devise.saml_resource_validator_hook
  if Devise.saml_resource_validator || Devise.saml_resource_validator_hook
    valid = if Devise.saml_resource_validator then Devise.saml_resource_validator.new.validate(resource, saml_response)
            else Devise.saml_resource_validator_hook.call(resource, decorated_response, auth_value)
            end
    if !valid
      logger.info("User(#{auth_value}) did not pass custom validation.")
      return nil
    end
  end

  if resource.nil?
    if Devise.saml_create_user
      logger.info("Creating user(#{auth_value}).")
      resource = new
    else
      logger.info("User(#{auth_value}) not found.  Not configured to create the user.")
      return nil
    end
  end

  if Devise.saml_update_user || (resource.new_record? && Devise.saml_create_user)
    Devise.saml_update_resource_hook.call(resource, decorated_response, auth_value)
  end

  resource
end

authenticate_with_samlメソッドの中で、SamlAuthenticatable::SamlResponse.newが呼び出されていましたね。


SamlAuthenticatable::SamlResponseクラス

github.com

改行を含めても16行の小さいクラスでした。

require 'devise_saml_authenticatable/saml_mapped_attributes'

module SamlAuthenticatable
  class SamlResponse
    attr_reader :raw_response, :attributes

    def initialize(saml_response, attribute_map)
      @attributes = ::SamlAuthenticatable::SamlMappedAttributes.new(saml_response.attributes, attribute_map)
      @raw_response = saml_response
    end

    def attribute_value_by_resource_key(key)
      attributes.value_by_resource_key(key)
    end
  end
end

initializeメソッドの中で SamlAuthenticatable::SamlMappedAttributesというクラスがnewされていますので、処理を見てみます。

と思ったんですが、authenticate_with_samlメソッドの中でattribute_mapというメソッドが呼ばれてますね、、、こちらから見てみましょうか。

attribute_map

定義元はSamlAuthenticatableモジュールの84行目です。

github.com

def attribute_map(saml_response = nil)
  attribute_map_resolver.new(saml_response).attribute_map
end

def attribute_map_resolver
  if Devise.saml_attribute_map_resolver.respond_to?(:new)
    Devise.saml_attribute_map_resolver
  else
    Devise.saml_attribute_map_resolver.constantize
  end
end

Devise.saml_attribute_map_resolverに対して、newが定義されていれば Devise.saml_attribute_map_resolver.newを呼び出し、

newが定義されていなければ Devise.saml_attribute_map_resolverをcontantizeメソッドで文字列をクラス化した後にnewを呼び出していました。

github.com

module DeviseSamlAuthenticatable
  class DefaultAttributeMapResolver
    def initialize(saml_response)
      @saml_response = saml_response
    end

    def attribute_map
      return {} unless File.exist?(attribute_map_path)

      attribute_map = YAML.load(File.read(attribute_map_path))
      if attribute_map.key?(Rails.env)
        attribute_map[Rails.env]
      else
        attribute_map
      end
    end

    private

    attr_reader :saml_response

    def attribute_map_path
      Rails.root.join("config", "attribute-map.yml")
    end
  end
end

initializeメソッドでは引数で渡されたsaml_responseをインスタンス変数に代入しているだけですね。

attribute_mapメソッドは、configディレクトリ直下にattribute_map.ymlファイルが存在していなければ {} を返却し、

存在していれば、YAML.loadで読み出して、attribute_mal.ymlにproduction: のように環境毎に定義が分かれていれば、その環境の値を読み出し、

定義が分かれていなければ全てのattribute_map.ymlの値を返しています。この実装方法、他にも応用が効きそうな気がしています。

attribute_map.ymlファイルの中身はこんな感じになるかと思います。

"urn:mace:dir:attribute-def:email": "email"

SAMLの属性とdeviseの属性をmappingする用途で使っています。

この辺りはコンソールで試してみましょうか。

# Instead of storing the attribute_map in attribute-map.yml, store it in the database, or set it programatically
# attribute_mapをattribute-map.ymlに保存する代わりに、データベースに保存するか、プログラムで設定します

# 私の環境ではfalseが返りました。
$ Devise.saml_attribute_map_resolver.respond_to?(:new)
=> false

# newは DeviseSamlAuthenticatable::DefaultAttributeMapResolver に対して呼び出される
$ Devise.saml_attribute_map_resolver.constantize
=> DeviseSamlAuthenticatable::DefaultAttributeMapResolver

# 私の環境ではattribute-map.ymlを定義しているので返り値が存在する
$ attribute_map_path
=> #<Pathname:/app/config/attribute-map.yml>

$ File.exist?(attribute_map_path)
=> true

$ attribute_map
=> {"urn:mace:dir:attribute-def:email"=>"email"}

attribute_mapメソッドの動きが理解できたところで、 SamlAuthenticatable::SamlResponseクラスに戻ります。

SamlAuthenticatable::SamlMappedAttributesクラス

deviseとsaml_responseのattrのmappingを担当するクラスですね。

github.com

module SamlAuthenticatable
  class SamlMappedAttributes
    def initialize(attributes, attribute_map)
      @attributes = attributes
      @attribute_map = attribute_map
    end

    def saml_attribute_keys
      @attribute_map.keys
    end

    def resource_keys
      @attribute_map.values
    end

    def value_by_resource_key(key)
      str_key = String(key)

      # Find all of the SAML attributes that map to the resource key
      attribute_map_for_key = @attribute_map.select { |_, resource_key| String(resource_key) == str_key }

      saml_value = nil

      # Find the first non-nil value
      attribute_map_for_key.each_key do |saml_key|
        saml_value = value_by_saml_attribute_key(saml_key)

        break unless saml_value.nil?
      end

      saml_value
    end

    def value_by_saml_attribute_key(key)
      @attributes[String(key)]
    end
  end
end

initialize時に引数で渡ってきたSamlResponseの属性を基に、attribute_mapの値と比較しつつ、合致した値を返却するような処理が含まれていました。

こちらもコンソールで試してみましょう。

$ decorated_response.attribute_value_by_resource_key(key)
=> nil

# stepでメソッド内部に入り込んでなぜnilが返るのか検証してみました

    16: def value_by_resource_key(key)
 => 17:   str_key = String(key)
    18:
    19:   # Find all of the SAML attributes that map to the resource key
    20:   attribute_map_for_key = @attribute_map.select { |_, resource_key| String(resource_key) == str_key }
    21:
    22:   saml_value = nil
    23:
    24:   # Find the first non-nil value
    25:   attribute_map_for_key.each_key do |saml_key|
    26:     saml_value = value_by_saml_attribute_key(saml_key)
    27:
    28:     break unless saml_value.nil?
    29:   end
    30:
    31:   saml_value
    32: end

$ key
=> :email

$ str_key = String(key)
=> "email"

$  attribute_map_for_key = @attribute_map.select { |_, resource_key| String(resource_key) == str_key }
=> {"urn:mace:dir:attribute-def:email"=>"email"}

    34: def value_by_saml_attribute_key(key)
 => 35:   @attributes[String(key)]
    36: end

# @attributesがそもそも{}だったからでした
$  @attributes[String(key)]
=> nil

概ね挙動の理解ができました。

まとめ

SAMLResponseとdeviseのattrのマッピングの実現方法は、普段の実装でも活かせるような気がしています。(ymlファイルの読み込み等々)

一通り挙動を追ってみて思ったのですが、やはりSAMLによるSSO周りの仕様の理解が追いついてないのをコードを読めば読むほど痛感しますね、、、

近いうちに、「この値を設定していないとこのレスポンスが返ってくる」とか、
「この値が間違っているとこのエラーになる」みたいなのを体当たりで検証してみたいと思います。(IdP側のコードも読んでみたいな、、、)