RailsのActiveRecordにおいて保存していない親レコードに紐づく子レコードへのpluckは空配列が返る件

こんにちは!kossyです!


今回は保存していない親レコードに紐づく子レコードにpluckメソッドを使って、意図通り動作しない事象に遭遇したため、

備忘録としてブログに残してみたいと思います。


環境

Ruby 2.6.8
Rails 6.0.4
MacOS BigSur


pluckメソッド

Railsでは、ActiveRecordのpluckメソッドとActiveSupportを用いている場合にEnumerableにpluckメソッドが定義されています。

api.rubyonrails.org

edgeguides.rubyonrails.org

ActiveRecordのpluckメソッドは実行時にSQLが走り、返り値は配列が返ります。(これを理解していればハマることはなかった。)


ハマったポイント

以下のようなケースでハマりました。

$ user = User.new(name: '田中太郎', email: "tarotanaka@gmail.com")

$ Post.new(user: user, title: "田中性は日本に何人いるのか?", body: "続きはWebで")

$ user.posts.pluck(:title)
=> []

とある処理の中で親インスタンスと子インスタンスを生成し、紐づく子インスタンスの値をまとめて取得して後続の処理を行いたいケースがありました。

pluckを使えば子インスタンスの値を取得できると思っていたのですが、前述の通り、ActiveRecordのpluckメソッドの場合は実行時にSQLが走りますので、

まだDBに保存されていないレコードを対象に実行しても返り値は空の配列になります。

なので、今回のケースではEnumerable#mapメソッドを使うのが正解でした。

$ user = User.new(name: '田中太郎', email: "tarotanaka@gmail.com")

$ Post.new(user: user, title: "田中性は日本に何人いるのか?", body: "続きはWebで")

$ user.posts.map(&:title)
=> ["田中性は日本に何人いるのか?"]

まとめ

ActiveRecordのpluckメソッドの挙動を理解していればハマらなかっただろうに、使ってしまった時間が悔やまれます。

この記事がどなたかの助けになることを願っています。。。


大いに参考にさせていただいた記事

素晴らしいコンテンツの提供、誠にありがとうございます。

Railsの技: pluckはActive RecordモデルでもEnumerableでも使える(翻訳)|TechRacho by BPS株式会社

SAMLでのSSOを実現するGem「ruby-saml」のソースコードを追ってみる(SamlResponse編)

こんにちは!kossyです!


今回は、SAMLでのSSOを実現するGem「ruby-saml」のソースコードを追ってみた(SamlResponseだけ)ので、
備忘録としてブログに残してみたいと思います。


環境
Ruby 2.6.8
Rails 6.0.4.1
MacOS Catalina


なお、IdPにはLINE WORKSを用いていると仮定してコードリーディングしてみます。

そして、リーディング元のレポジトリは拙著で作成したアプリケーションとします。

kossy-web-engineer.hatenablog.com

acsアクション

SAMLRequestを送った後、IdP側からacsアクションが叩かれます。

def acs
  settings = Account.get_saml_settings(get_url_base)
  response = OneLogin::RubySaml::Response.new(params[:SAMLResponse], settings: settings)

  if response.is_valid?
    session[:nameid] = response.nameid
    session[:attributes] = response.attributes
    @attrs = session[:attributes]
    logger.info "Sucessfully logged"
    logger.info "NAMEID: #{response.nameid}"
    render :action => :index
  else
    logger.info "Response Invalid. Errors: #{response.errors}"
    @errors = response.errors
    render :action => :fail
  end
end

OneLogin::RubySaml::Responseクラスのinitializeメソッドから読んでいきます。


OneLogin::RubySaml::Response#initialize

def initialize(response, options = {})
  raise ArgumentError.new("Response cannot be nil") if response.nil?

  @errors = []

  @options = options
  @soft = true
  unless options[:settings].nil?
    @settings = options[:settings]
    unless @settings.soft.nil?
      @soft = @settings.soft
    end
  end

  @response = decode_raw_saml(response, settings)
  @document = XMLSecurity::SignedDocument.new(@response, @errors)

  if assertion_encrypted?
    @decrypted_document = generate_decrypted_document
  end
end

まず、response(= params[:SAMLResponse])がnilの場合は例外を発生させて処理を終了させています。

次に、options[:settings](= saml_settings)がnilでなければ、@settingsとしてインスタンス変数化し、さらに@settingsのsoft属性がnilでなければ、@settings.softの値を@softとして定義しています。

decode_raw_samlメソッドを見てみます。

decode_raw_saml

# https://github.com/onelogin/ruby-saml/blob/master/lib/onelogin/ruby-saml/saml_message.rb

def decode_raw_saml(saml, settings = nil)
  return saml unless base64_encoded?(saml)

  settings = OneLogin::RubySaml::Settings.new if settings.nil?
  if saml.bytesize > settings.message_max_bytesize
    raise ValidationError.new("Encoded SAML Message exceeds " + settings.message_max_bytesize.to_s + " bytes, so was rejected")
  end

  decoded = decode(saml)
  begin
    inflate(decoded)
  rescue
    decoded
  end
end

# base64_encoded?メソッドの定義はこちら
# BASE64_FORMAT = %r(\A([A-Za-z0-9+/]{4})*([A-Za-z0-9+/]{2}==|[A-Za-z0-9+/]{3}=)?\Z)
def base64_encoded?(string)
  !!string.gsub(/[\r\n]|\\r|\\n|\s/, "").match(BASE64_FORMAT)
end

# decodeメソッドの定義はこちら
def decode(string)
  Base64.decode64(string)
end

# inflateメソッドの定義はこちら
def inflate(deflated)
  Zlib::Inflate.new(-Zlib::MAX_WBITS).inflate(deflated)
end

早期リターンを行なっている行は、引数のsaml(= params[:SAMLResponse])がbase64エンコードできる文字だけで構成されているかを確認しています。

settingsがnilの場合は新規でOneLogin::RubySaml::Settingsインスタンスを生成していますね。

次の行のif文では、samlのbytesizeの方がsettingsのmessage_max_bytesize属性よりも大きかった場合に、例外を発生させています。

このバリデーションが追加された経緯はこちらのPRのようでした。

github.com

samlのbytesizeを巨大にすることでDos攻撃が可能になっていたため、上記のバリデーションが追加されたようです。

また、元々はOneLogin::RubySaml::SamlMessageクラスに定数として定義されていたバリデーションの数値が、OneLogin::RubySaml::Settingsインスタンスから参照可能なように書き換えられたようでした。

github.com


次はassertion_encrypted?メソッドを見てみます。

assertion_encrypted?

# Checks if the SAML Response contains or not an EncryptedAssertion element
# @return [Boolean] True if the SAML Response contains an EncryptedAssertion element

# SAMLResponse に EncryptedAssertion 要素が含まれているかどうかを確認します
# SAMLResponse に EncryptedAssertion要素が含まれている場合はTrueが返り値となります

def assertion_encrypted?
  ! REXML::XPath.first(
    document,
    "(/p:Response/EncryptedAssertion/)|(/p:Response/a:EncryptedAssertion/)",
    { "p" => PROTOCOL, "a" => ASSERTION }
  ).nil?
end

コメントアウト部分を読めばOKなコードでした。

if assertion_encrypted?
  @decrypted_document = generate_decrypted_document
end

この箇所は、「SAMLResponse に EncryptedAssertion要素が含まれている場合は、複合化したDocumentを生成する」と読めそうです。(generate_decrypted_documentのコードリーディングは割愛)


やっとinitializeメソッドを読み終えました。。。


OneLogin::RubySaml::Response#is_valid?

次はis_valid?メソッドを追ってみます。

# Validates the SAML Response with the default values (soft = true)
# @param collect_errors [Boolean] Stop validation when first error appears or keep validating. (if soft=true)
# @return [Boolean] TRUE if the SAML Response is valid
#

# SAMLResponseをデフォルト値で検証します(soft = true)
# 最初のエラーが表示されたら検証を停止するか、検証を続けます。 (soft = trueの場合)
# SAMLResponseが有効な場合は TRUE が返り値となります。

def is_valid?(collect_errors = false)
  validate(collect_errors)
end

# validateメソッドの定義はこちら

# Validates the SAML Response (calls several validation methods)
# @param collect_errors [Boolean] Stop validation when first error appears or keep validating. (if soft=true)
# @return [Boolean] True if the SAML Response is valid, otherwise False if soft=True
# @raise [ValidationError] if soft == false and validation fails

# SAMLResponseを検証します(いくつかの検証メソッドを呼び出します)
# 最初のエラーが表示されたら検証を停止するか、検証を続けます。 (soft = trueの場合)
# SAMLResponseが有効な場合はTrue、それ以外の場合はsoft = Trueの場合はFalse
# soft == falseで、検証が失敗した場合はValidationErrorを発生させます。

def validate(collect_errors = false)
  reset_errors!
  return false unless validate_response_state

  validations = [
    :validate_version,
    :validate_id,
    :validate_success_status,
    :validate_num_assertion,
    :validate_no_duplicated_attributes,
    :validate_signed_elements,
    :validate_structure,
    :validate_in_response_to,
    :validate_one_conditions,
    :validate_conditions,
    :validate_one_authnstatement,
    :validate_audience,
    :validate_destination,
    :validate_issuer,
    :validate_session_expiration,
    :validate_subject_confirmation,
    :validate_name_id,
    :validate_signature
  ]

  if collect_errors
    validations.each { |validation| send(validation) }
    @errors.empty?
  else
    validations.all? { |validation| send(validation) }
  end
end

Input/Outputはわかりましたが、内部で呼び出しているバリデーションメソッドを全て読むのは流石に骨が折れるので、いくつか気になったメソッドをピックアップして読んでいきます。


validate_issuer

def validate_issuer
  return true if settings.idp_entity_id.nil?

  begin
    obtained_issuers = issuers
  rescue ValidationError => e
    return append_error(e.message)
  end

  obtained_issuers.each do |issuer|
    unless OneLogin::RubySaml::Utils.uri_match?(issuer, settings.idp_entity_id)
      error_msg = "Doesn't match the issuer, expected: <#{settings.idp_entity_id}>, but was: <#{issuer}>"
      return append_error(error_msg)
    end
  end

  true
end

# issuersメソッドの定義はこちら

# Gets the Issuers (from Response and Assertion).
# (returns the first node that matches the supplied xpath from the Response and from the Assertion)
# @return [Array] Array with the Issuers (REXML::Element)

# issuerを取得します(SamlResponseとアサーションから)。
# SAMLResponseおよびアサーションから指定されたxpathに一致する最初のノードを返します
# 返り値はissuersの配列が返ります

def issuers
  @issuers ||= begin
    issuer_response_nodes = REXML::XPath.match(
      document,
      "/p:Response/a:Issuer",
      { "p" => PROTOCOL, "a" => ASSERTION }
    )

    unless issuer_response_nodes.size == 1
      error_msg = "Issuer of the Response not found or multiple."
      raise ValidationError.new(error_msg)
    end

    issuer_assertion_nodes = xpath_from_signed_assertion("/a:Issuer")
    unless issuer_assertion_nodes.size == 1
      error_msg = "Issuer of the Assertion not found or multiple."
      raise ValidationError.new(error_msg)
    end

    nodes = issuer_response_nodes + issuer_assertion_nodes
    nodes.map { |node| Utils.element_text(node) }.compact.uniq
  end
end

begin end と ||= を使ってSAMLのissuerを見ながらバリデーションを行い、問題なければ@issuersをインスタンス変数で定義するメソッドでした。

settingsのissuerとSAMLに記載されたissuerがマッチしない場合は、append_errorメソッドを呼び出していました。


validate_name_id

# Validates the NameID element
def validate_name_id
  if name_id_node.nil?
    if settings.security[:want_name_id]
      return append_error("No NameID element found in the assertion of the Response")
    end
  else
    if name_id.nil? || name_id.empty?
      return append_error("An empty NameID value found")
    end

    unless settings.sp_entity_id.nil? || settings.sp_entity_id.empty? || name_id_spnamequalifier.nil? || name_id_spnamequalifier.empty?
      if name_id_spnamequalifier != settings.sp_entity_id
        return append_error("The SPNameQualifier value mistmatch the SP entityID value.")
      end
    end
  end

  true
end

# name_id_nodeメソッドの定義はこちら
def name_id_node
  @name_id_node ||=
    begin
      encrypted_node = xpath_first_from_signed_assertion('/a:Subject/a:EncryptedID')
      if encrypted_node
        node = decrypt_nameid(encrypted_node)
      else
        node = xpath_first_from_signed_assertion('/a:Subject/a:NameID')
      end
    end
end

もしname_id_nodeがnilで、settings.security[:want_name_id]が存在する場合、append_errorを呼び出しています。

want_name_idが追加されたcommitはこちらです。

github.com

commitメッセージを見たところ、「Several security improvements: Reject empty nameID」との文言があったため、NameIDが空でも処理が成功してしまう脆弱性を改善したんだと思われます。


以上、全てのバリデーションを実行してエラーがなければ、validとみなされます。


まとめ

残りの処理はsessionにnameidを格納したりログに「ログイン成功!」「nameidはこちら!」と書き込んで、indexアクションをレンダリングするだけです。

session[:nameid] = response.nameid
session[:attributes] = response.attributes
@attrs = session[:attributes]
logger.info "Sucessfully logged"
logger.info "NAMEID: #{response.nameid}"
render :action => :index

実際にコードを読んでみて思ったことですが、PRの概要やcommitメッセージを読むと、多岐に渡る考慮が追加されているのがわかります。

特にsamlのbytesizeの方がsettingsのmessage_max_bytesize属性よりも大きかった場合に、

例外を発生させる実装についての背景は今後のプログラミングにもすぐに活かせそうだと感じています。(Dos攻撃のくだりですね)


あとがき

正直validationのところだけで1記事書けるんじゃないかと思っているので、また別の機会に書いてみようと思います。。。


参考にさせていただいたサイト

素晴らしいコンテンツの提供、誠にありがとうございます。

ruby-saml を使ったOneLogin での SAML 認証の処理シーケンスを追う - Qiita

SAMLでのSSOを実現するGem「ruby-saml」のソースコードを追ってみる(SamlRequest編)

こんにちは!kossyです!


今回は、SAMLでのSSOを実現するGem「ruby-saml」のソースコードを追ってみた(SamlRequestだけ)ので、
備忘録としてブログに残してみたいと思います。


環境
Ruby 2.6.8
Rails 6.0.4.1
MacOS Catalina


なお、IdPにはLINE WORKSを用いていると仮定してコードリーディングしてみます。

そして、リーディング元のレポジトリは拙著で作成したアプリケーションとします。

kossy-web-engineer.hatenablog.com


sso アクション

まずはSAMLリクエストを送信するアクションのソースコードから読んでみます。

class SamlController < ApplicationController
  # 省略

  def sso
    settings = Account.get_saml_settings(get_url_base)
    if settings.nil?
      render :action => :no_settings
      return
    end

    request = OneLogin::RubySaml::Authrequest.new

    redirect_to(request.create(settings))
  end

  # 省略
end

requestオブジェクトのcreateメソッドの処理を見てみます。

def create(settings, params = {})
  params = create_params(settings, params)
  params_prefix = (settings.idp_sso_service_url =~ /\?/) ? '&' : '?'
  saml_request = CGI.escape(params.delete("SAMLRequest"))
  request_params = "#{params_prefix}SAMLRequest=#{saml_request}"
  params.each_pair do |key, value|
    request_params << "&#{key.to_s}=#{CGI.escape(value.to_s)}"
  end
  raise SettingError.new "Invalid settings, idp_sso_service_url is not set!" if settings.idp_sso_service_url.nil? or settings.idp_sso_service_url.empty?
  @login_url = settings.idp_sso_service_url + request_params
end


create_paramsが実際にパラメータを生成する処理っぽいので見てみます。

def create_params(settings, params={})
  # The method expects :RelayState but sometimes we get 'RelayState' instead.
  # Based on the HashWithIndifferentAccess value in Rails we could experience
  # conflicts so this line will solve them.
  relay_state = params[:RelayState] || params['RelayState']

  if relay_state.nil?
    params.delete(:RelayState)
    params.delete('RelayState')
  end

  request_doc = create_authentication_xml_doc(settings)
  request_doc.context[:attribute_quote] = :quote if settings.double_quote_xml_attribute_values

  request = ""
  request_doc.write(request)

  Logging.debug "Created AuthnRequest: #{request}"

  request = deflate(request) if settings.compress_request
  base64_request = encode(request)
  request_params = {"SAMLRequest" => base64_request}

  if settings.idp_sso_service_binding == Utils::BINDINGS[:redirect] && settings.security[:authn_requests_signed] && settings.private_key
    params['SigAlg']    = settings.security[:signature_method]
    url_string = OneLogin::RubySaml::Utils.build_query(
      :type => 'SAMLRequest',
      :data => base64_request,
      :relay_state => relay_state,
      :sig_alg => params['SigAlg']
    )
    sign_algorithm = XMLSecurity::BaseDocument.new.algorithm(settings.security[:signature_method])
    signature = settings.get_sp_key.sign(sign_algorithm.new, url_string)
    params['Signature'] = encode(signature)
  end

  params.each_pair do |key, value|
    request_params[key] = value.to_s
  end

  request_params
end

長い、、、じっくり見てみます。まずはコメントアウトの翻訳から。

create_params(settings, params={})

The method expects :RelayState but sometimes we get 'RelayState' instead.
Based on the HashWithIndifferentAccess value in Rails we could experience
conflicts so this line will solve them.

このメソッドは:RelayStateを想定していますが、代わりに 'RelayState' を取得する場合があります。
RailsのHashWithIndifferentAccess値に基づいて、競合が発生する可能性があるため、この行で競合を解決します。

出典: https://github.com/onelogin/ruby-saml/blob/master/lib/onelogin/ruby-saml/authrequest.rb#L54

シンボルでも文字列でのkey指定でもRelayState(検証後の遷移先)を取得できるようにしているようです。

もしrelay_stateの値がnilならparamsからRelayStateを削除しています。

create_authentication_xml_docメソッドを見る必要がありそう。

def create_authentication_xml_doc(settings)
  document = create_xml_document(settings)
  sign_document(document, settings)
end

create_xml_documentメソッド、長いぞ、、、

create_xml_document

def create_xml_document(settings)
  time = Time.now.utc.strftime("%Y-%m-%dT%H:%M:%SZ")

  request_doc = XMLSecurity::Document.new
  request_doc.uuid = uuid

  root = request_doc.add_element "samlp:AuthnRequest", { "xmlns:samlp" => "urn:oasis:names:tc:SAML:2.0:protocol", "xmlns:saml" => "urn:oasis:names:tc:SAML:2.0:assertion" }
  root.attributes['ID'] = uuid
  root.attributes['IssueInstant'] = time
  root.attributes['Version'] = "2.0"
  root.attributes['Destination'] = settings.idp_sso_service_url unless settings.idp_sso_service_url.nil? or settings.idp_sso_service_url.empty?
  root.attributes['IsPassive'] = settings.passive unless settings.passive.nil?
  root.attributes['ProtocolBinding'] = settings.protocol_binding unless settings.protocol_binding.nil?
  root.attributes["AttributeConsumingServiceIndex"] = settings.attributes_index unless settings.attributes_index.nil?
  root.attributes['ForceAuthn'] = settings.force_authn unless settings.force_authn.nil?

  # Conditionally defined elements based on settings
  if settings.assertion_consumer_service_url != nil
    root.attributes["AssertionConsumerServiceURL"] = settings.assertion_consumer_service_url
  end
  if settings.sp_entity_id != nil
    issuer = root.add_element "saml:Issuer"
    issuer.text = settings.sp_entity_id
  end

  if settings.name_identifier_value_requested != nil
    subject = root.add_element "saml:Subject"

    nameid = subject.add_element "saml:NameID"
    nameid.attributes['Format'] = settings.name_identifier_format if settings.name_identifier_format
    nameid.text = settings.name_identifier_value_requested

    subject_confirmation = subject.add_element "saml:SubjectConfirmation"
    subject_confirmation.attributes['Method'] = "urn:oasis:names:tc:SAML:2.0:cm:bearer"
  end

  if settings.name_identifier_format != nil
    root.add_element "samlp:NameIDPolicy", {
        # Might want to make AllowCreate a setting?
        "AllowCreate" => "true",
        "Format" => settings.name_identifier_format
    }
  end

  if settings.authn_context || settings.authn_context_decl_ref

    if settings.authn_context_comparison != nil
      comparison = settings.authn_context_comparison
    else
      comparison = 'exact'
    end

    requested_context = root.add_element "samlp:RequestedAuthnContext", {
      "Comparison" => comparison,
    }

    if settings.authn_context != nil
      authn_contexts_class_ref = settings.authn_context.is_a?(Array) ? settings.authn_context : [settings.authn_context]
      authn_contexts_class_ref.each do |authn_context_class_ref|
        class_ref = requested_context.add_element "saml:AuthnContextClassRef"
        class_ref.text = authn_context_class_ref
      end
    end

    if settings.authn_context_decl_ref != nil
      authn_contexts_decl_refs = settings.authn_context_decl_ref.is_a?(Array) ? settings.authn_context_decl_ref : [settings.authn_context_decl_ref]
      authn_contexts_decl_refs.each do |authn_context_decl_ref|
        decl_ref = requested_context.add_element "saml:AuthnContextDeclRef"
        decl_ref.text = authn_context_decl_ref
      end
    end
  end

  request_doc
end

長いですが、SAMLのキモであるXMLドキュメントの構築部分なので気合いいれて読んで試してみます。

# rails c

$ settings = Account.get_saml_settings("http://localhost:3000")

$ request = OneLogin::RubySaml::Authrequest.new

$ time = Time.now.utc.strftime("%Y-%m-%dT%H:%M:%SZ")
=> "2021-10-23T12:45:30Z"

$ request_doc = XMLSecurity::Document.new
=> <UNDEFINED/>

# uuidはSecureRandom.uuid
# OneLogin::RubySaml::Utils.uuid
# def self.uuid
#   RUBY_VERSION < '1.9' ? "_#{@@uuid_generator.generate}" : "_#{SecureRandom.uuid}"
# end

$  request_doc.uuid = request.uuid 
=> "_2179fe0b-198a-46ab-83da-a155128f8080"

$  root = request_doc.add_element "samlp:AuthnRequest", { "xmlns:samlp" => "urn:oasis:names:tc:SAML:2.0:protocol", "xmlns:saml" => "urn:oasis:names:tc:SAML:2.0:assertion" }
=> <samlp:AuthnRequest xmlns:samlp='urn:oasis:names:tc:SAML:2.0:protocol' xmlns:saml='urn:oasis:names:tc:SAML:2.0:assertion'/>

$  root.attributes['ID'] = request.uuid # 認証要求メッセージ毎にユニークなランダム文字列
=> "_2179fe0b-198a-46ab-83da-a155128f8080"

$ root.attributes['IssueInstant'] = time # 認証要求メッセージの発行日時
=> "2021-10-23T12:45:30Z"

$ root.attributes['Version'] = "2.0" # SAMLのバージョン
=> "2.0"

# root.attributes['Destination'] = settings.idp_sso_service_url unless settings.idp_sso_service_url.nil? or settings.idp_sso_service_url.empty?
# をまるっと実行するのは面白くないので1フレーズ毎に実行してみます。

$ settings.idp_sso_service_url
=> "https://auth.worksmobile.com/saml2/idp/your_group_name"

$ settings.idp_sso_service_url.nil? or settings.idp_sso_service_url.empty?
=> false

# Destinationは認証要求先
$ root.attributes['Destination'] = settings.idp_sso_service_url unless settings.idp_sso_service_url.nil? or settings.idp_sso_service_url.empty?
=> "https://auth.worksmobile.com/saml2/idp/your_group_name"

$ root.attributes['IsPassive'] = settings.passive unless settings.passive.nil? # ユーザーを関与させずに認証できる場合にのみこのユーザーを認証するかどうか
=> nil

# IdP側がSPにSamlResponseを送信する際に利用するSAML Binding
$ root.attributes['ProtocolBinding'] = settings.protocol_binding unless settings.protocol_binding.nil?
=> "urn:oasis:names:tc:SAML:2.0:bindings:HTTP-POST"

# IdPに要求するユーザ属性グループのインデックスを指定
$ root.attributes["AttributeConsumingServiceIndex"] = settings.attributes_index unless settings.attributes_index.nil?

# IdPが以前のSecurity Contextを使用せず、必ずユーザーを直接的に認証するかどうかを指定
$ root.attributes['ForceAuthn'] = settings.force_authn unless settings.force_authn.nil?

$ settings.assertion_consumer_service_url != nil
=> true

# SPがSamlResponseを受け取るエンドポイントのURL
$ root.attributes["AssertionConsumerServiceURL"] = settings.assertion_consumer_service_url
=> "http://localhost:3000/saml/acs"

$ settings.sp_entity_id != nil
=> true

$ issuer = root.add_element "saml:Issuer" # SPのユニークなID
=> <saml:Issuer/>

$ issuer.text = settings.sp_entity_id
=> "http://localhost:3000/saml/metadata"

$ settings.name_identifier_value_requested != nil
=> false

$ settings.name_identifier_format != nil
=> true

# SamlResponseメッセージ内のユーザーの識別子に関するポリシー
$ root.add_element "samlp:NameIDPolicy", {
    # Might want to make AllowCreate a setting?
    "AllowCreate" => "true",
    "Format" => settings.name_identifier_format
}

# 電子メール アドレス形式で NameID 要求を発行
$ <samlp:NameIDPolicy AllowCreate='true' Format='urn:oasis:names:tc:SAML:1.1:nameid-format:emailAddress'/>

# authn_contextは必要な認証方法を指定
$ settings.authn_context || settings.authn_context_decl_ref
=> nil

これで一通りcreate_xml_documentメソッドの処理が追えました、、、

次にsign_documentメソッドを見てみます。

sign_document

def sign_document(document, settings)
  if settings.idp_sso_service_binding == Utils::BINDINGS[:post] && settings.security[:authn_requests_signed] && settings.private_key && settings.certificate
    private_key = settings.get_sp_key
    cert = settings.get_sp_cert
    document.sign_document(private_key, cert, settings.security[:signature_method], settings.security[:digest_method])
  end

  document
end

こちらもコンソールで実行しながら試してみます。

$ settings.idp_sso_service_binding
=> "urn:oasis:names:tc:SAML:2.0:bindings:HTTP-Redirect"

$ OneLogin::RubySaml::Utils::BINDINGS[:post]
=> "urn:oasis:names:tc:SAML:2.0:bindings:HTTP-POST"

$ settings.security[:authn_requests_signed]
=> false

$ settings.private_key && settings.certificate
=> nil

$ settings.idp_sso_service_binding == OneLogin::RubySaml::Utils::BINDINGS[:post] && settings.security[:authn_requests_signed] && settings.private_key && settings.certificate
=> false

もし上記の条件がtrueだった場合は、XMLSecurity::Documentのインスタンスに定義されているメソッドであるsign_documentを呼び出す実装になっていました。

create_authentication_xml_docメソッド内で呼び出されているメソッドを読み終えたので、create_paramsメソッドに戻ります。

create_params

# 一部のIdPでSPで開始されたシナリオでの属性値のシングルクォートに問題があるため
$ request_doc.context[:attribute_quote] = :quote if settings.double_quote_xml_attribute_values
=> nil

$ request = ""

$ request_doc.write(request)
=> [<?xml ... ?>,
 <samlp:AuthnRequest xmlns:samlp='urn:oasis:names:tc:SAML:2.0:protocol' xmlns:saml='urn:oasis:names:tc:SAML:2.0:assertion' IssueInstant='2021-10-23T12:45:30Z' Version='2.0' ID='_2179fe0b-198a-46ab-83da-a155128f8080' Destination='https://auth.worksmobile.com/saml2/idp/your_group_name' AssertionConsumerServiceURL='http://localhost:3000/saml/acs'> ... </>]

# FirefoxSAMLTracerなどの診断ツールとうまく連携するため
# https://github.com/onelogin/ruby-saml/pull/57
$ request = Zlib::Deflate.deflate(request, 9)[2..-5] if settings.compress_request
=> "}\x92MK\xC3@\x10\x86\xFFJn{\xCA\xC7\xA6\xAD\xC6%\t\x84\x16\xA1PEZ\xF5\xE0E\xA6\xC9\x94,\xD9\x8F\xB8\xB3\xB1\xFA\xEFMS\x84z\xB0\xD7\xE5y\xDEy\x99\xD9\x9C@\xAB^T\x83o\xCD\x16?\x06$\x1FTD\xD8\xBC\xB4fi\r\r\x1A\xDD\x0E\xDD\xA7\xAC\xF1e\xBB)X\xEB}/\xE2X\xD9\x1ATk\xC9\x8BY\x92$\xF1)%\x86\x9AX\xB0\x1A\x13\xA4\x81\x93~\x86i\xA4a\x8C\x8F\x8E\xD6u\xA4\xED^*\x8Cj\xAB''\x8De\xD3\xC7\x1DJ\x1A:\xCC,\xA5\xB2\x83#\xB0`\xBD*\xD8{\xCAo\xEF\x0E\x98\xECC~\x97A8\xBF\x81}\x98\xCD\x1A\b\x81/\x16<\xCD\x0EY\x92%#J4\xE0\xDA\x90\a\xE3\v\x96&)\x0Fy\x12\xA6\xB3g\x9E\x8A\xF9b\xAC\xF7\xC6\x82Wt4\x15J\xA3\xD1\xF8\xD2\xCA\x908\x8D/\xD8\xE0\x8C\xB0@\x92\x84\x01\x8D$|-v\xD5\xC3F\x8C\xB0\x80\xDF=\\*\xFDu\xA7w\xD6\xDB\xDA*V\xE6'ZL\xED\\yek\x1A=4\xE0!\x8F/\x85\xFC|\x97\xC7q\xC0z\xF5d\x95\xAC\xBF\x83J){\\:\x04\x8F\x05\xF3n@\x16\xDC[\xA7\xC1\xFF_\x89G|z\x91Mx\x98P\x81\x1A\xA4\xAA\x9A\xC6!\x11\x8B\xCB\xF3\xD4\xBF\x1F\xA0\xFC\x01"

# https://github.com/onelogin/ruby-saml/blob/master/lib/onelogin/ruby-saml/saml_message.rb#L128
$ base64_request = Base64.strict_encode64(request)
=> "fZJNS8NAEIb/ms54ysemrcYlCYQWoVBFWvXgRabJlCzZj7izsfrvTVOEerDX5XneeZnZnECrXlSDb80WPwYkH1RE6Ly0ZmkNDRrdDt2nrPFluylY630v4ljZGlRryYtZkiTxKSWGmliwGhOkgZN+hmmkYYyPjtZ1pO1eKoxqqycnjWXTxx1KGjrsLLWygyOwYL0q2HvKb+8OmOxDfpdBOL+BfZjNGgiBLxY8zQ5ZkiUjSjTg2pAH4wuWJikPeRKms2eeivlirPfGgld0NBVKo9H40sqQOI0v2OCMsECShAGNJHwtdtXDRoyggN89XCr9dad31tvaKlbmJ1pM7Vx5ZWsaPTTgIY8vhfx8l8dxwHr1ZJWsv4NKKXtcOgSPBfNuQBbcW6fB/1+JR3x6kU14mFCBGqSqmsYhEYvL89S/H6D8AQ=="

$ request_params = {"SAMLRequest" => base64_request}

$ request_params = {"SAMLRequest" => base64_request}
=> {"SAMLRequest"=>"fZJNS8NAEIb/ms54ysemrcYlCYQWoVBFWvXgRabJlCzZj7izsfrvTVOEerDX5XneeZnZnECrXlSDb80WPwYkH1RE6Ly0ZmkNDRrdDt2nrPFluylY630v4ljZGlRryYtZkiTxKSWGmliwGhOkgZN+hmmkYYyPjtZ1pO1eKoxqqycnjWXTxx1KGjrsLLWygyOwYL0q2HvKb+8OmOxDfpdBOL+BfZjNGgiBLxY8zQ5ZkiUjSjTg2pAH4wuWJikPeRKms2eeivlirPfGgld0NBVKo9H40sqQOI0v2OCMsECShAGNJHwtdtXDRoyggN89XCr9dad31tvaKlbmJ1pM7Vx5ZWsaPTTgIY8vhfx8l8dxwHr1ZJWsv4NKKXtcOgSPBfNuQBbcW6fB/1+JR3x6kU14mFCBGqSqmsYhEYvL89S/H6D8AQ=="}

$ settings.idp_sso_service_binding == OneLogin::RubySaml::Utils::BINDINGS[:redirect]
=> true

$ settings.security[:authn_requests_signed] && settings.private_key
=> false

$ settings.idp_sso_service_binding == OneLogin::RubySaml::Utils::BINDINGS[:redirect] && settings.security[:authn_requests_signed] && settings.private_key
=> false

$ params.each_pair do |key, value|
  request_params[key] = value.to_s
end
=> {}

ようやくcreate_paramsメソッドも読み終わりました。ざっくりの理解ですがSamlRequest用のパラメータを構築するための処理でしたね。

createメソッドの処理に戻ります。

create

$ params = request_params

$ params_prefix = (settings.idp_sso_service_url =~ /\?/) ? '&' : '?'
=> "?"

# SAMLRequest needs to be URL-encoded とのこと。
$ saml_request = CGI.escape(params.delete("SAMLRequest"))
=> "fQJNS8NADIb%2FSm57ysemrcYlCYQWoVBFDvXgRabJlCzZj7izsfrvTVOEerDX5XneeZnZnDCrCVAQb80WPwYkH1RE6Ly0ZmkNDRrdDt2nrPFluylY630v4ljZGlRryYtZkiTxKSWGmliwGhOkgZN%2BhmmkYYyPjtZ1pO1eKoxqqycnjWXTxx1KGjrsLLSygyOwMS0q2HvKb%2B8LmOxDfpdBOL%2BBfZjNGgiBLxY8zQ5ZkiUjSjTg2pAH4wuWJikPeRKms2eeivlirPfGgld0NBVKo9H40sqQOI0v2OCMsECShAGNJHwtdtXDRoyggN89XCr9dad31tvaKlbmJ1pM7Vx5ZWsaPTTgIY8vhfx8l8dxwHr1ZJWsv4NKKXtcOgSPBfNuQBbcW6fB%2F1%2BJR3x6kU14mFCBGqSqmsYhEYvL89S%2FH6D8AQ%3D%3C"

$ request_params = "#{params_prefix}SAMLRequest=#{saml_request}"
=> "?fQJNS8NADIb%2FSm57ysemrcYlCYQWoVBFDvXgRabJlCzZj7izsfrvTVOEerDX5XneeZnZnDCrCVAQb80WPwYkH1RE6Ly0ZmkNDRrdDt2nrPFluylY630v4ljZGlRryYtZkiTxKSWGmliwGhOkgZN%2BhmmkYYyPjtZ1pO1eKoxqqycnjWXTxx1KGjrsLLSygyOwMS0q2HvKb%2B8LmOxDfpdBOL%2BBfZjNGgiBLxY8zQ5ZkiUjSjTg2pAH4wuWJikPeRKms2eeivlirPfGgld0NBVKo9H40sqQOI0v2OCMsECShAGNJHwtdtXDRoyggN89XCr9dad31tvaKlbmJ1pM7Vx5ZWsaPTTgIY8vhfx8l8dxwHr1ZJWsv4NKKXtcOgSPBfNuQBbcW6fB%2F1%2BJR3x6kU14mFCBGqSqmsYhEYvL89S%2FH6D8AQ%3D%3C"

$ params.each_pair do |key, value|
  request_params << "&#{key.to_s}=#{CGI.escape(value.to_s)}"
end
=> {}

# もしidp_sso_service_urlがnilまたは空の場合は Invalid settings, idp_sso_service_url is not set! の例外が返る
$ settings.idp_sso_service_url.nil? or settings.idp_sso_service_url.empty?
=> false

$ @login_url = settings.idp_sso_service_url + request_params
=> "https://auth.worksmobile.com/saml2/idp/your_group_name?SAMLRequest=fQJNS8NADIb%2FSm57ysemrcYlCYQWoVBFDvXgRabJlCzZj7izsfrvTVOEerDX5XneeZnZnDCrCVAQb80WPwYkH1RE6Ly0ZmkNDRrdDt2nrPFluylY630v4ljZGlRryYtZkiTxKSWGmliwGhOkgZN%2BhmmkYYyPjtZ1pO1eKoxqqycnjWXTxx1KGjrsLLSygyOwMS0q2HvKb%2B8LmOxDfpdBOL%2BBfZjNGgiBLxY8zQ5ZkiUjSjTg2pAH4wuWJikPeRKms2eeivlirPfGgld0NBVKo9H40sqQOI0v2OCMsECShAGNJHwtdtXDRoyggN89XCr9dad31tvaKlbmJ1pM7Vx5ZWsaPTTgIY8vhfx8l8dxwHr1ZJWsv4NKKXtcOgSPBfNuQBbcW6fB%2F1%2BJR3x6kU14mFCBGqSqmsYhEYvL89S%2FH6D8AQ%3D%3C"

やっと読み終えた、、、

OneLogin::RubySaml::AuthRequestインスタンスのcreateメソッドは、SAMLRequest用のURLを返却するメソッドでした。(間でいろーんな処理を挟みつつ。)

もう一度controllerの処理を見ます。

def sso
  settings = Account.get_saml_settings(get_url_base)
  if settings.nil?
    render :action => :no_settings
    return
  end

  request = OneLogin::RubySaml::Authrequest.new

  redirect_to(request.create(settings))
end

ssoアクションsamlのsettingsがnilならno_settingsの画面をレンダリングし、settingsがあればrequest.create(settings)の処理で得られたURLへリダイレクトする処理でした。


まとめ

acsアクションのコードリーディングは別の記事にします。(すでに16000字越え)

SamlRequest生成のところだけでも知らない用語が大量にあり、読むのに大変時間がかかりました、、、

ただ、実行しつつわからない単語を調べつつ進めたことで、ただ「SSOできた!!」だけで終わらせるよりも遥かに効果があったと感じています。

SamlResponseの方も今回と同じくらいの文量になりそう、、、


ruby-saml を使ったSSOを本番環境で試してみる

こんにちは!kossyです!

さて、今回はSAML認証のクライアント側を実装できるGem「ruby-saml」でLINE WORKSのSAML2.0でSSOをHerokuにデプロイした環境で試してみたので、備忘録としてブログに残してみたいと思います。


環境
Ruby 2.6.8
Rails 6.0.4.1
MacOS Catalina


以前、レポジトリのセットアップからruby-samlの導入、ローカル環境での動作確認までを以下ブログで書いております。

今回の記事で以下で作成したレポジトリをherokuにデプロイしてSSOを試してみたいと思います。

kossy-web-engineer.hatenablog.com


herokuへのデプロイ

こちらのガイドを参考にしました。

devcenter.heroku.com

ガイドに記載されてない点で実行したことは環境変数の設定です。

$ heroku config:set IDP_GROUP_NAME=your_group_name

$ heroku config:set IDP_FINGERPRINT=38:5A:8C:53:CC:8A:C8:53:C3:32:C2:00:34:C1:A5:8A:00:23:0A:C8:0C:6A:36:CF:41:EA:42:5F:3E:62:07:85

これで環境変数ソースコード内で参照できるようになります。

LINE WORKSの設定

開発環境の設定とは別で新規で作成するのがいいでしょう。

f:id:kossy-web-engineer:20211023163655p:plain

herokuへのアプリケーションデプロイに成功するとURLが発行されると思いますので、そちらのURLをyour_domainの箇所と置き換えてください。

これで一通り動作が確認できる環境は整ったかと思います。


トラブルシューティング

heroku logs --tail コマンドを実行すると、起動中のアプリケーションのログをリアルタイムで確認することができます。

$ heroku logs --tail

私の場合、ACS URLが間違っていて Routing Errorが発生していたので、ログを確認することで間違いに気が付くことができました。。。

まとめ

動作確認はローカル環境の時とほとんど変わらない(URLが違うだけ)なので割愛します。

今回はデプロイ先にHerokuを選択しましたが、AWSでもGCPでもやることは変わらないかと思います。

ruby-saml、本当に優秀です。


余談

完全に余談なんですがLINE WORKSのdevelopers画面はだいぶ簡素な作りなので改善の余地があるかと思われます。。。

ruby-saml を使ってSSOを試してみる with LINE WORKS

こんにちは!kossyです!

さて、今回はSAML認証のクライアント側を実装できるGem「ruby-saml」でLINE WORKSのSAML2.0でSSOを試してみたので、備忘録としてブログに残してみたいと思います。


環境
Ruby 2.6.8
Rails 6.0.4.1
MacOS Catalina


saml-spレポジトリの作成

SAMLのServiceProvider側を作成するために、Railsアプリを作成します。今回はsaml-spというレポジトリ名とします。

$ rails new saml-sp -d postgresql -T

$ cd saml-sp

$ rails db:create

$ rails s

これでlocalhost:3000にアクセスしまして、毎度お馴染み「Yay!」の画面が表示されればOKです。

ruby-samlの導入

次に、Gemfileを修正します。

# Gemfile

gem 'ruby-saml'
gem 'figaro' # 環境変数を管理するために使います。必須ではないです

で bundle。

$ bundle

次にfigaroのinstallコマンドを叩きます。

$ bundle exec figaro install

      create  config/application.yml
      append  .gitignore

このコマンドで作成されたconfig/application.ymlファイルに秘密情報を記載していきます。


認証用のモデルを作成

次に認証用のAccountモデルを作成します。

$ rails g model Account

$ rails db:migrate

作成されたapp/models/account.rbに以下のメソッドを追加します。(中身が空ですが後ほど実装します。)

class Account < ApplicationRecord
  # 追加
  def self.get_saml_settings(url_base)
  end
end

routing/controller/viewsの定義

順に定義していきます。

# config/routes.rb

  resources :saml, only: :index do
    collection do
      get :sso
      post :acs
      get :metadata
      get :logout
    end
  end

  root 'saml#index'
# app/controllers/saml_controller.rb

class SamlController < ApplicationController
  skip_before_action :verify_authenticity_token, :only => [:acs, :logout]

  def index
    @attrs = {}
  end

  def sso
    settings = Account.get_saml_settings(get_url_base)
    if settings.nil?
      render :action => :no_settings
      return
    end

    request = OneLogin::RubySaml::Authrequest.new

    redirect_to(request.create(settings))
  end

  def acs
    settings = Account.get_saml_settings(get_url_base)
    response = OneLogin::RubySaml::Response.new(params[:SAMLResponse], settings: settings)

    if response.is_valid?
      session[:nameid] = response.nameid
      session[:attributes] = response.attributes
      @attrs = session[:attributes]
      logger.info "Sucessfully logged"
      logger.info "NAMEID: #{response.nameid}"
      render :action => :index
    else
      logger.info "Response Invalid. Errors: #{response.errors}"
      @errors = response.errors
      render :action => :fail
    end
  end

  def metadata
    settings = Account.get_saml_settings(get_url_base)
    meta = OneLogin::RubySaml::Metadata.new
    render :xml => meta.generate(settings, true)
  end

  # Trigger SP and IdP initiated Logout requests
  def logout
    # If we're given a logout request, handle it in the IdP logout initiated method
    if params[:SAMLRequest]
      return idp_logout_request

    # We've been given a response back from the IdP
    elsif params[:SAMLResponse]
      return process_logout_response
    elsif params[:slo]
      return sp_logout_request
    else
      reset_session
    end
  end

  # Create an SP initiated SLO
  def sp_logout_request
    # LogoutRequest accepts plain browser requests w/o paramters
    settings = Account.get_saml_settings(get_url_base)

    if settings.idp_slo_target_url.nil?
      logger.info "SLO IdP Endpoint not found in settings, executing then a normal logout'"
      reset_session
    else

      # Since we created a new SAML request, save the transaction_id
      # to compare it with the response we get back
      logout_request = OneLogin::RubySaml::Logoutrequest.new()
      session[:transaction_id] = logout_request.uuid
      logger.info "New SP SLO for User ID: '#{session[:nameid]}', Transaction ID: '#{session[:transaction_id]}'"

      if settings.name_identifier_value.nil?
        settings.name_identifier_value = session[:nameid]
      end

      relayState = url_for controller: 'saml', action: 'index'
      redirect_to(logout_request.create(settings, :RelayState => relayState))
    end
  end

  # After sending an SP initiated LogoutRequest to the IdP, we need to accept
  # the LogoutResponse, verify it, then actually delete our session.
  def process_logout_response
    settings = Account.get_saml_settings(get_url_base)
    request_id = session[:transaction_id]
    logout_response = OneLogin::RubySaml::Logoutresponse.new(params[:SAMLResponse], settings, :matches_request_id => request_id, :get_params => params)
    logger.info "LogoutResponse is: #{logout_response.response.to_s}"

    # Validate the SAML Logout Response
    if not logout_response.validate
      error_msg = "The SAML Logout Response is invalid.  Errors: #{logout_response.errors}"
      logger.error error_msg
      render :inline => error_msg
    else
      # Actually log out this session
      if logout_response.success?
        logger.info "Delete session for '#{session[:nameid]}'"
        reset_session
      end
    end
  end

  # Method to handle IdP initiated logouts
  def idp_logout_request
    settings = Account.get_saml_settings(get_url_base)
    logout_request = OneLogin::RubySaml::SloLogoutrequest.new(params[:SAMLRequest], :settings => settings)
    if not logout_request.is_valid?
      error_msg = "IdP initiated LogoutRequest was not valid!. Errors: #{logout_request.errors}"
      logger.error error_msg
      render :inline => error_msg
    end
    logger.info "IdP initiated Logout for #{logout_request.nameid}"

    # Actually log out this session
    reset_session

    logout_response = OneLogin::RubySaml::SloLogoutresponse.new.create(settings, logout_request.id, nil, :RelayState => params[:RelayState])
    redirect_to logout_response
  end

  def get_url_base
	"#{request.protocol}#{request.host_with_port}"
  end
end
# app/views/saml/fail.html.erb

<html>
  <body>
  <h4>SAML Response invalid</h4>
    <% if @errors %>
      <% @errors.each do |error| %>
        <p><%= error %></p>
      <% end %>
    <% end %>
  </body>
</html>
# app/views/saml/index.html.erb
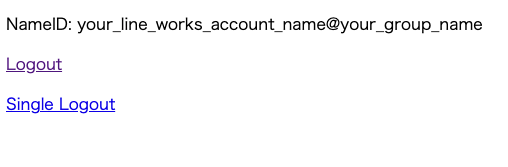
<% if session[:nameid].present? %>
  <p>NameID: <%= session[:nameid] %></p>

  <% if @attrs.any? %>
    <p>Received the following attributes in the SAML Response:</p>
    <table><thead><th>Name</th><th>Values</th></thead><tbody>

    <% @attrs.each do |key,attr_value|  %>

      <tr><td><%= key %></td>
      <td>
      <% if attr_value.any? %>
          <ul>
          <% attr_value.each do |val| %>
              <li><%= val %></li>
          <% end %>
          </ul>
      <% end %>
      </td></tr>
    <% end %>
    </tbody>
    </table>
  <% end %>
  <p><%= link_to "Logout", :action => "logout" %></p>
  <p><%= link_to "Single Logout", :action => "logout", :slo => '1' %></p>

<% else %>
  <p><%= link_to "Login", :action=>"sso"%></p>
<% end -%>
# app/views/saml/logout.html.erb

<p>Logged out</p>

<p><%= link_to "Login", :action=>"sso"%></p>
# app/views/saml/no_settings.html.erb

<h2>No Settings found</h2>

ここまで実装できましたら、一旦動作の確認をしてみます。(get_saml_settingsメソッドが空なので当然意図通り動きませんが、、、)

localhost:3000 にアクセスすると、Loginというリンクがあるページが表示されます。

f:id:kossy-web-engineer:20211017201558p:plain

クリックすると以下の表示になるはずです。

f:id:kossy-web-engineer:20211017201617p:plain

saml_controller.rbのssoアクションのコードを見ると、

  def sso
    settings = Account.get_saml_settings(get_url_base)
    if settings.nil?
      render :action => :no_settings
      return
    end

    request = OneLogin::RubySaml::Authrequest.new

    redirect_to(request.create(settings))
  end

settingsがnilの場合はno_settingsをレンダリングするため、NoSettingのページに遷移しています。

あとはget_saml_settingsメソッドの中身を実装していくだけです。


get_saml_settingsメソッドの実装

では本丸のメソッドの実装です。

get_saml_settingsメソッドを以下のように書き換えてください。

  def self.get_saml_settings(url_base)
    # this is just for testing purposes.
    # should retrieve SAML-settings based on subdomain, IP-address, NameID or similar
    settings = OneLogin::RubySaml::Settings.new

    url_base ||= "http://localhost:3000"

    # Example settings data, replace this values!

    # When disabled, saml validation errors will raise an exception.
    settings.soft = true

    #SP section
    settings.issuer                         = url_base + "/saml/metadata"
    settings.assertion_consumer_service_url = url_base + "/saml/acs"
    settings.assertion_consumer_logout_service_url = url_base + "/saml/logout"
    settings.protocol_binding = "urn:oasis:names:tc:SAML:2.0:bindings:HTTP-POST" # 指定しないとGet Request で /saml/acs を叩いてくるため

    idp_base_url = "https://auth.worksmobile.com/saml2"

    # IdP section
    settings.idp_entity_id                  = "#{idp_base_url}/#{ENV['IDP_GROUP_NAME']}"
    settings.idp_sso_target_url             = "#{idp_base_url}/idp/#{ENV['IDP_GROUP_NAME']}"
    settings.idp_slo_target_url             = "#{idp_base_url}/idp/#{ENV['IDP_GROUP_NAME']}/logout"
    settings.idp_cert_fingerprint           = "#{ENV['IDP_FINGERPRINT']}"
    settings.idp_cert_fingerprint_algorithm = XMLSecurity::Document::SHA256

    settings.name_identifier_format         = "urn:oasis:names:tc:SAML:1.1:nameid-format:emailAddress"

    # Security section
    settings.security[:authn_requests_signed] = false
    settings.security[:logout_requests_signed] = false
    settings.security[:logout_responses_signed] = false
    settings.security[:metadata_signed] = false
    settings.security[:digest_method] = XMLSecurity::Document::SHA1
    settings.security[:signature_method] = XMLSecurity::Document::RSA_SHA1

    settings
  end

ほとんどruby-samlのexampleのコピペだったりするんですが、いくつか異なる点があります。

1つ目は、settings.protocol_binding属性にurn:oasis:names:tc:SAML:2.0:bindings:HTTP-POST を指定している点です。

LINE WORKSのSAMLのドキュメントを読むと、

SAML Request に指定した Protocol Binding により、GET または POST を使用します。
"urn:oasis:names:tc:SAML:2.0:bindings:HTTP-POST" の場合は POST、それ以外は GET を使用します。

出典: https://developers.worksmobile.com/jp/document/1001500302?lang=ja

との記載があります。

先ほど設定したconfig/routes.rbの定義を確認すると、

      post :acs

となっており、POSTリクエストで/acsが叩かれることを想定しているため、上記の設定を加えることでPOSTリクエストで叩かれるようにしています。(これにハマって1日溶かしました。ドキュメント読むの大事ですね。)

2つ目は、IdPセクションの設定値を環境変数にしていることですね。


これで準備完了!と言いたいところですが、肝心のLINE WORKSのアカウントがないので作成します。


LINE WORKS にアカウントを作成

LINE WORKSでSAML2.0によるSSO機能を使うには、有料アカウントで登録する必要があります。(2021年10月時点。ライトプラン・ユーザー一人当たり月額360円)

360円は自己投資だと思うようにしましょう(技術書よりは全然安いし、、、)

line.worksmobile.com

料金表はこちらです。

line.worksmobile.com


まずは無料でアカウントを作成し、その後にライトプランにアップグレードする必要があります。


SAML Appsの登録

無事課金し終えてライトプランにアップグレードできましたら、LINE WORKSのデベロッパーコンソールからSSO機能を利用するアプリの登録を行う必要があります。

f:id:kossy-web-engineer:20211017204035p:plain

・Application Nameにはsaml-sp

ACS URLには http://localhost:3000/saml/acs

・SP Issuer(Entity ID)には http://localhost:3000/saml/metadata

を入力してください。

f:id:kossy-web-engineer:20211017204155p:plain

「次へ」をクリックし、以下の表示が出れば設定成功です。

f:id:kossy-web-engineer:20211016211905p:plain
registered

登録後、以下URLにアクセスすると、

https://developers.worksmobile.com/jp/console/idp/saml/view

f:id:kossy-web-engineer:20211016212325p:plain
SAML Apps

先ほど追加したサービスが表示されていると思いますので、まずは使用状態を「無効」から「有効」に切り替えます。

「変更」をクリックすると、以下のモーダルが表示されますので、ラジオボタンの「有効」をクリックし、「保存」をクリックすると、使用状態を切り替えられます。

f:id:kossy-web-engineer:20211016212543p:plain

次に、「LINE WORKS Identity Provider情報」をクリックすると、SSO URL と Response Issuer の確認と Certificate のダウンロードが行えますので、

SSO URL と Response Issuer は一旦どこかにコピペしておき、 Certificateのダウンロードを行ってください。

f:id:kossy-web-engineer:20211016212856p:plain
Identity_provider_information

ダウンロードしたCertificateを使って、以下コマンドを叩いてフィンガープリントを取得してください。

$ openssl x509 -text -noout -in ~/Downloads/<your file name> -fingerprint -sha256

出力された値はおそらく以下のような感じになるはず。

SHA256 Fingerprint=59:10:LO:D0:9L:31:PO:AM:59:10:LO:D0:9L:31:PO:AM:59:10:LO:D0:9L:31:PO:AM:59:10:LO:D0:9L:31:PO:AM

この値を、application.ymlに追記してください。
ついでにentity_idやsso_target_urlで使う値も環境変数にします。

config/application.yml

IDP_CERT_FINGERPRINT: 59:10:LO:D0:9L:31:PO:AM:59:10:LO:D0:9L:31:PO:AM:59:10:LO:D0:9L:31:PO:AM:59:10:LO:D0:9L:31:PO:AM
IDP_GROUP_NAME: your_group_name

これで準備完了です。動作を確認してみましょう。


localhost:3000にアクセス

f:id:kossy-web-engineer:20211017202816p:plain

LoginをクリックするとLINE WORKSのログイン画面にリダイレクトする

f:id:kossy-web-engineer:20211017202932p:plain

ログインに成功すると、ローカルのアプリにリダイレクトして、以下の画面が表示される

f:id:kossy-web-engineer:20211017203113p:plain

ログアウトも可能

f:id:kossy-web-engineer:20211017203139p:plain

Single Logoutの方は正しく動作しなかったので、いつか検証してブログにします。


まとめ

少々ハマりどころもありましたが、ruby-saml Gemのexampleを参考にすれば簡単に動作確認まで行うことができました。これが本番運用となるとまた考慮するポイントが変わってくるとは思いますが、

それは追々ブログにまとめたいと思います。(まずはherokuとかからかな)

あとはdevise_saml_authenticatable等のGemではどう実装すればいいか?などもありますので、まだまだSAMLについての記事を書いていくことになると思います。


過去に使用されたパスワードの再設定を制限するdevise-securityの「PasswordArchivable」のソースコードを追ってみる

こんにちは!kossyです!


今回は、過去に使用されたパスワードの再設定を制限するdevise-securityの「PasswordArchivable」のソースコードを追う機会があったので、ブログに残してみたいと思います。


偉大なる本家レポジトリ


環境
Ruby 2.6.8
Rails 6.0.4.1
devise-security 0.16.0
DockerCompose 1.27.0


archive_password

ソースコードを見たところ、PasswordArchivableモジュールをincludeすると、関連やコールバック、バリデーションが定義されるようでしたので、まずはコールバックから読んでみます。

      # 以下の3つの関連やコールバック、バリデーションが定義される

      included do
        has_many :old_passwords, class_name: 'OldPassword', as: :password_archivable, dependent: :destroy
        before_update :archive_password, if: :will_save_change_to_encrypted_password?
        validate :validate_password_archive, if: :password_present?
      end

archive_passwordのソースコードは以下です。

private

# Archive the last password before save and delete all to old passwords from archive
# @note we check to see if an old password has already been archived because
#   mongoid will keep re-triggering this callback when we add an old password
def archive_password
  if max_old_passwords.positive?
    return true if old_passwords.where(encrypted_password: encrypted_password_was).exists?

    old_passwords.create!(encrypted_password: encrypted_password_was) if encrypted_password_was.present?
    old_passwords.reorder(created_at: :desc).offset(max_old_passwords).destroy_all
  else
    old_passwords.destroy_all
  end
end

コメントアウト部分を意訳してみます。

Archive the last password before save and delete all to old passwords from archive.

@note we check to see if an old password has already been archived because mongoid will keep re-triggering this callback when we add an old password.

保存する前に最後のパスワードをアーカイブし、アーカイブから古いパスワードをすべて削除します。

古いパスワードを追加すると、mongoidがこのコールバックを再トリガーし続けるため、古いパスワードがすでにアーカイブされているかどうかを確認します。

パスワード更新処理の前に更新前のパスワードをアーカイブ(= old_passwordsテーブルへレコードを追加)し、古いパスワード(= old_passwordsテーブルに記録済みのレコード)を全て削除する処理のようです。

まずはmax_old_passwordsから読んでみます。

# @return [Integer] max number of old passwords to store and check
def max_old_passwords
  case deny_old_passwords
  when true
    [1, archive_count].max
  when false
    0
  else
    deny_old_passwords.to_i
  end
end

def deny_old_passwords
  self.class.deny_old_passwords
end

def archive_count
  self.class.password_archiving_count
end

deny_old_passwordsメソッドは、config/devise_security.rbで設定したフラグを返すメソッドでした。

config/devise-security.rb

  # Deny old passwords (true, false, number_of_old_passwords_to_check)
  # Examples:
  # config.deny_old_passwords = false # allow old passwords
  # config.deny_old_passwords = true # will deny all the old passwords
  # config.deny_old_passwords = 3 # will deny new passwords that matches with the last 3 passwords
  # config.deny_old_passwords = true

trueの場合は全ての旧パスワードの設定をできないようにし、falseの場合は逆に全ての旧パスワードの設定を許可するようになります。
数字を設定した場合は、数字の回数分だけ旧パスワードの設定をできないようにするようです。

一つずつコンソールで試してみます。(前提としてPasswordArchivableをincludeしたUserモデルが定義済みとします)

# deny_old_passwordsが true の場合

$ User.first.update!(password: '12345678')
=> true

$ User.first.update!(password: '87654321')
=> true

$ User.first.update!(password: '12345678')
=> ActiveRecord::RecordInvalid: バリデーションに失敗しました: Passwordは既に使われています
# deny_old_passwordsが false の場合

$ User.first.old_passwords.destroy_all

$ User.first.update!(password: '12345678')
=> true

$ User.first.update!(password: '87654321')
=> true

$ User.first.update!(password: '12345678')
=> true
# deny_old_passwordsが 1 の場合

$ User.first.old_passwords.destroy_all

$ User.first.update!(password: '12345678')
=> true

$ User.first.update!(password: '87654321')
=> true

$ User.first.update!(password: '12345678')
=> ActiveRecord::RecordInvalid: バリデーションに失敗しました: Passwordは既に使われています。

$ User.first.update!(password: '87654321')
=> ActiveRecord::RecordInvalid: バリデーションに失敗しました: Passwordは既に使われています。

$ User.first.update!(password: 'test1234')
=> true

$ User.first.update!(password: '87654321')
=> ActiveRecord::RecordInvalid: バリデーションに失敗しました: Passwordは既に使われています

値に応じて挙動が変わることが確認できました。

deny_old_passwordsは、

過去に設定したことのあるパスワードを全て再設定できないようにしたい場合は true
過去に設定したことのあるパスワードでも設定できるようにしたい場合は false
前回設定したパスワードの設定はできないようにしたい場合は 1

を設定すれば良さそうです。

password_archiving_countは、設定した値までパスワードをアーカイブしておく数値で、こちらもconfig/devise-security.rbで設定した値を呼び出すメソッドでした。

ここでmax_old_passwordsを再掲します。

# @return [Integer] max number of old passwords to store and check
def max_old_passwords
  case deny_old_passwords
  when true
    [1, archive_count].max
  when false
    0
  else
    deny_old_passwords.to_i
  end
end

deny_old_passwordsの値に応じて、保持しておくアーカイブしたパスワードの最大値を返すメソッドでしたね。

validate_password_archive

次にvalidate_password_archiveメソッドを見てみます。

def validate_password_archive
  errors.add(:password, :taken_in_past) if will_save_change_to_encrypted_password? && password_archive_included?
end

password_archive_included?メソッドを見る必要がありそうなので見てみる。

def password_archive_included?
  return false unless max_old_passwords.positive?

  old_passwords_including_cur_change = old_passwords.reorder(created_at: :desc).limit(max_old_passwords).pluck(:encrypted_password)
  old_passwords_including_cur_change << encrypted_password_was # include most recent change in list, but don't save it yet!
  old_passwords_including_cur_change.any? do |old_password|
    # NOTE: we deliberately do not do mass assignment here so that users that
    #   rely on `protected_attributes_continued` gem can still use this extension.
    #   See issue #68
    self.class.new.tap { |object| object.encrypted_password = old_password }.valid_password?(password)
  end
end

self.class.new.tap の部分はPRを見に行くと経緯がわかるっぽいので、見に行ってみます。

github.com

この変更に至った経緯はこのコメントが参考になりそう。

This fixes a bug where devise-security skips the password history check in certain cases,
e.g. using the protected_attributes_continued gem and not having :encrypted_password in attr_accessible.

There are other instances in the codebase where there's mass assignment, but this is a start

これにより、devise-securityが特定の場合にパスワード履歴チェックをスキップするバグが修正されます。
例えば、protected_attributes_continuous gemを使用し、attr_accessibleに:encrypted_passwordがない場合などです。

コードベースの中には他にも大量に割り当てられている例がありますが、これはその手始めです。

validate_password_archiveは、encrypted_passwordが更新対象で、かつpassword_archive_included? が true の場合は パスワードをアーカイブしない処理のようでした。


まとめ

configファイル数行とコールバックとバリデーションを読めば一通り処理の流れは追えてしまうmoduleでした。

devise-securityの別のmoduleであるPasswordExpirableと合わせて、「パスワードの定期変更強制機能 + 過去に使用されたパスワードの再設定の制限」を実装する要件があれば採用してもいいのかなと思いました。

とはいえ「パスワードの定期変更強制機能」については、総務省がパスワードの定期的な変更は不要と明言しているので、要件として指定される機会はそれほどないかもと思ったりもしています。。。

www.soumu.go.jp

railsで開発途中からdocker環境を構築する場合の注意点

こんにちは!kossyです!


今回はアプリ開発環境に開発途中でdockerを用いた環境構築を行った際に軽くハマったことをブログに残してみたいと思います。


環境
Ruby 2.6.8
Rails 6.0.4.1
Docker-Compose 1.27.0


docker-compose build が通らない

以下のようなdockerfileおよびdocker-compose.ymlを書きました。

FROM ruby:2.6
ENV LANG C.UTF-8

RUN apt-get update -qq && apt-get install -y build-essential libpq-dev nodejs vim graphviz

RUN mkdir /app
WORKDIR /app

COPY Gemfile /app/Gemfile
COPY Gemfile.lock /app/Gemfile.lock

RUN bundle install
COPY . /app
version: '3'
services:
  db:
    image: postgres:13.4
    environment:
      POSTGRES_USER: root
      POSTGRES_PASSWORD: password
    ports:
      - "2345:2345"
    volumes:
      - ./tmp/db:/var/lib/postgresql/data
  web:
    build: .
    command: bash -c "rm -f tmp/pids/server.pid && bundle exec rails s -p 3000 -b '0.0.0.0'"
    volumes:
      - .:/app
      - gem_data:/usr/local/bundle
    ports:
      - 3000:3000
    depends_on:
      - db
    tty: true
    stdin_open: true
volumes:
  gem_data:

コンソールで docker-compose build を実行すると、以下のエラーログが出力されました。

/usr/local/lib/ruby/2.6.0/rubygems.rb:283:in `find_spec_for_exe': Could not find 'bundler' (2.1.4) required by your /app/Gemfile.lock. (Gem::GemNotFoundException)
To update to the latest version installed on your system, run `bundle update --bundler`.
To install the missing version, run `gem install bundler:2.1.4`
	from /usr/local/lib/ruby/2.6.0/rubygems.rb:302:in `activate_bin_path'
	from /usr/local/bin/bundle:23:in `<main>'

どうやらGemfile.lockのbundlerのバージョンが見つからないと言われているようだったので、Gemfile.lockを一度空にし、再度 docker-compose build を実行したところ、buildが通りました。

皆さんも開発環境に途中からdockerを導入する場合はお気をつけください。

環境変数を管理できるGem「figaro」を使ってみる

こんにちは!kossyです!


今回は環境変数を管理できるGem「figaro」を個人開発アプリに導入してみたので、備忘録としてブログに残してみたいと思います。


偉大なる本家レポジトリ

github.com


環境
Ruby 2.6.8
Rails 6.0.4.1
docker-compose 1.27.0


導入

まずはGemfileを編集してbundle。

# Gemfile

gem 'figaro'

# terminal

$ bundle

次に、以下のコマンドを実行します。

# terminal

$ bundle exec figaro install

      create  config/application.yml
      append  .gitignore

config配下にapplication.ymlというファイルが追加され、.gitigoreに当該ファイルが追加されました。

# config/application.yml

# Add configuration values here, as shown below.
#
# pusher_app_id: "2954"
# pusher_key: 7381a978f7dd7f9a1117
# pusher_secret: abdc3b896a0ffb85d373
# stripe_api_key: sk_test_2J0l093xOyW72XUYJHE4Dv2r
# stripe_publishable_key: pk_test_ro9jV5SNwGb1yYlQfzG17LHK
#
# production:
#   stripe_api_key: sk_live_EeHnL644i6zo4Iyq4v1KdV9H
#   stripe_publishable_key: pk_live_9lcthxpSIHbGwmdO941O1XVU

使い方

application.ymlで定義した値は、ENVオブジェクトで参照できます。

# config/application.yml

sendgrid_user_name: api_key
sendgrid_api_key: AA.AAaaAaaaAA1aaa1a_AAAAaA.aaaAAAaAaAa1aa1AaAa1AaAaaaaAAAAaaaAaAAAaAAa
sendgrid_domain: kossy-web-engineer@example.com

# terminal

$ rails c

>  ENV["sendgrid_user_name"]
=> "api_key"

> ENV["sendgrid_api_key"]
=> "AA.AAaaAaaaAA1aaa1a_AAAAaA.aaaAAAaAaAa1aa1AaAa1AaAaaaaAAAAaaaAaAAAaAAa"

> ENV["sendgrid_domain"]
=> "kossy-web-engineer@example.com"

ENVオブジェクトのkeyを指定することで値を取得することができました。

rails c は特にオプションを付与しないとデフォルトでdevelop環境で立ち上がるので、試しにtest環境で起動してみます。

# config/application.yml

development:
  sendgrid_user_name: api_key
  sendgrid_api_key: AA.AAaaAaaaAA1aaa1a_AAAAaA.aaaAAAaAaAa1aa1AaAa1AaAaaaaAAAAaaaAaAAAaAAa
  sendgrid_domain: kossy-web-engineer@example.com

test:
  sendgrid_user_name: test_api_key # 変更
  sendgrid_api_key: AA.AAaaAaaaAA1aaa1a_AAAAaA.aaaAAAaAaAa1aa1AaAa1AaAaaaaAAAAaaaAaAAAaAAa
  sendgrid_domain: kossy-web-engineer@example.com

# terminal

$ RAILS_ENV=test rails c

>  Rails.env
=> "test"

> ENV["sendgrid_user_name"]
=> "test_api_key"

test環境の場合はtest環境の値が返却されるのが確認できました。

応用的な使い方(その1)

githubのReadMeを読むと、Figaro.envでも値を参照できるようなので、試してみました。

# terminal

$ rails c

> Figaro.env.sendgrid_user_name
=> "api_key"

ENVオブジェクトを使わなくても環境変数の値を参照できました。

ただ、figaroではなく別の環境変数管理機能に移行するとなった場合に、修正箇所が増えてしまうので、個人的にはこの機能は使わないと思います。。。

応用的な使い方(その2)

config/figaro.rb で以下のように定義すると、application.ymlで定義されてないkeyがあった場合にアプリ起動時に例外を発生させることができます。

# config/initializers/figaro.rb

Figaro.require_keys("sendgrid_user_name", "sendgrid_api_key", "sendgrid_domain", "sendgrid_config") # sendgrid_configというkeyは未定義

# terminal

$ rails c

/usr/local/bundle/gems/figaro-1.2.0/lib/figaro.rb:28:in `require_keys': Missing required configuration keys: ["sendgrid_config"] (Figaro::MissingKeys)
	from /app/config/initializers/figaro.rb:1:in `<main>'

Figaro::MissingKeysという例外がthrowされてコンソールの立ち上げに失敗しました。


応用的な使い方(その3)

これはfigaro独自の使い方ではなくymlの話になりますが、以下のように書くことで共通化したい値をまとめて設定することができます。

# config/application.yml

default: &default
  sendgrid_domain: kossy-web-enginner

development:
  <<: *default

test:
  <<: *default

# terminal

$ rails c

> ENV["sendgrid_domain"]
=> "kossy-web-enginner"

> exit

$ RAILS_ENV=test rails c

> ENV["sendgrid_domain"]
=> "kossy-web-enginner"

まとめ

環境変数の管理をするGemはdotenvがありますが、dotenvを本番環境で使わない方がいいのではという意見もあります。

Dotenvはproductionで使わないほうがよいのではという話の続き - なんかかきたい

figaroの場合はunicornの再起動時に読み直されるとのことなので、余計なトラブルに見舞われずに済みそうです。

参考にさせていただいたサイト

素晴らしいコンテンツの提供、誠にありがとうございます。

Dotenvはproductionで使わないほうがよいのではという話の続き - なんかかきたい

RailsのActionDispatch::Http::URLのsubdomainメソッドのソースコードを覗いてみる

こんにちは!kossyです!


今回は、ActionDispatch::Http::URLのsubdomainメソッドのソースコードを読む機会があったので、備忘録としてブログに残してみたいと思います。


環境

Ruby 2.6.6
Rails 6.1.0
MacOS BigSur


subdomainメソッド

ソースコードの位置はこちらです。

github.com

      # Returns all the \subdomains as a string, so <tt>"dev.www"</tt> would be
      # returned for "dev.www.rubyonrails.org". You can specify a different <tt>tld_length</tt>,
      # such as 2 to catch <tt>"www"</tt> instead of <tt>"www.rubyonrails"</tt>
      # in "www.rubyonrails.co.uk".
      def subdomain(tld_length = @@tld_length)
        ActionDispatch::Http::URL.extract_subdomain(host, tld_length)
      end

コメントアウト部分を訳してみます。

Returns all the \subdomains as a string, so "dev.www" would be returned for "dev.www.rubyonrails.org". You can specify a different tld_length, such as 2 to catch "www" instead of "www.rubyonrails" in "www.rubyonrails.co.uk".


すべての\ subdomainsを文字列として返すため、「dev.www.rubyonrails.org」に対して "dev.www" が返されます。 「www.rubyonrails.co.uk」の中で、「www.rubyonrails」の代わりに「www」をキャッチするために、2などの別の tld_length を指定できます。

出典: https://github.com/rails/rails/blob/6-1-stable/actionpack/lib/action_dispatch/http/url.rb#L341

引数でキャッチするサブドメインの階層を指定できるようです。

例えば、https://www.dev.sample.comがRequestのurlの場合、

$ request.subdomain
=> "www.dev"

$ request.subdomain(2)
=> "www"

$ request.subdomain(3)
=> ""

の返り値を得られます。(存在しないサブドメインの階層が指定されても例外上がらないのか、、、)

実際にサブドメインを算出する処理は、ActionDispatch::Http::URL.extract_subdomainで行っているようなので、見に行ってみます。

# Returns the subdomains of a host as a String given the domain level.
#
#    # Top-level domain example
#    extract_subdomain('www.example.com', 1) # => "www"
#    # Second-level domain example
#    extract_subdomain('dev.www.example.co.uk', 2) # => "dev.www"
def extract_subdomain(host, tld_length)
  extract_subdomains(host, tld_length).join(".")
end

# Returns the subdomains of a host as an Array given the domain level.
#
#    # Top-level domain example
#    extract_subdomains('www.example.com', 1) # => ["www"]
#    # Second-level domain example
#    extract_subdomains('dev.www.example.co.uk', 2) # => ["dev", "www"]
def extract_subdomains(host, tld_length)
  if named_host?(host)
    extract_subdomains_from(host, tld_length)
  else
    []
  end
end

# 実際にサブドメインを算出する処理
def extract_subdomains_from(host, tld_length)
  parts = host.split(".")
  parts[0..-(tld_length + 2)]
end

extract_subdomains_fromのコードをコンソールから試してみましょう。

# 適当なコントローラーでbinding.pryで処理を止める

$ host = request.host
=> "www.dev.sample.com"

$ parts = host.split(".")
=> ["www", "dev", "sample", "com"]

$ tld_length = 1

$ parts[0..-(tld_length + 2)]
=> ["www", "dev"]

$ tld_length = 2

$ parts[0..-(tld_length + 2)]
=> ["www"]

tld_lengthの数値によって取得できるサブドメインの数が変化するカラクリが解明できましたね。

subdomainsメソッド

ついでにsubdomainsメソッドも読んでみます。

      # Returns all the \subdomains as an array, so <tt>["dev", "www"]</tt> would be
      # returned for "dev.www.rubyonrails.org". You can specify a different <tt>tld_length</tt>,
      # such as 2 to catch <tt>["www"]</tt> instead of <tt>["www", "rubyonrails"]</tt>
      # in "www.rubyonrails.co.uk".
      def subdomains(tld_length = @@tld_length)
        ActionDispatch::Http::URL.extract_subdomains(host, tld_length)
      end

コメントアウト部分を訳してみます。

Returns all the \subdomains as an array, so ["dev", "www"] would be returned for "dev.www.rubyonrails.org". You can specify a different tld_length, such as 2 to catch ["www"] instead of ["www", "rubyonrails"] in "www.rubyonrails.co.uk".

すべての\ subdomainsを配列として返すため、「dev.www.rubyonrails.org」に対して ["dev"、 "www"] が返されます。 ["www"、 "rubyonrails"] の代わりに ["www"] をキャッチするために2などの別の tld_length を指定できます。 「www.rubyonrails.co.uk」。


出典: https://github.com/rails/rails/blob/6-1-stable/actionpack/lib/action_dispatch/http/url.rb#L333

こちらもコンソールで試してみます。

$ request.subdomains
=> ["www", "dev"]

$ request.subdomains(1)
=> ["www", "dev"]

$ request.subdomains(2)
=> ["www"]

サブドメインが配列で返ることがわかりました。


@tld_lengthが追加された経緯

取得するサブドメインの階層を指定できるtld_lengthですが、どういった経緯で追加されたのでしょうか。

該当のコミットはこちらでした。

github.com

Pull Requestは私の調査力不足で見つけられなかったのですが、1で固定だったのをconfigファイルで設定できるように修正したようです。

ちなみに、tldは「Top Level Domain」の略のようです。

guides.rubyonrails.org


まとめ

多階層のサブドメインを設定する運用の場合は、configファイルのtld_lengthの値をいじくる必要があるようです。

techracho.bpsinc.jp

Railsソースコードを読んでいると、愚直な実装にお目にかかれて良きです。

大いに参考にさせていただいた記事

素晴らしいコンテンツの提供、誠にありがとうございます。

https://techracho.bpsinc.jp/baba/2012_11_19/6393

ログイン周りの情報の追跡を実現する、deviseの「trackable」のソースコードを追ってみる

こんにちは!kossyです!


今回は、ログイン周りの追跡を実現する、deviseの「trackable」のソースコードを追ってみたので、ブログに残してみたいと思います。


環境

Ruby 2.6系
Rails 6.0.4
devise 4.8.0


github.com


trackableモジュールとは

ソースコード内のコメントアウト部分を訳してみます。

Track information about your user sign in. It tracks the following columns:

sign_in_count - Increased every time a sign in is made (by form, openid, oauth)
current_sign_in_at - A timestamp updated when the user signs in
last_sign_in_at - Holds the timestamp of the previous sign in
current_sign_in_ip - The remote ip updated when the user sign in
last_sign_in_ip - Holds the remote ip of the previous sign in


ユーザーのサインインに関する情報を追跡します。次の列を追跡します。

sign_in_count: サインインが行われるたびに増加します(form、openid、oauthによる)
current_sign_in_at: ユーザーがサインインしたときに更新されるタイムスタンプ
last_sign_in_at: 前のサインインのタイムスタンプを保持します
current_sign_in_ip: ユーザーがサインインするとリモートIPが更新されます
last_sign_in_ip: 前のサインインのリモートIPを保持します

出典: https://github.com/heartcombo/devise/blob/master/lib/devise/models/trackable.rb

trackableモジュールを導入することで何ができるようになるのかが一通りわかりました。

次の項で詳しくコードの中身を追ってみます。

required_fields

def self.required_fields(klass)
  [:current_sign_in_at, :current_sign_in_ip, :last_sign_in_at, :last_sign_in_ip, :sign_in_count]
end

trackableモジュールをincludeしているモデルに、配列内のsymbolと同名のメソッドが定義されているかを検証するために使うメソッドかと思われます。

このメソッドの参照箇所はこちらです。

devise/models.rb at c82e4cf47b02002b2fd7ca31d441cf1043fc634c · heartcombo/devise · GitHub

def self.check_fields!(klass)
  failed_attributes = []
  instance = klass.new

  klass.devise_modules.each do |mod|
    constant = const_get(mod.to_s.classify)

    constant.required_fields(klass).each do |field|
      failed_attributes << field unless instance.respond_to?(field)
    end
  end

  if failed_attributes.any?
    fail Devise::Models::MissingAttribute.new(failed_attributes)
  end
end

instance.respond_to?(field)でメソッドの定義確認を行なっていました。

update_tracked_fields

def update_tracked_fields(request)
  old_current, new_current = self.current_sign_in_at, Time.now.utc
  self.last_sign_in_at     = old_current || new_current
  self.current_sign_in_at  = new_current

  old_current, new_current = self.current_sign_in_ip, extract_ip_from(request)
  self.last_sign_in_ip     = old_current || new_current
  self.current_sign_in_ip  = new_current

  self.sign_in_count ||= 0
  self.sign_in_count += 1
end

current_sign_in_atの値をold_currentとし、現在時刻をnew_currentとし、old_currentがあればそちらをlast_sign_in_atの値として採用して、なければnew_currentの値を採用しています。

そして、current_sign_in_atの値にnew_currentを代入しています。

extract_ip_fromメソッドは覗いてみる必要がありそう。

devise/trackable.rb at master · heartcombo/devise · GitHub

def extract_ip_from(request)
  request.remote_ip
end

requestオブジェクトのリモートIPを返すメソッドでした。

remote_ipメソッドの定義元はこちら(本ブログでの説明範囲を超えているのでソースコードだけ明記します)

rails/request.rb at 6-1-stable · rails/rails · GitHub

last_sign_in_ipの処理はlast_sign_in_atと似通ったものになっています。

残りの2行は、sign_in_countがnilの場合、0を代入しています。

最後にsign_in_countの値を1増加させています。


update_tracked_fields!

devise/trackable.rb at c82e4cf47b02002b2fd7ca31d441cf1043fc634c · heartcombo/devise · GitHub

def update_tracked_fields!(request)
  # We have to check if the user is already persisted before running
  # `save` here because invalid users can be saved if we don't.
  # See https://github.com/heartcombo/devise/issues/4673 for more details.
  return if new_record?

  update_tracked_fields(request)
  save(validate: false)
end

コメントアウト部分を訳してみます。

We have to check if the user is already persisted before running
`save` here because invalid users can be saved if we don't.
See https://github.com/heartcombo/devise/issues/4673 for more details.

実行する前に、ユーザーがすでに永続化されているかどうかを確認する必要があります
ここで save するのは、無効なユーザーを保存できるからです。
詳細については、https://github.com/heartcombo/devise/issues/4673を参照してください。

出典: https://github.com/heartcombo/devise/blob/c82e4cf47b02002b2fd7ca31d441cf1043fc634c/lib/devise/models/trackable.rb#L33

この変更のPRはこちらですね。

github.com

余談ですが、「どうやってテストすればいいかわからない」というコメントに対して、「統合テストを作成し、検証が実行された場合にクラスにグローバル値を設定する検証をモデルに追加すればいいよ」とアドバイスをしているのが大変参考になります。。。

update_tracked_fields!はどこから呼ばれているんでしょう。

devise/trackable.rb at c82e4cf47b02002b2fd7ca31d441cf1043fc634c · heartcombo/devise · GitHub

# frozen_string_literal: true

# After each sign in, update sign in time, sign in count and sign in IP.
# This is only triggered when the user is explicitly set (with set_user)
# and on authentication. Retrieving the user from session (:fetch) does
# not trigger it.
Warden::Manager.after_set_user except: :fetch do |record, warden, options|
  if record.respond_to?(:update_tracked_fields!) && warden.authenticated?(options[:scope]) && !warden.request.env['devise.skip_trackable']
    record.update_tracked_fields!(warden.request)
  end
end

ここでした。ログイン後のhookで呼ばれているみたいです。


まとめ

カラムを用意してtrackableモジュールをincludeするだけで機能を追加できるので、とても便利かと思います。

また、deviseの-ble系のモジュールの中でも、内部のコードがかなり少ないモジュールでした。

加えて、update_tracked_fieldsとupdate_tracked_fields!のように、「値の代入」と「値の保存」を分けるようにコーディングしているのも、設計として面白いなと思いました。

コード量的にもOSSのコードリーディングの入り口に向いているのではないかと思います。