Vue.jsのAuth0の認証チュートリアルを Vue3 + TypeScriptで書き直してみた
こんにちは!kossyです!
さて、今回はVue.jsのAuth0の認証チュートリアルを Vue.js 3 + TypeScriptで書き直してみたので、
備忘録としてブログに残してみたいと思います。
環境
vue/cli 4.5.9
vue 3.0.4
node 14.15.0
npm 6.14.8
Vue.jsのボイラープレートを作る
インストール
まずはvue/cliをインストールします。
yarnでもOKですが、今回はnpmでインストールを行います。
既にvue/cliをインストールされている方は、
$ vue --version
でVue CLIのバージョンを確認し、4.5.0よりバージョンが低い場合は、4.5.0以上にアップグレードを行うようにお願いします。
この時、既に作成されているVueアプリの開発に影響が出ることがあるので、
作業ディレクトリ内にのみ最新版のVue CLI を入れるようにしましょう。
初めてVue CLIをインストールする場合
$ npm install -g @vue/cli
4.5.0よりバージョンが低いVue CLIをインストールしたことがある方
$ mkdir 任意のディレクトリ
$ cd 任意のディレクトリ
任意のディレクトリ $ npm install @vue/cli
vue createの実行
無事Vue CLIのインストールに成功したら、vue createコマンドを実行してボイラープレートを作成します。
プロジェクト名はなんでもいいですが、今回はauth0-sampleとします。
設定はお好みでいいと思いますが、私は以下のようにしました。
? Please pick a preset: Manually select features
? Check the features needed for your project: Choose Vue version, Babel, TS, Router, CSS Pre-processors, Linter
? Choose a version of Vue.js that you want to start the project with 3.x (Preview)
? Use class-style component syntax? No
? Use Babel alongside TypeScript (required for modern mode, auto-detected polyfills, transpiling JSX)? Yes
? Use history mode for router? (Requires proper server setup for index fallback in production) Yes
? Pick a CSS pre-processor (PostCSS, Autoprefixer and CSS Modules are supported by default): Sass/SCSS (with dart-sass)
? Pick a linter / formatter config: Standard
? Pick additional lint features: Lint on save
? Where do you prefer placing config for Babel, ESLint, etc.? In dedicated config files
? Save this as a preset for future projects? No
? Pick the package manager to use when installing dependencies: NPM
@auth0/auth0-spa-jsのインストール
Auth0公式よりSDKが提供されているので、プロジェクトにインストールします。
以下のコマンドを実行してください。
$ npm install @auth0/auth0-spa-js

...

+ @auth0/auth0-spa-js@1.13.6
added 7 packages from 8 contributors and audited 1460 packages in 7.692s

82 packages are looking for funding
  run `npm fund` for details

found 0 vulnerabilities
上記のような表示が出たらインストール成功です。
Auth0の管理画面でApplicationの作成と設定
ユーザー登録を行った後、サイドメニューのApplicationにアクセスします。

アクセスしたら、CREATE APPLICATON のボタンを押して下さい。
モーダルが開きますので、任意のプロジェクト名と、今回はVue.js内でAuth0を用いるので、Single Page Web Applicationsを選択します。
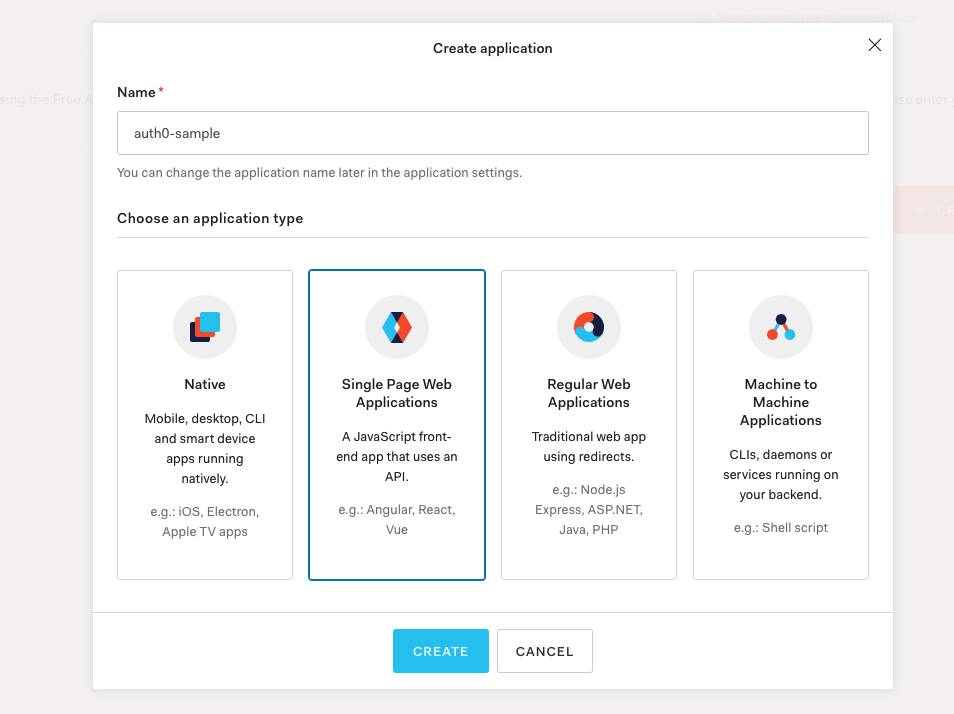
入力と選択ができましたら、CREATEボタンを押して下さい。
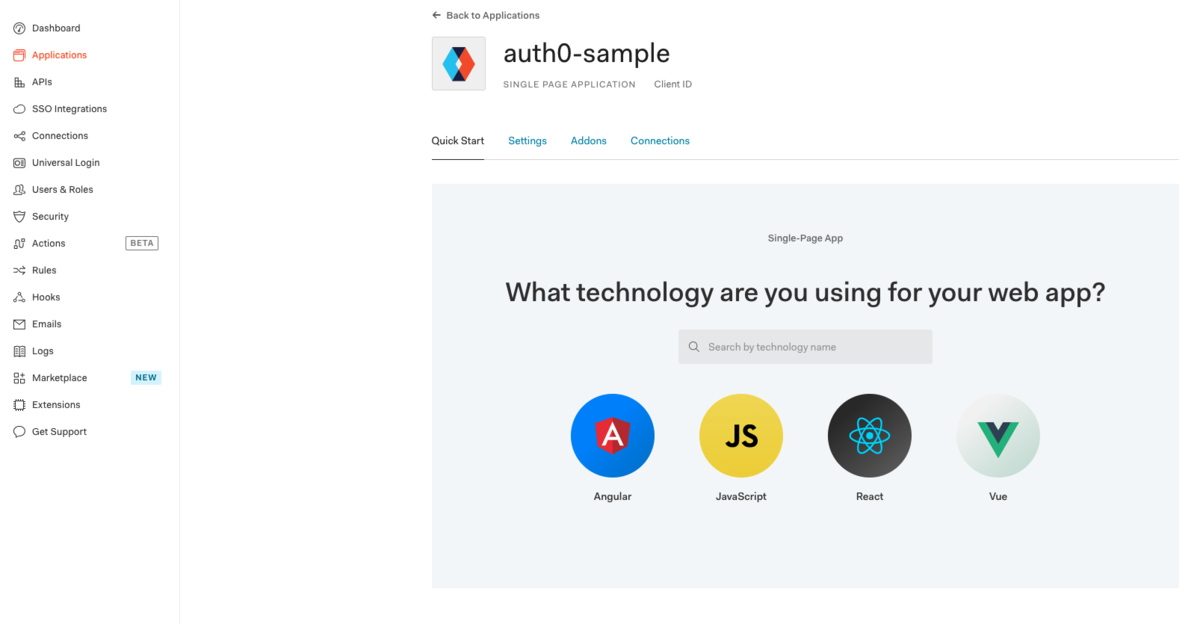
上記の画面が表示されたら、Settingsのタブをクリックします。
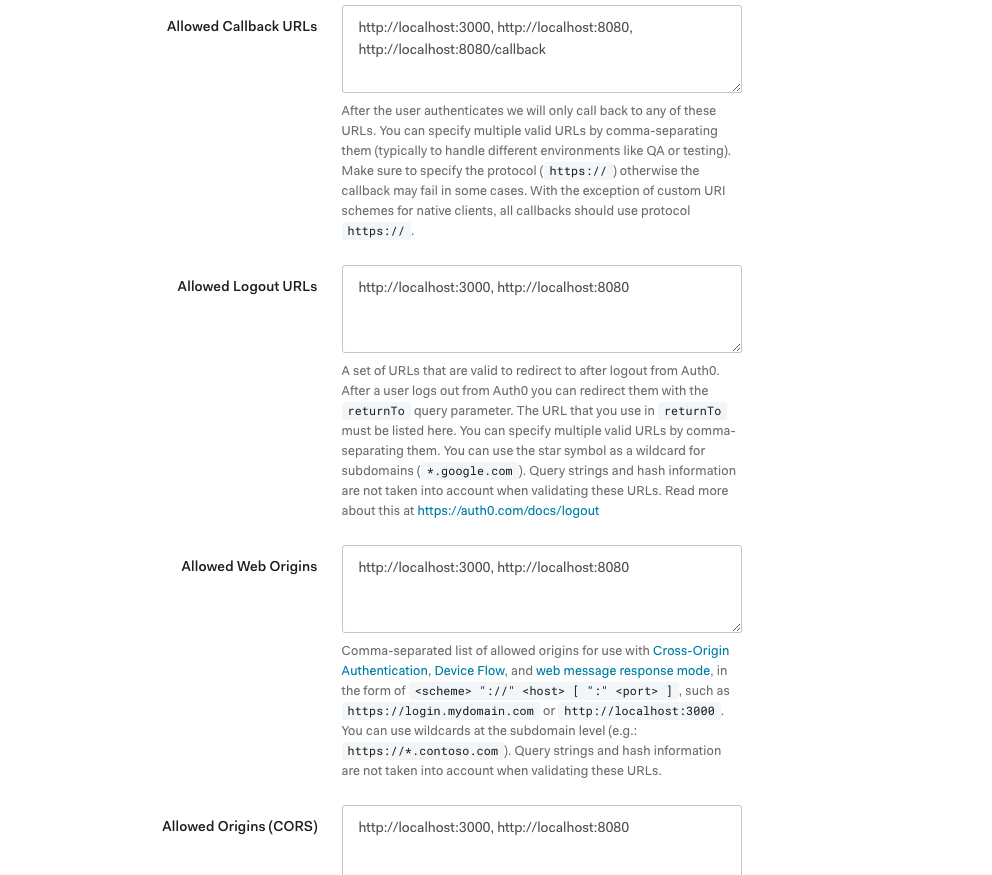
スクロールしていくと、URLを入力するフォームがあるので、添付画像のようにURLを入力します。
また、domainとclient_idは後ほど使いますので、どこかに控えておいて下さい。
認証機能を実現するコードを実装
公式のチュートリアルのJavaScriptのソースコードをベースにTypeScriptに書き換える形で実装します。
auth0.com
以下のコマンドを実行してください。
$ mkdir src/auth

$ touch src/auth/index.ts
まずindex.tsのコードを全晒しします。
import createAuth0Client, { Auth0Client, Auth0ClientOptions, GetIdTokenClaimsOptions, LogoutOptions, RedirectLoginOptions, User } from '@auth0/auth0-spa-js'
import { App, computed, reactive, watchEffect } from 'vue'
import { NavigationGuardNext, RouteLocationNormalized } from 'vue-router'

let client: Auth0Client

const state = reactive({
  loading: true,
  isAuthenticated: false,
  user: {} as User | undefined,
  popupOpen: false,
  error: null
})

async function loginWithPopup () {
  state.popupOpen = true

  try {
    await client.loginWithPopup()
  } catch (e) {
    console.error(e)
  } finally {
    state.popupOpen = false
  }

  state.user = await client.getUser()
  state.isAuthenticated = true
}

async function handleRedirectCallback () {
  state.loading = true

  try {
    await client.handleRedirectCallback()
    state.user = await client.getUser()
    state.isAuthenticated = true
  } catch (e) {
    state.error = e
  } finally {
    state.loading = false
  }
}

function loginWithRedirect (o: RedirectLoginOptions | undefined) {
  return client.loginWithRedirect(o)
}

function getIdTokenClaims (o: GetIdTokenClaimsOptions | undefined) {
  return client.getIdTokenClaims(o)
}

function getTokenSilently (o: GetIdTokenClaimsOptions | undefined) {
  return client.getTokenSilently(o)
}

function getTokenWithPopup (o: GetIdTokenClaimsOptions | undefined) {
  return client.getTokenWithPopup(o)
}

function logout (o: LogoutOptions | undefined) {
  return client.logout(o)
}

const authPlugin = {
  isAuthenticated: computed(() => state.isAuthenticated),
  loading: computed(() => state.loading),
  user: computed(() => state.user),
  getIdTokenClaims,
  getTokenSilently,
  getTokenWithPopup,
  handleRedirectCallback,
  loginWithRedirect,
  loginWithPopup,
  logout
}

export const routeGuard = (to: RouteLocationNormalized, from: RouteLocationNormalized, next: NavigationGuardNext) => {
  const { isAuthenticated, loading, loginWithRedirect } = authPlugin

  const verify = () => {
    if (isAuthenticated.value) {
      return next()
    }

    loginWithRedirect({ appState: { targetUrl: to.fullPath } })
  }

  if (!loading.value) {
    return verify()
  }

  watchEffect(() => {
    if (loading.value === false) {
      return verify()
    }
  })
}

export const setupAuth = async (options: Auth0ClientOptions, callbackRedirect: Function) => {
  client = await createAuth0Client({
    ...options
  })

  try {
    if (
      window.location.search.includes('code=') &&
      window.location.search.includes('state=')
    ) {
      const { appState } = await client.handleRedirectCallback()

      callbackRedirect(appState)
    }
  } catch (e) {
    state.error = e
  } finally {
    // Initialize our internal authentication state
    state.isAuthenticated = await client.isAuthenticated()
    state.user = await client.getUser()
    state.loading = false
  }

  return {
    install: (app: App) => {
      app.config.globalProperties.$auth = authPlugin
      app.provide('$auth', app.config.globalProperties.$auth)
    }
  }
}
コードについて説明していきます。(というか込み入ったことはほとんどSDKの中でやってくれてる)
1行目から3行目
import createAuth0Client, { Auth0Client, Auth0ClientOptions, GetIdTokenClaimsOptions, LogoutOptions, RedirectLoginOptions, User } from '@auth0/auth0-spa-js'
import { App, computed, reactive, watchEffect } from 'vue'
import { NavigationGuardNext, RouteLocationNormalized } from 'vue-router'
そもそもAuth0Clientってなんやねんという答えはここですね。
auth0-spa-js/Auth0Client.ts at master · auth0/auth0-spa-js · GitHub
1行目から3行目までは認証のためのインスタンスを生成する関数や型定義に用いるType、
composition-apiを使うための関数等をimportしています。
createAuth0Clientは、100行目付近で呼び出しています。中身の処理としては、引数にAuth0ClientOptions型のオブジェクトを取って、
新しいAuth0Clientを生成しています。
SDKの中の処理で言うと、
createAuth0Client関数の定義元は以下で、
auth0-spa-js/index.ts at master · auth0/auth0-spa-js · GitHub
export default async function createAuth0Client(options: Auth0ClientOptions) {
  const auth0 = new Auth0Client(options);
  await auth0.checkSession();
  return auth0;
}
auth0Clientインスタンスを作成しています。
7行目 ~ 13行目
const state = reactive({
  loading: true,
  isAuthenticated: false,
  user: {} as User | undefined,
  popupOpen: false,
  error: null
})
7行目 ~ 13行目の const state の部分は、Vue.js 3系から導入されたreactive関数を使って、各種プロパティをreactiveな値にしています。
15行目 ~ 27行目
async function loginWithPopup () {
  state.popupOpen = true

  try {
    await client.loginWithPopup()
  } catch (e) {
    console.error(e)
  } finally {
    state.popupOpen = false
  }

  state.user = await client.getUser()
  state.isAuthenticated = true
}
15行目からのloginWithPopupメソッドは、stateの値をいじりつつ、Auth0ClientインスタンスのloginWithPopup関数を呼び出す実装になっています。
loginWithPopup関数のSDKの実装箇所はこの辺りですね。
auth0-spa-js/Auth0Client.ts at master · auth0/auth0-spa-js · GitHub
loginWithPopup関数の中でrunPopup関数が呼ばれているのですが、実際に画面遷移を行っている関数はrunPopup関数で、SDKでの実装箇所はこの辺りかと思われます。
auth0-spa-js/utils.ts at master · auth0/auth0-spa-js · GitHub
30行目 ~ 41行目
async function handleRedirectCallback () {
  state.loading = true

  try {
    await client.handleRedirectCallback()
    state.user = await client.getUser()
    state.isAuthenticated = true
  } catch (e) {
    state.error = e
  } finally {
    state.loading = false
  }
}
30行目からのhandleRedirectCallback関数は、stateをいじってloading中にしつつ、Auth0ClientインスタンスのhandleRedirectCallback関数を呼び出す実装になっています。
handleRedirectCallback関数のSDKでの実装箇所はこの辺り。
auth0-spa-js/Auth0Client.ts at master · auth0/auth0-spa-js · GitHub
44行目から62行目
function loginWithRedirect (o: RedirectLoginOptions | undefined) {
  return client.loginWithRedirect(o)
}

function getIdTokenClaims (o: GetIdTokenClaimsOptions | undefined) {
  return client.getIdTokenClaims(o)
}

function getTokenSilently (o: GetIdTokenClaimsOptions | undefined) {
  return client.getTokenSilently(o)
}

function getTokenWithPopup (o: GetIdTokenClaimsOptions | undefined) {
  return client.getTokenWithPopup(o)
}

function logout (o: LogoutOptions | undefined) {
  return client.logout(o)
}
44行目から62行目まではAuth0Clientインスタンスの各種関数を呼び出す関数を定義しています。
64行目 ~ 75行目
const authPlugin = {
  isAuthenticated: computed(() => state.isAuthenticated),
  loading: computed(() => state.loading),
  user: computed(() => state.user),
  getIdTokenClaims,
  getTokenSilently,
  getTokenWithPopup,
  handleRedirectCallback,
  loginWithRedirect,
  loginWithPopup,
  logout
}
64行目のauthPlugin変数は、後にglobalPropertiesを使って$auth.logout()のように呼び出すために使うものです。
上記で定義した関数達を持つオブジェクトとして定義します。
77行目 ~ 97行目
export const routeGuard = (to: RouteLocationNormalized, from: RouteLocationNormalized, next: NavigationGuardNext) => {
  const { isAuthenticated, loading, loginWithRedirect } = authPlugin

  const verify = () => {
    if (isAuthenticated.value) {
      return next()
    }

    loginWithRedirect({ appState: { targetUrl: to.fullPath } })
  }

  if (!loading.value) {
    return verify()
  }

  watchEffect(() => {
    if (loading.value === false) {
      return verify()
    }
  })
}
77行目のrouteGuard関数は認証済みかどうかを検証してルーティングの制御を行う関数です。
99行目 ~ 127行目
export const setupAuth = async (options: Auth0ClientOptions, callbackRedirect: Function) => {
  client = await createAuth0Client({
    ...options
  })

  try {
    if (
      window.location.search.includes('code=') &&
      window.location.search.includes('state=')
    ) {
      const { appState } = await client.handleRedirectCallback()

      callbackRedirect(appState)
    }
  } catch (e) {
    state.error = e
  } finally {
    // Initialize our internal authentication state
    state.isAuthenticated = await client.isAuthenticated()
    state.user = await client.getUser()
    state.loading = false
  }

  return {
    install: (app: App) => {
      app.config.globalProperties.$auth = authPlugin
      app.provide('$auth', app.config.globalProperties.$auth)
    }
  }
}
99行目のsetupAuth関数は引数のAuth0ClientOptionsを使ってAuth0Clientを生成しつつ、URLにcodeやstateが含まれていればcallbackRedirectを呼び出し、
エラーが返ってくればstate.errorに代入、最後にPromiseの成功/失敗に関わらずAuth0Clientの各種関数を呼び出しながらstateを更新しています。
返り値は、main.tsでVueにglobalPropertiesとして定義するため、install関数を返すようにしています。
main.tsでsetupAuth関数を読み込む
上記で定義したsetupAuth関数をmain.tsで読み込むようにします。
import { setupAuth } from '@/auth'
import authConfig from '../auth_config.json'

const app = createApp(App).use(router)

function callbackRedirect (appState: any) {
  router.push(
    appState && appState.targetUrl ? appState.targetUrl : '/'
  )
}

setupAuth(authConfig, callbackRedirect).then((auth) => {
  app.use(auth)
})

app.mount('#app')
9行目でリダイレクト処理を行うための関数を定義し、15行目でauthconfig(後ほど定義します)とcallbackRedirect関数を渡して、
use関数でauthをプラグインとして使用できるようにしています。
auth_config.jsonの作成
認証情報を管理するjsonファイルをルートディレクトリに作成します。
touch auth_config.json
{
  "domain": "your_auth0_domain",
  "client_id": "your_auth0_client_id",
  "redirect_uri": "your_redirect_uri"
}
auth_config.jsonの各種値には、先ほどAuth0でApplicationを作成した際に控えたものを入力してください。
動作確認
簡単な動作確認のためにHomeコンポーネントを以下のように修正します。
<template>
  <div v-if="!auth.loading.value">
    <button v-if="!auth.isAuthenticated.value" @click="handleLogin">Log in</button>
    <div v-if="auth.isAuthenticated.value">
      <button @click="handleLogout">Log out</button>
      <p>{{ auth.user.value.name }}</p>
    </div>
  </div>
</template>

<script lang="ts">
import { defineComponent, inject } from 'vue'

export default defineComponent({
  name: 'Home',
  setup () {
    const auth = inject<any>('$auth')

    return {
      auth,
      handleLogin: () => {
        auth.loginWithRedirect()
      },
      handleLogout: () => {
        auth.logout({
          returnTo: window.location.origin
        })
      }
    }
  }
})
</script>
main.tsでuseメソッドで読み込んだ$authはinjectメソッドを用いることでコンポーネントで使うことができます。
一旦anyで渡していますが、適切な型を当てるのがいいと思います。
これで準備完了です。
npm run serve をターミナルで実行して、localhost:8080にアクセスしてください。
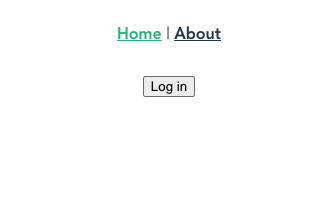
Loginボタンを押すと、Auth0のログイン画面が開きます。

サインアップのリンクをクリックし、登録を終えると、アプリの画面にリダイレクトします。
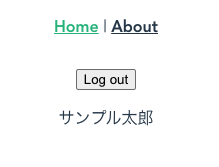
Log outのボタンとユーザー名が表示されれば成功です。
勉強になりました!